Setting Up Time Slots
In this article
Time Slots turn a date into a specific window — for example Monday 10am to 12pm. Without slots, customers only see dates, not times. Required for Pickup, Delivery, and Onsite Service. Not needed for Store Pickup.
Contents
Contents
Do I Need Custom Zones First?
Custom Zones are not required to create a Time Slot. You can set up a slot that works for every customer everywhere. Use zones only if you want to restrict a slot to specific areas or set a cap per zone.
Where to Find It
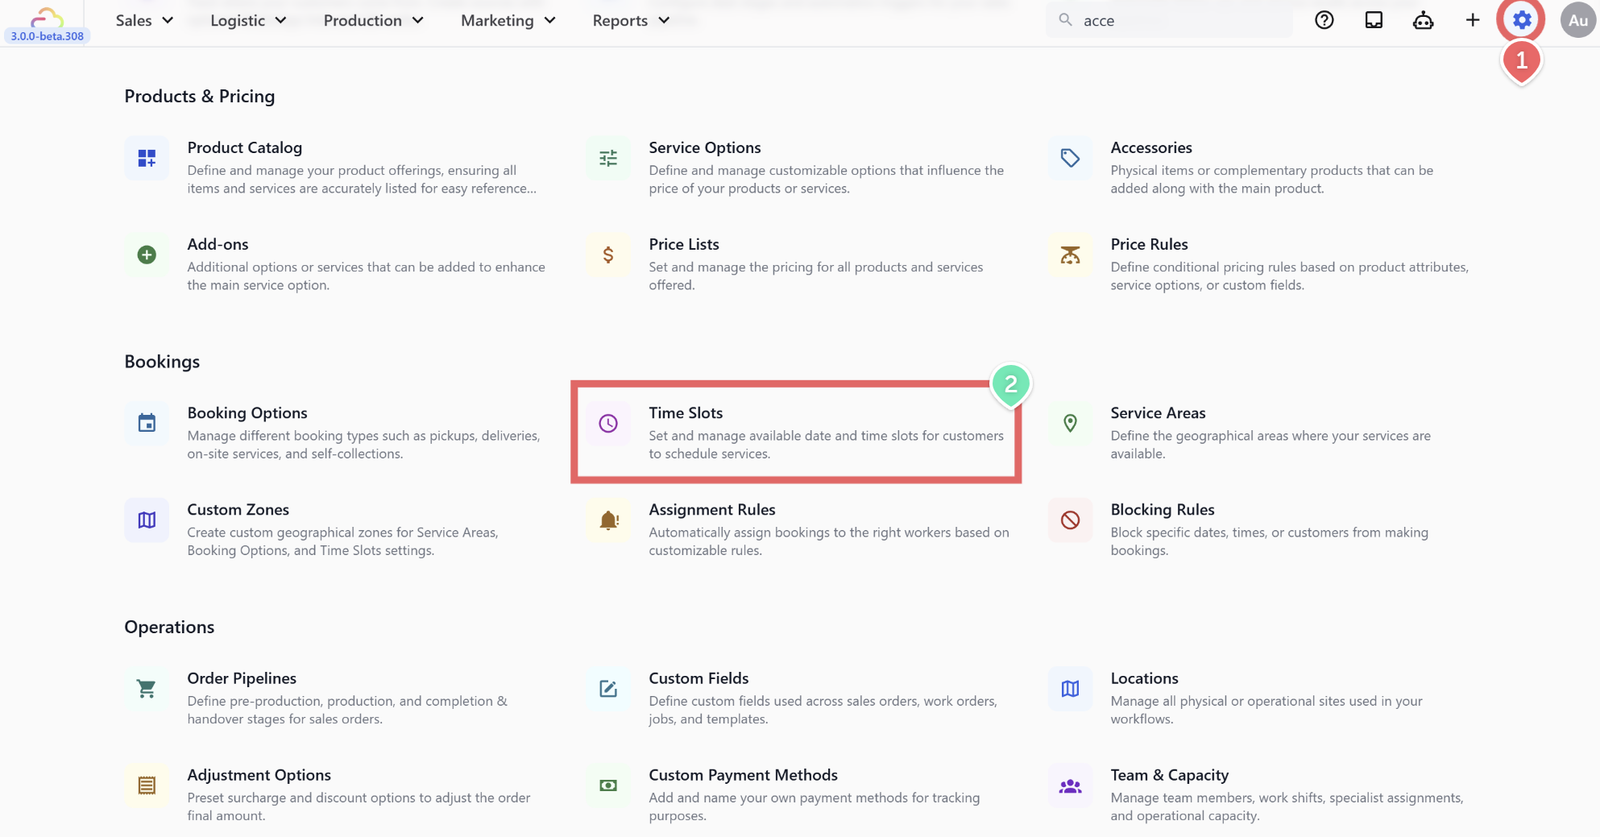
- Click the ⚙️ Settings icon in the top-right corner.
- Under the Bookings section, click Time Slots.
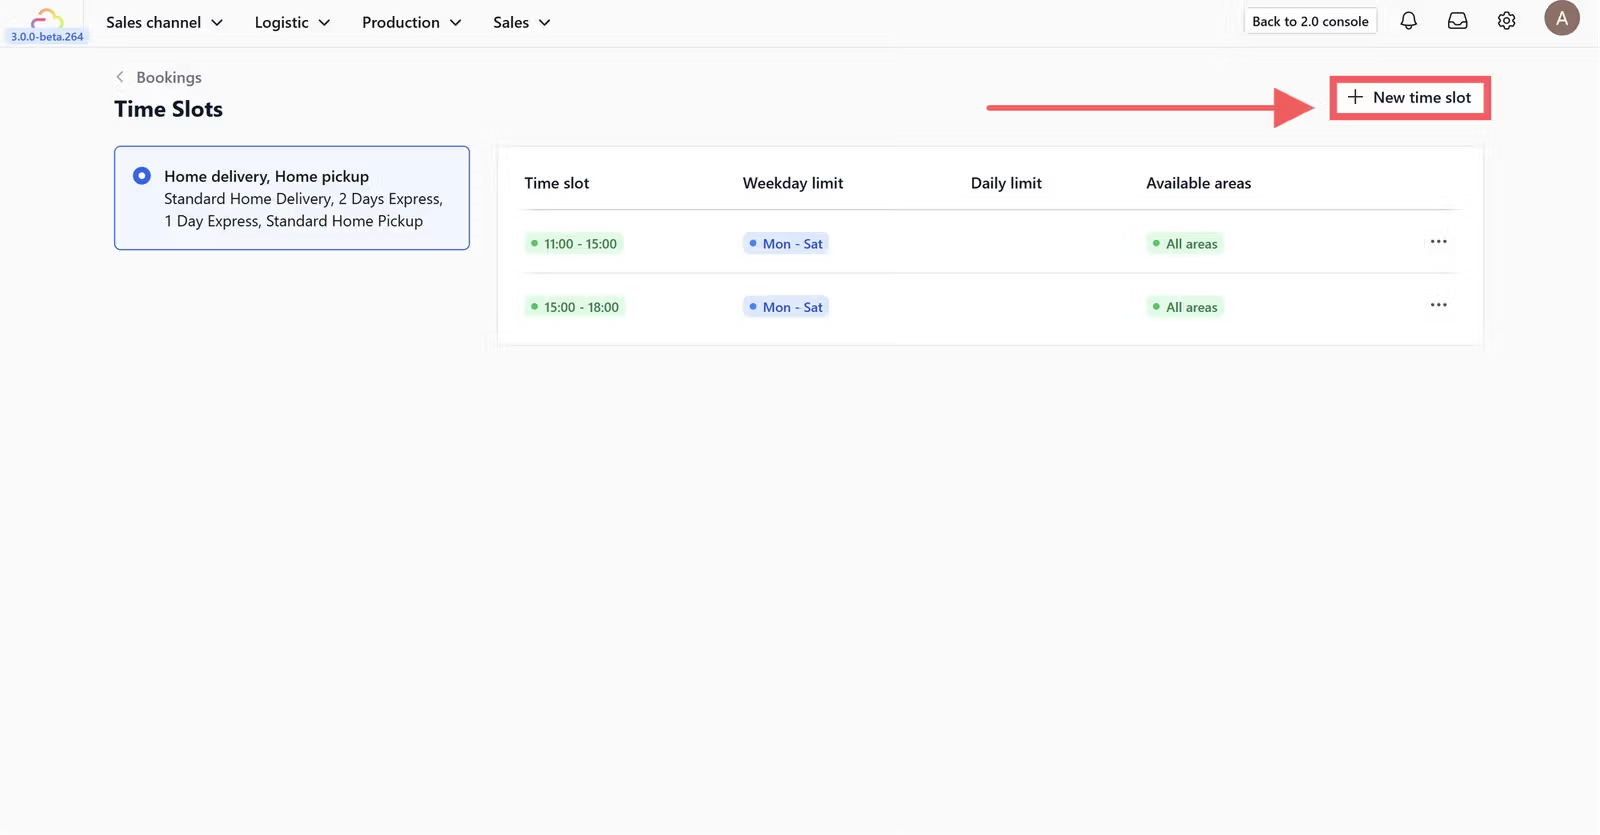
- Click + New time slot.
The Fields Explained
Time (start and end)
The window shown to customers. For example 10:00 to 12:00. Required.
Assign to booking options
Which Booking Options show this slot. Required. Store Pickup options are filtered out of this dropdown.
Eco time
| Pick this | Result |
|---|---|
| OFF | Slot appears normally |
| ON | Slot shows a leaf icon and becomes the default pick when the customer opens the date picker |
Weekday Limit
| Pick this | Result |
|---|---|
| Empty | Slot runs every day |
| Mon-Fri only | Slot hidden on Sat and Sun |
| Sat and Sun only | Weekend-only slot |
Daily booking limit
| Pick this | Result |
|---|---|
| Empty | No cap — unlimited bookings |
| 20 | Slot disappears after 20 bookings that day |
Limit per zone
| Pick this | Result |
|---|---|
| OFF | The daily limit counts all zones combined |
| ON | The daily limit counts each zone independently |
Available area
| Pick this | Result |
|---|---|
| Empty | Slot appears for every address |
| One or more zones | Slot appears only for customers inside those zones |
| Include "All other areas" | Slot also covers addresses outside every listed zone |
Sales channel limit
| Pick this | Result |
|---|---|
| Empty | Slot appears on every channel |
| POS only | Slot hidden online, shown only at the counter |
| Online Store + Mini App | Slot hidden from POS, customer-only online booking |
| Multiple Sales Channel | Select more than one sales channel, where this time slot will be shown to the selected sales channels |

Understanding the Limits
- Eco time -> shows a leaf icon and makes the slot the default choice when the customer opens the calendar. Customers can still pick any other slot. It does not change the price.
- Daily booking limit -> hides the slot for new customers once the cap is reached for that day.
- Limit per zone -> splits the daily cap per zone instead of counting all zones together. Useful when each zone has its own driver.
- Available area -> decides where the slot is offered. Tick "All other areas" to also catch addresses outside your listed zones.
- Sales channel limit -> decides who sees the slot. Restricting to an app hides a late-evening slot from the POS counter without removing it from the app.
FAQs
Do I need Time Slots before I go live?
Yes if you offer Pickup, Delivery, or Onsite Service. Without slots, customers see only dates and no time windows. For Store Pickup you can skip this.
What if I set a daily limit too low?
The slot disappears when full. New customers that day must pick another slot or another date. Raise the limit in Settings at any time.
What is Eco time — does it reduce the price?
No. Eco time only adds a visual leaf icon and makes the slot the default pick. Pricing is not changed.
What is the difference between Limit per zone and Available area?
Available area decides whether the slot appears in a zone at all. Limit per zone decides how the daily cap is counted across zones once the slot is visible.
Can two slots overlap in time?
Yes. You might want a 10am to 12pm slot for all areas and a separate 10am to 12pm slot with a lower cap for a remote zone.
What's Next
Now that your time windows and booking caps are in place, continue to [Setting Up Blocking Rules] to close specific dates like public holidays or pause customers from booking when needed.
Give feedback
Up next
Setting Up Blocking RulesPrevent unwanted bookings by blocking specific dates or customers based on your operational needs.
Read more