Set up the Item Entry Steps
In this article
When your team adds an item to an order, they may need to select a product, enter a quantity, or add special instructions. A Line Item Entry lets you define these steps so your team follows the same process every time. This guide walks you through how to set up those steps.
Contents
Contents
What is a Line Item Entry?
A Line Item Entry is a set of steps your team follows when adding an item to an order. For example, you might want them to select the product first, then enter the quantity, then add any notes. By setting this up, the system knows exactly what to ask for each item, so nothing gets missed.
Plan Your Item Details
If you choose to set this up, think about what information your team needs to collect when they handle an item. For this guide, we will set up a common workflow: Select a product → Take a photo → Add a note.
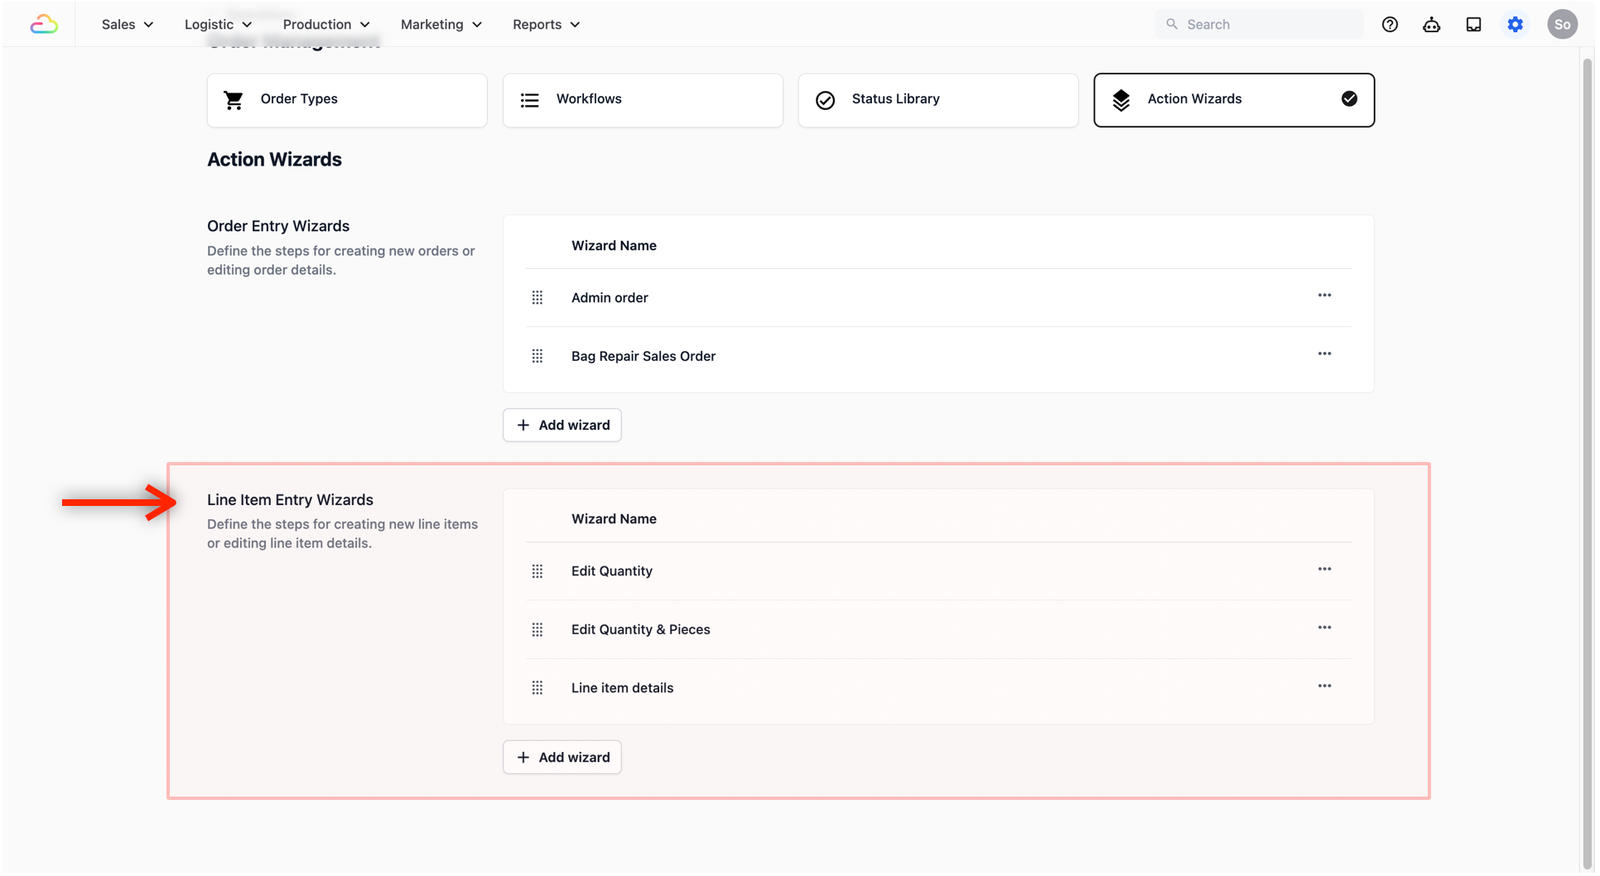
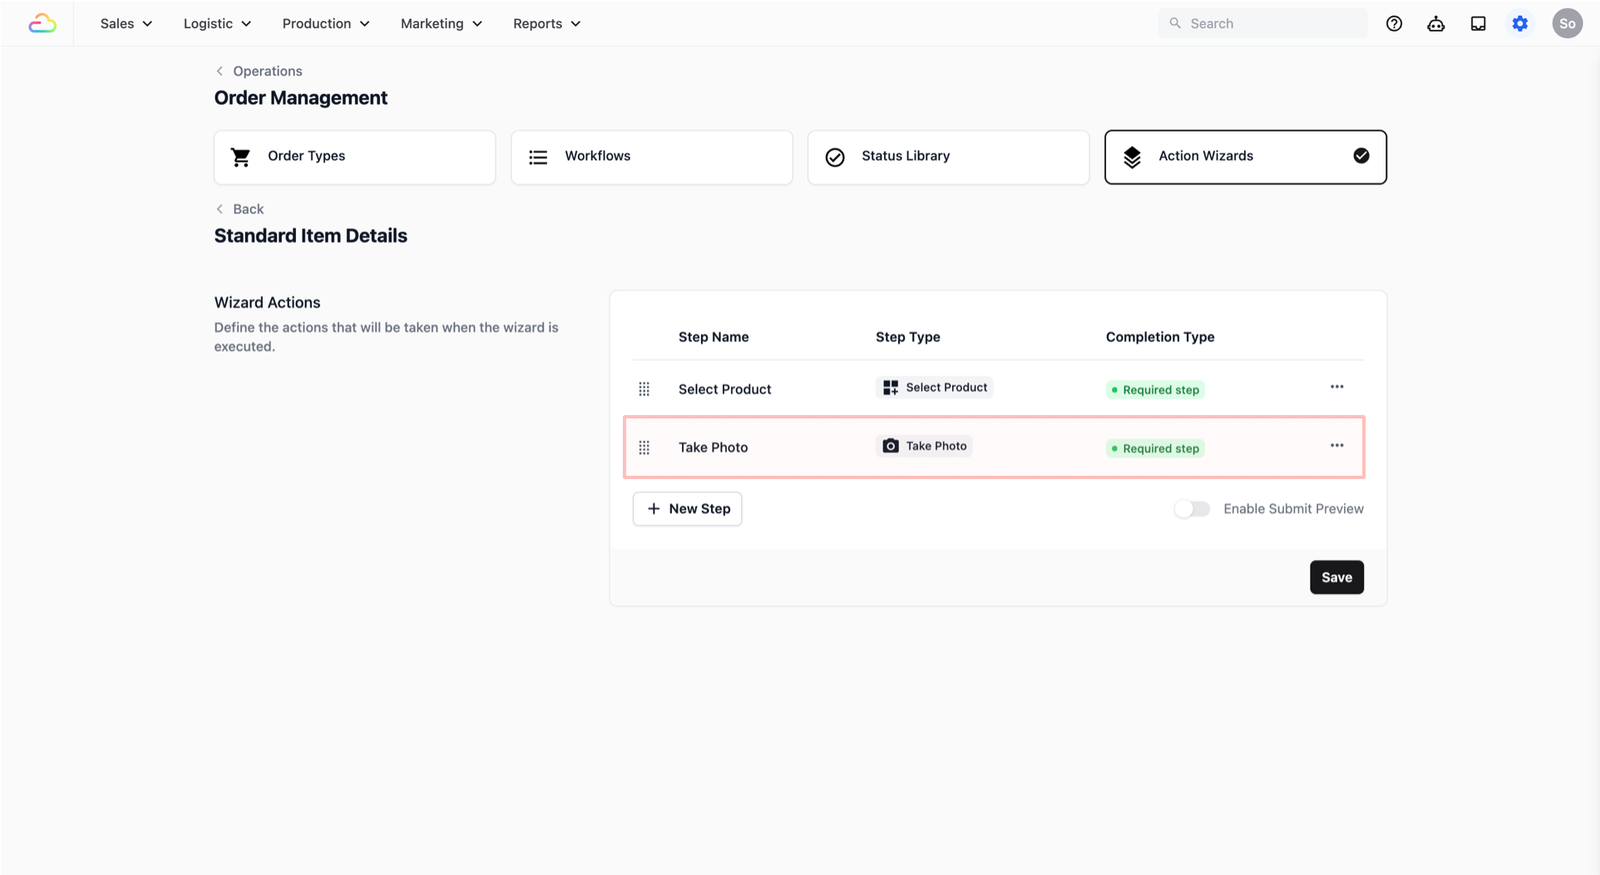
Access the Action Wizard
To define the steps your team follows when adding a new line item, you will first need to set up the steps in the Action Wizards.
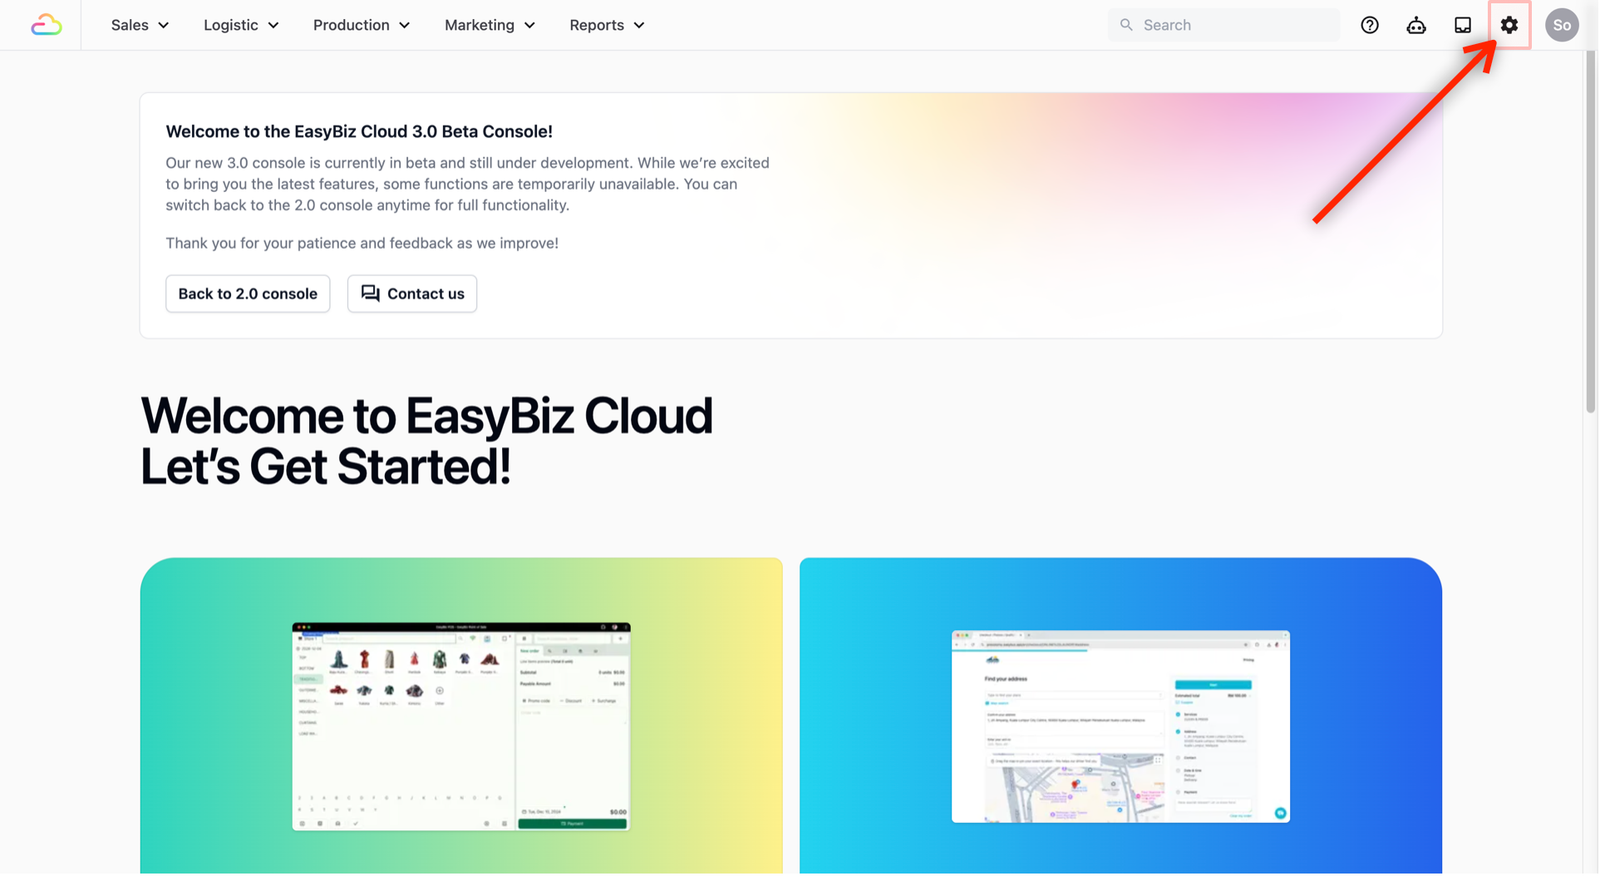
- On the top navigation bar, click the Gear Icon (Settings).
- Scroll down until you see Operations. Select Order Management.
- This is the central hub where you define your sales orders, the steps necessary for your team to create an order, and the processes tied to that order.
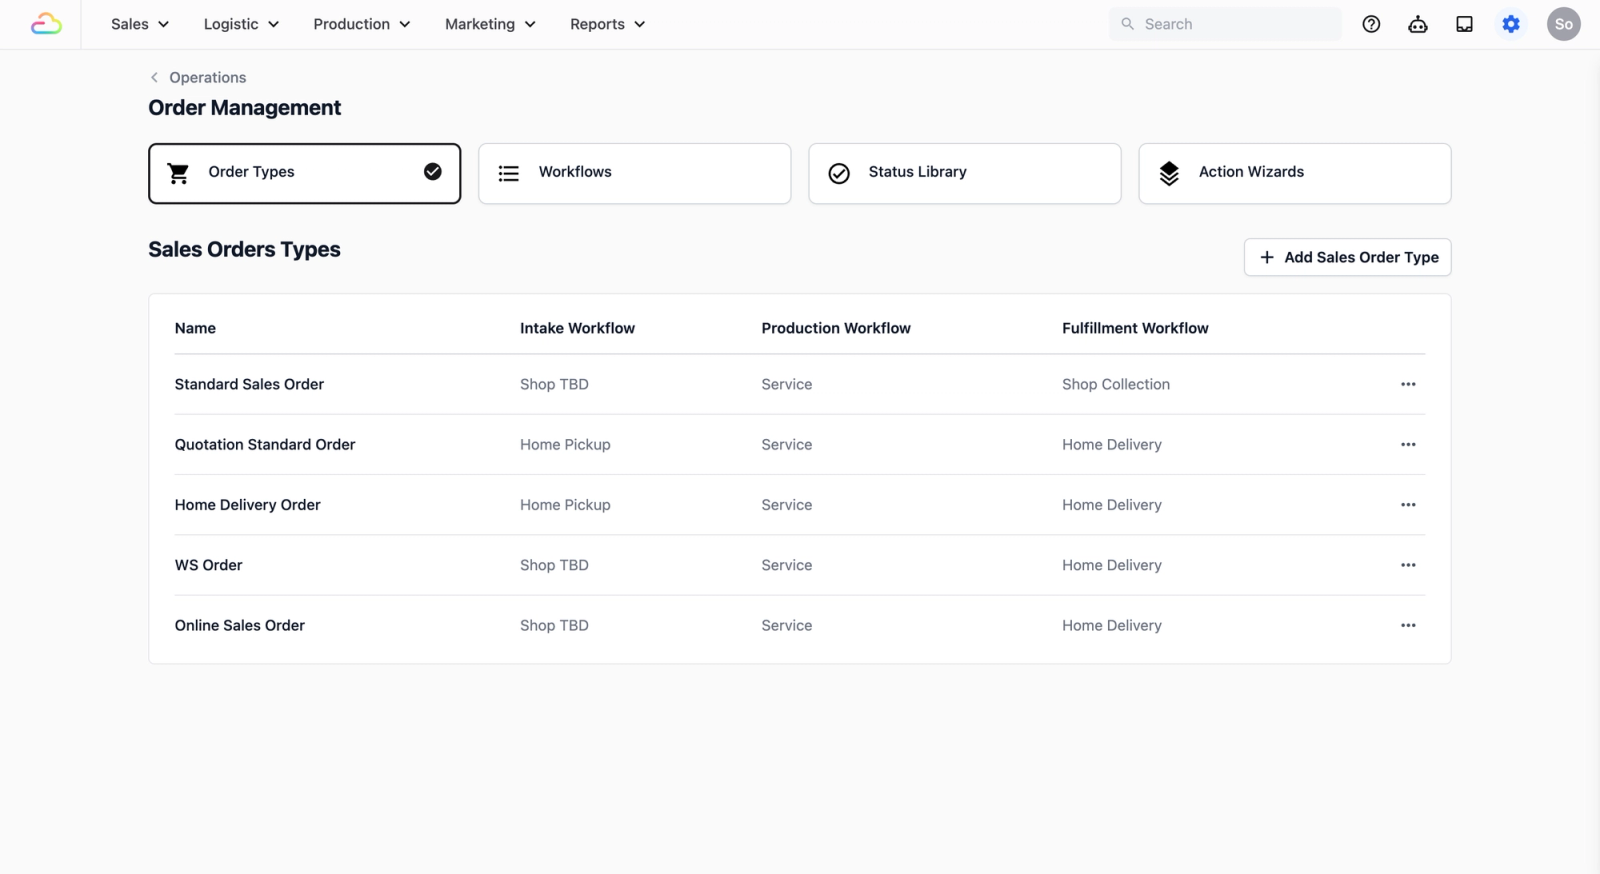
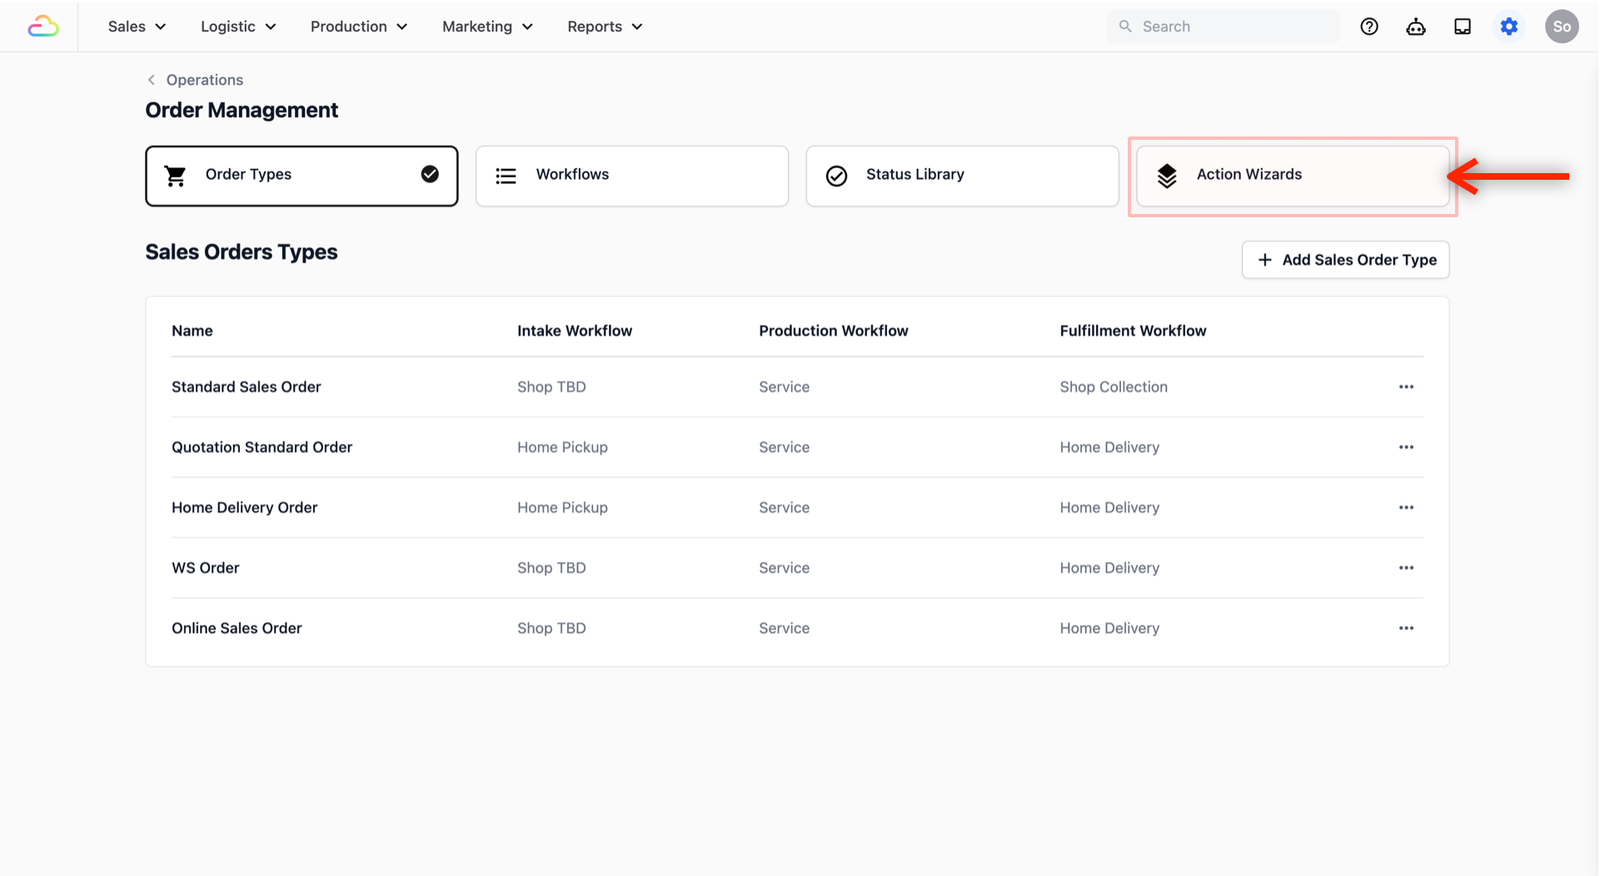
- Click on the Action Wizards tab to start creating a new Line Item Entry (the steps to create a new line item in your sales order).
Set up a new Line Item Entry
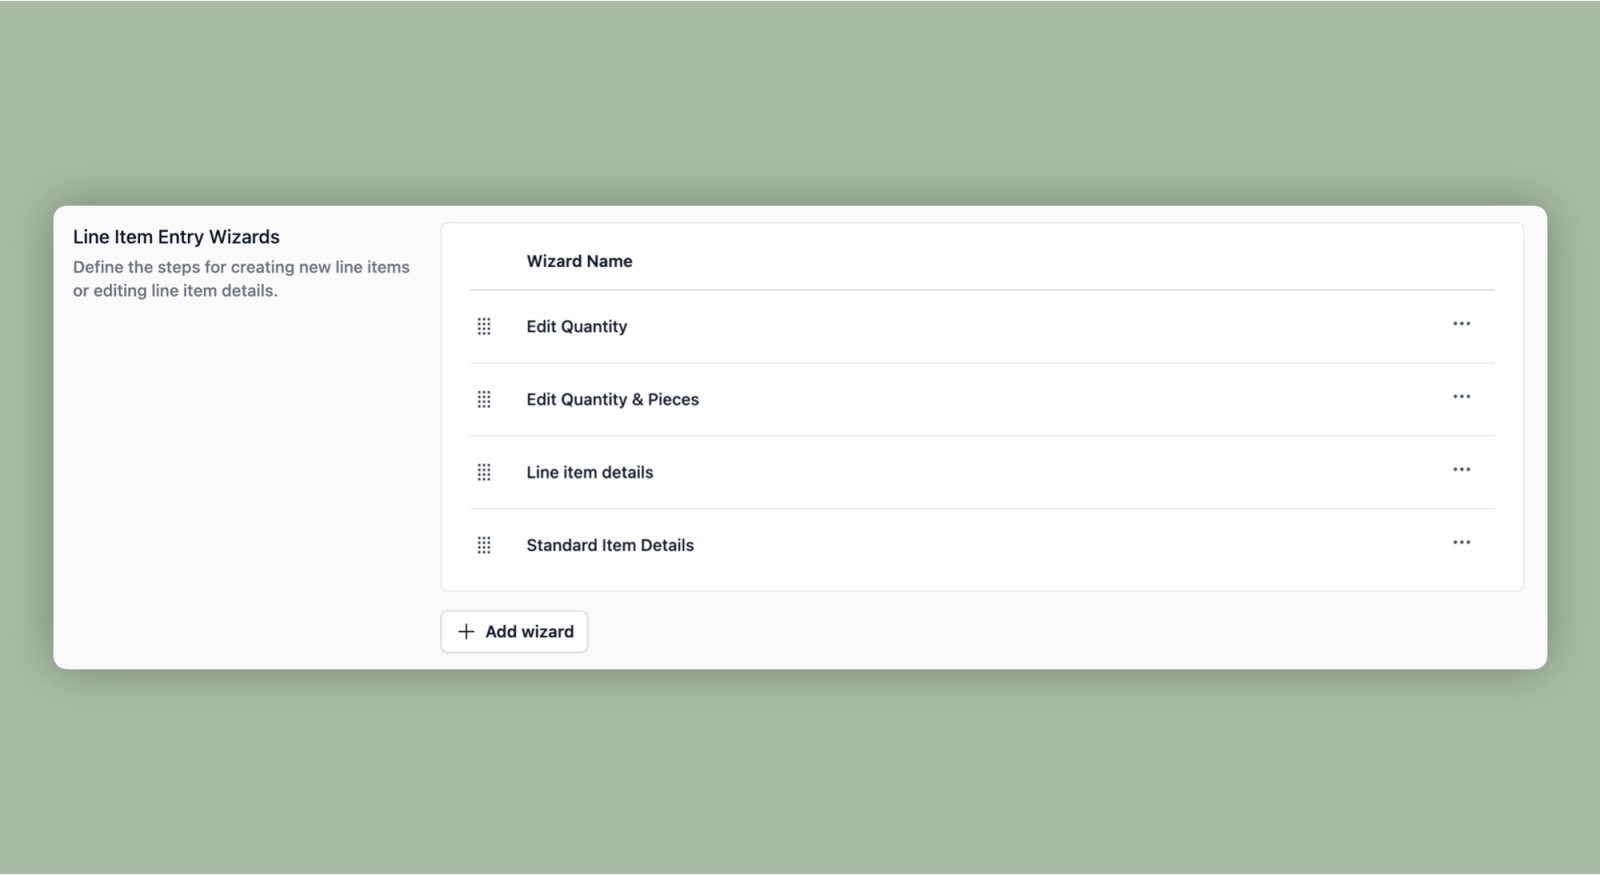
Locate the Line Item Entry Wizards section. This is where you define the steps to create a new line item in a sales order form.
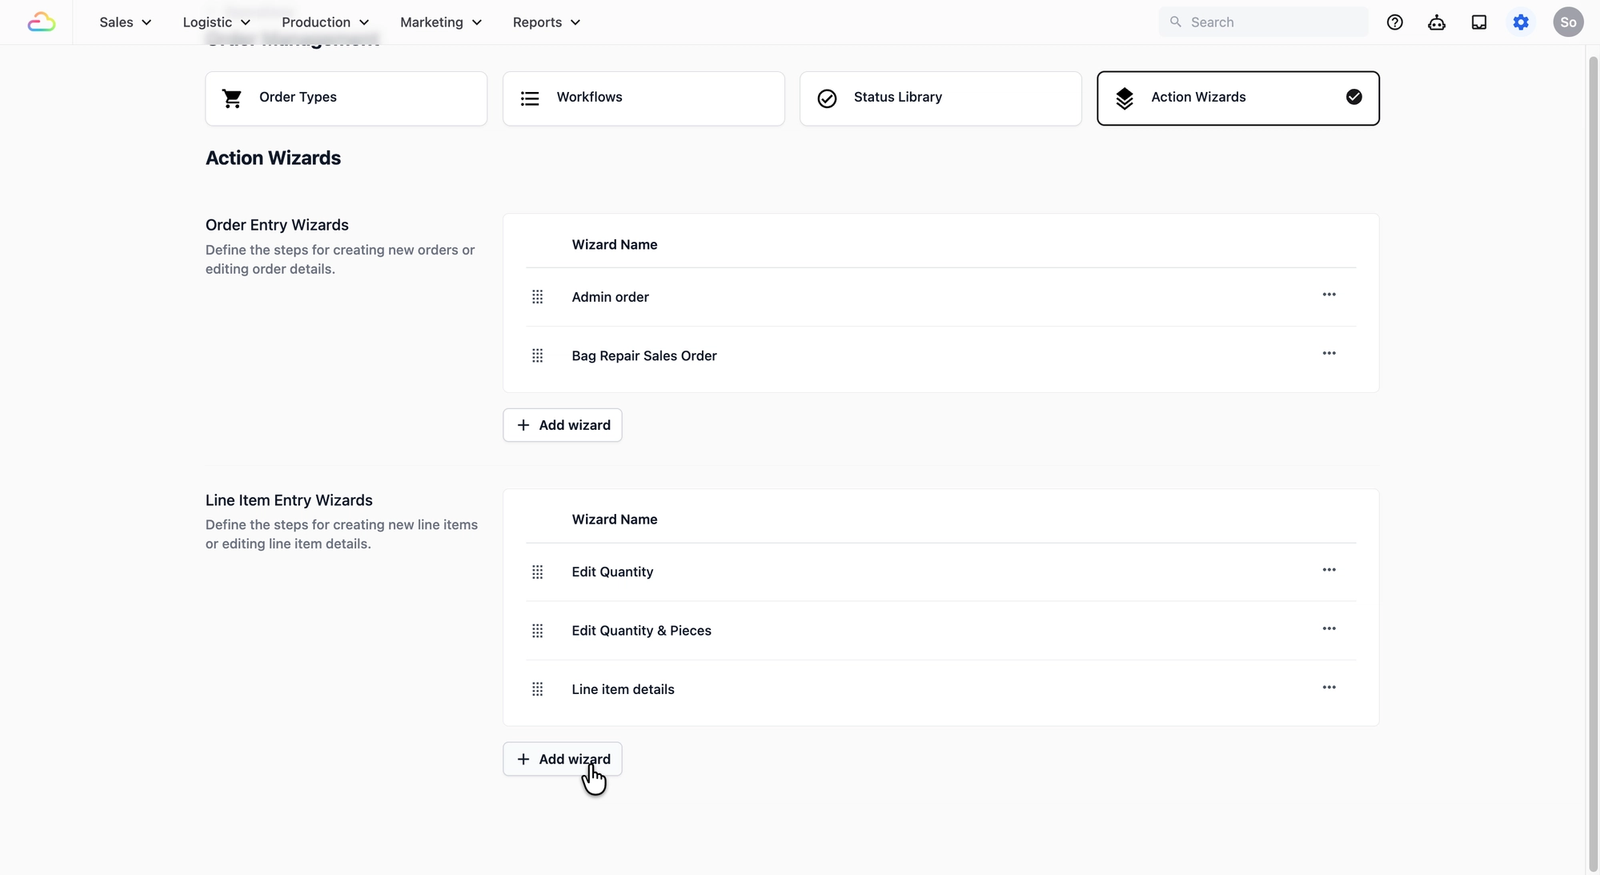
Click on the + Add wizard button to create a new Line Item Entry.
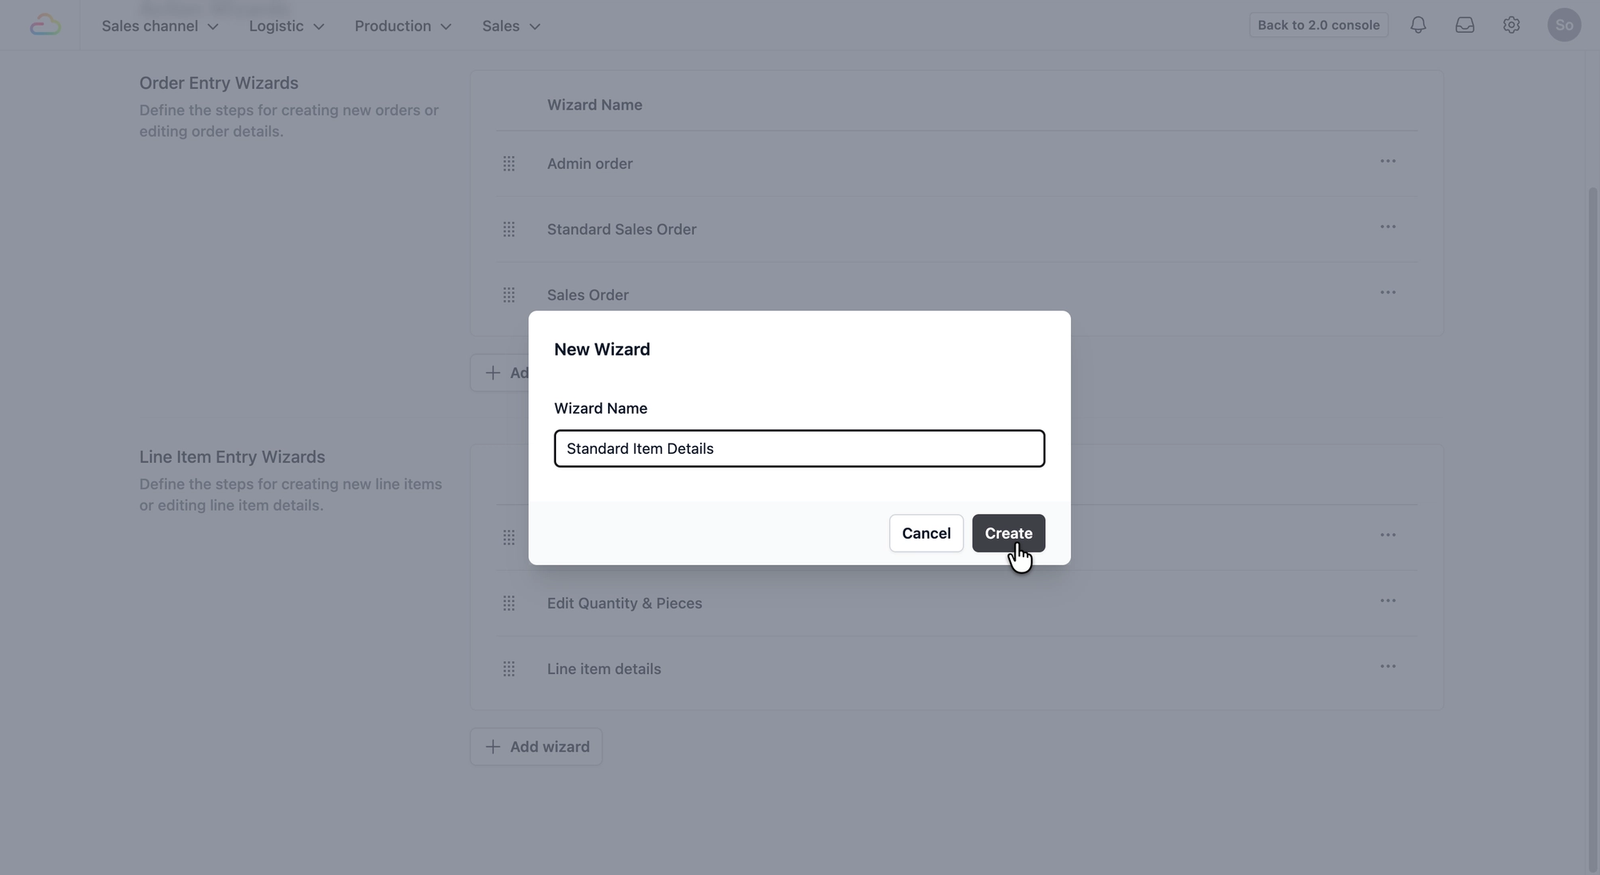
A pop-up window will appear for you to name your new Wizard (this name will be used to identify the procedure later on).
For this demo, we will name this "Standard Item Details", but feel free to name it based on your current business terminology.
Once done, click on the Create button.
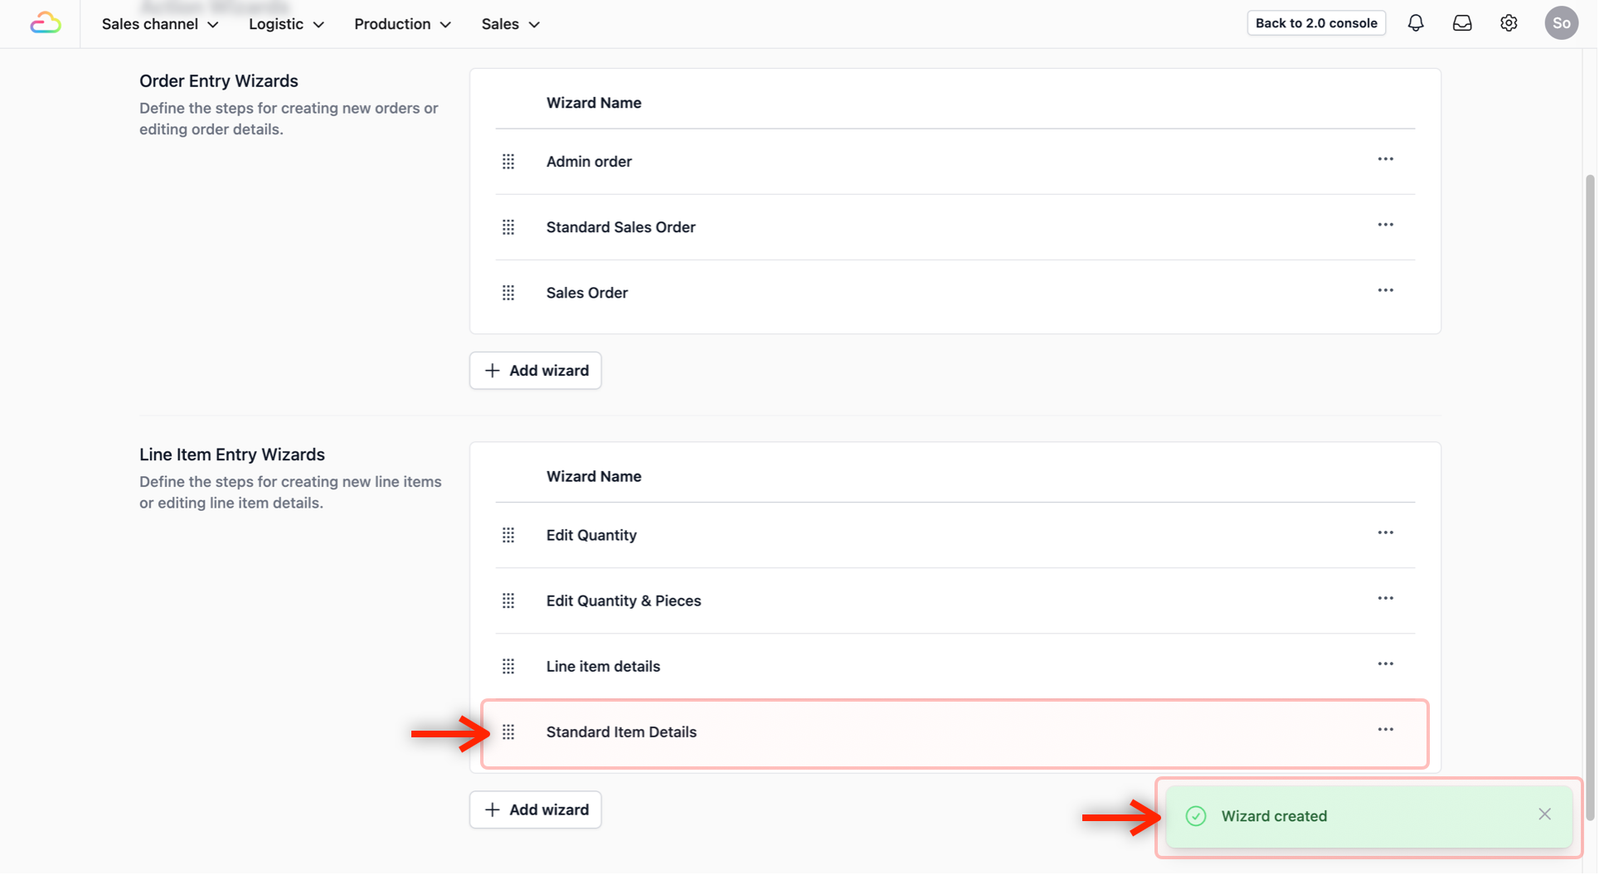
The pop-up will close and you will see a notification confirming the successful creation on the bottom right of your screen. Your new entry will now appear in the list under the Line Item Entry Wizards section.
Define Line Item Steps
Now that you have created a new Line Item Entry, the system needs to know what steps the staff should follow to create a line Item in a Sales Order.
For this demo, we will set up a 3-step common workflow that most service businesses would probably have:
- Select a product: The specific item or service the customer wants.
- Take a photo: Document the condition of the item when it comes in.
- Add a note: Any additional information or special instructions for that specific item.
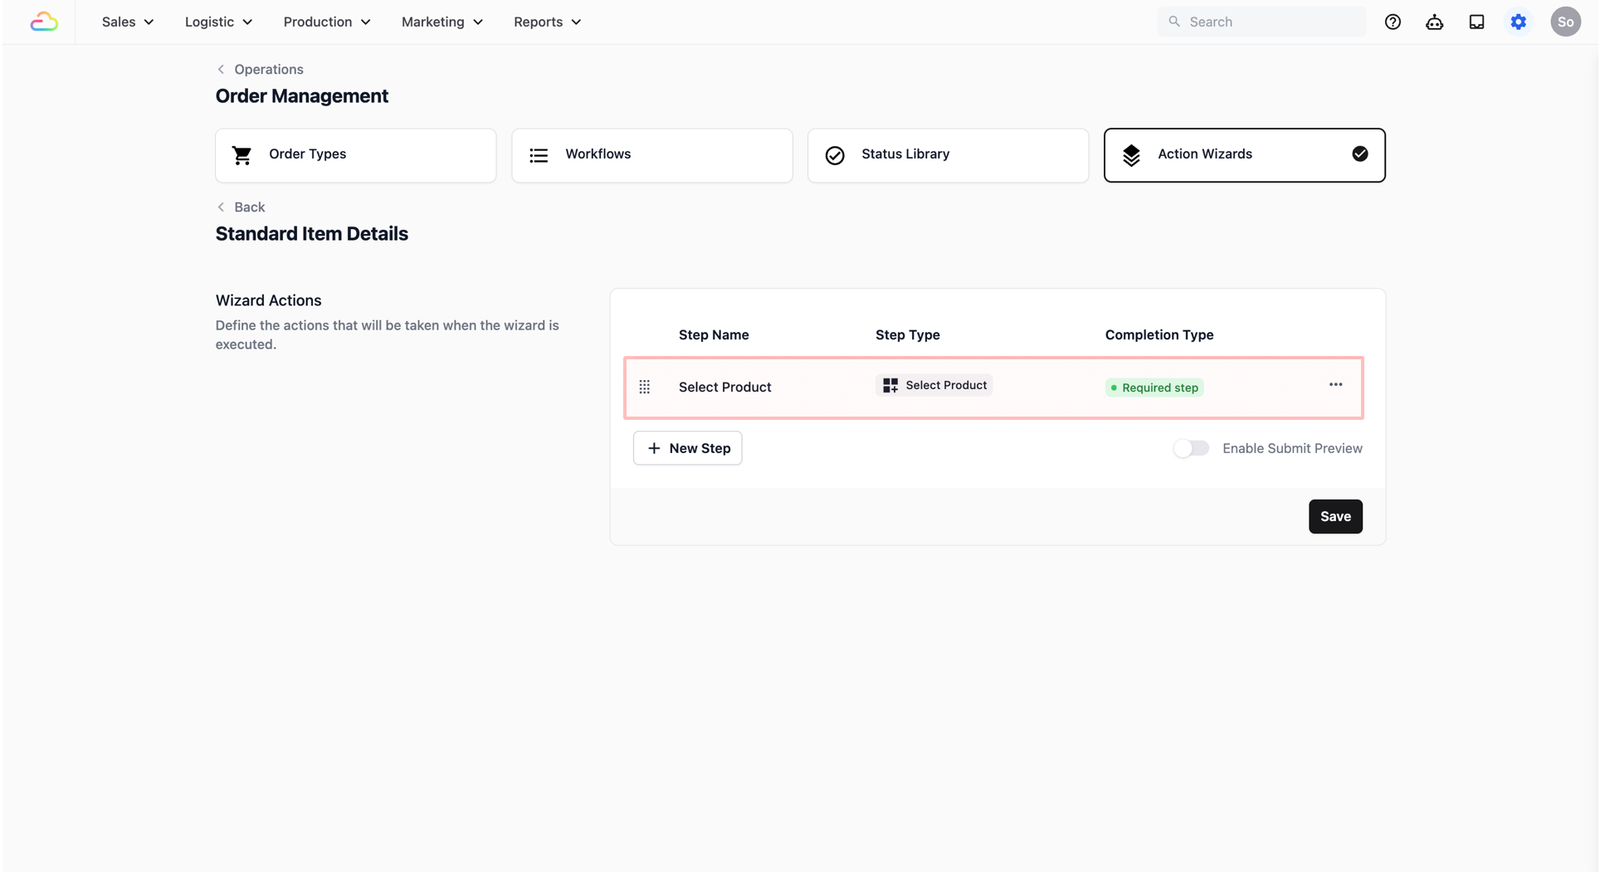
Locate the Line Item Entry you have just created.
Click on the ••• on the far right of the line item entry that you want to define the steps to and select Edit Actions.
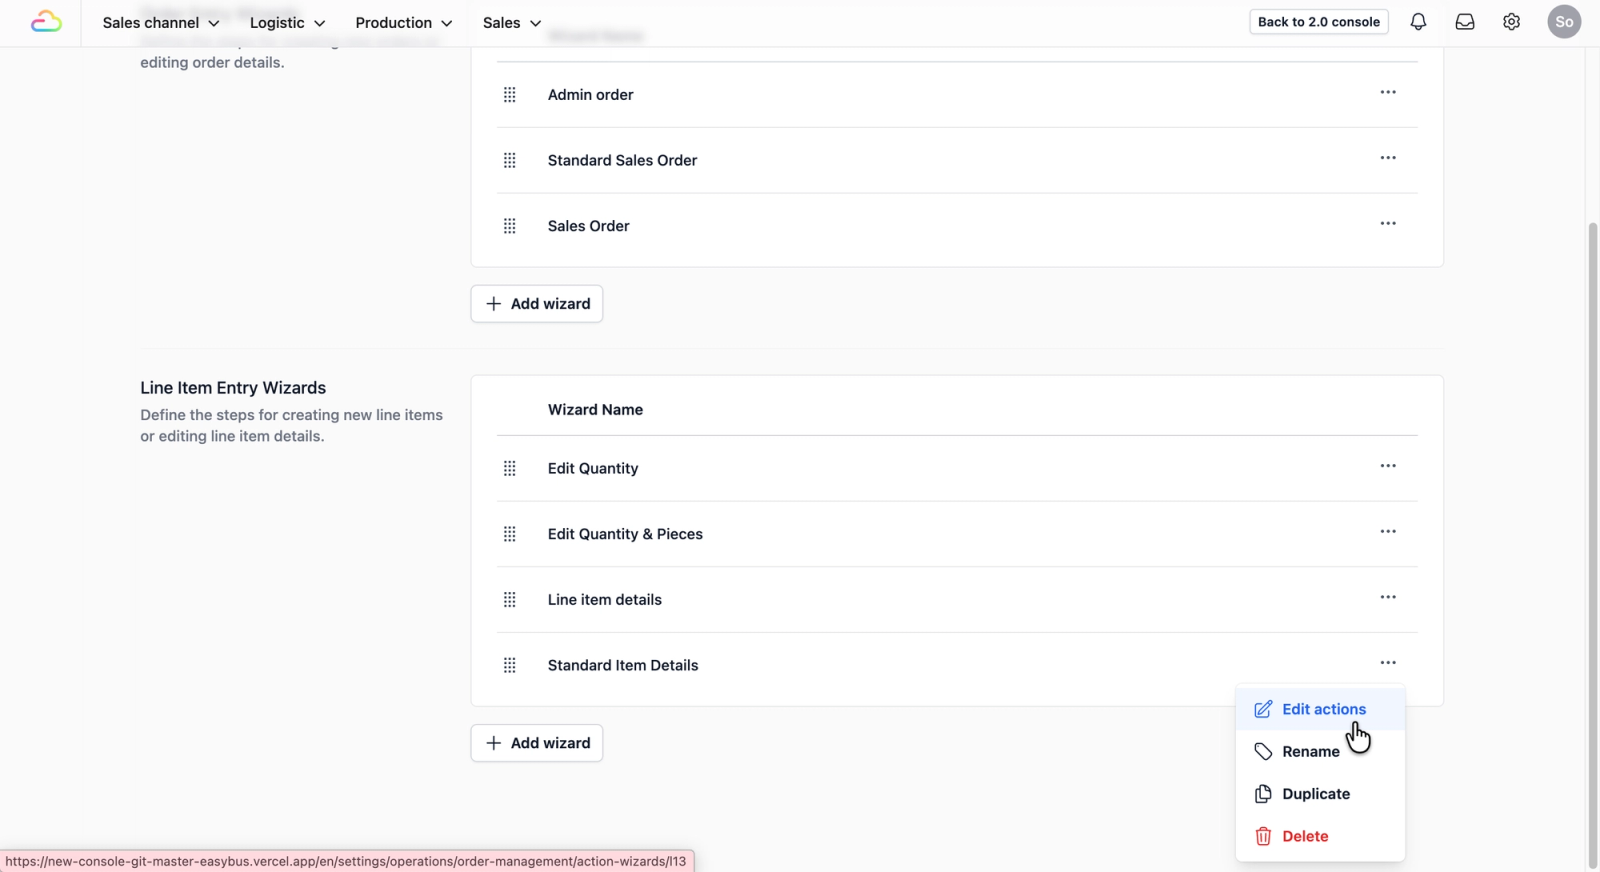
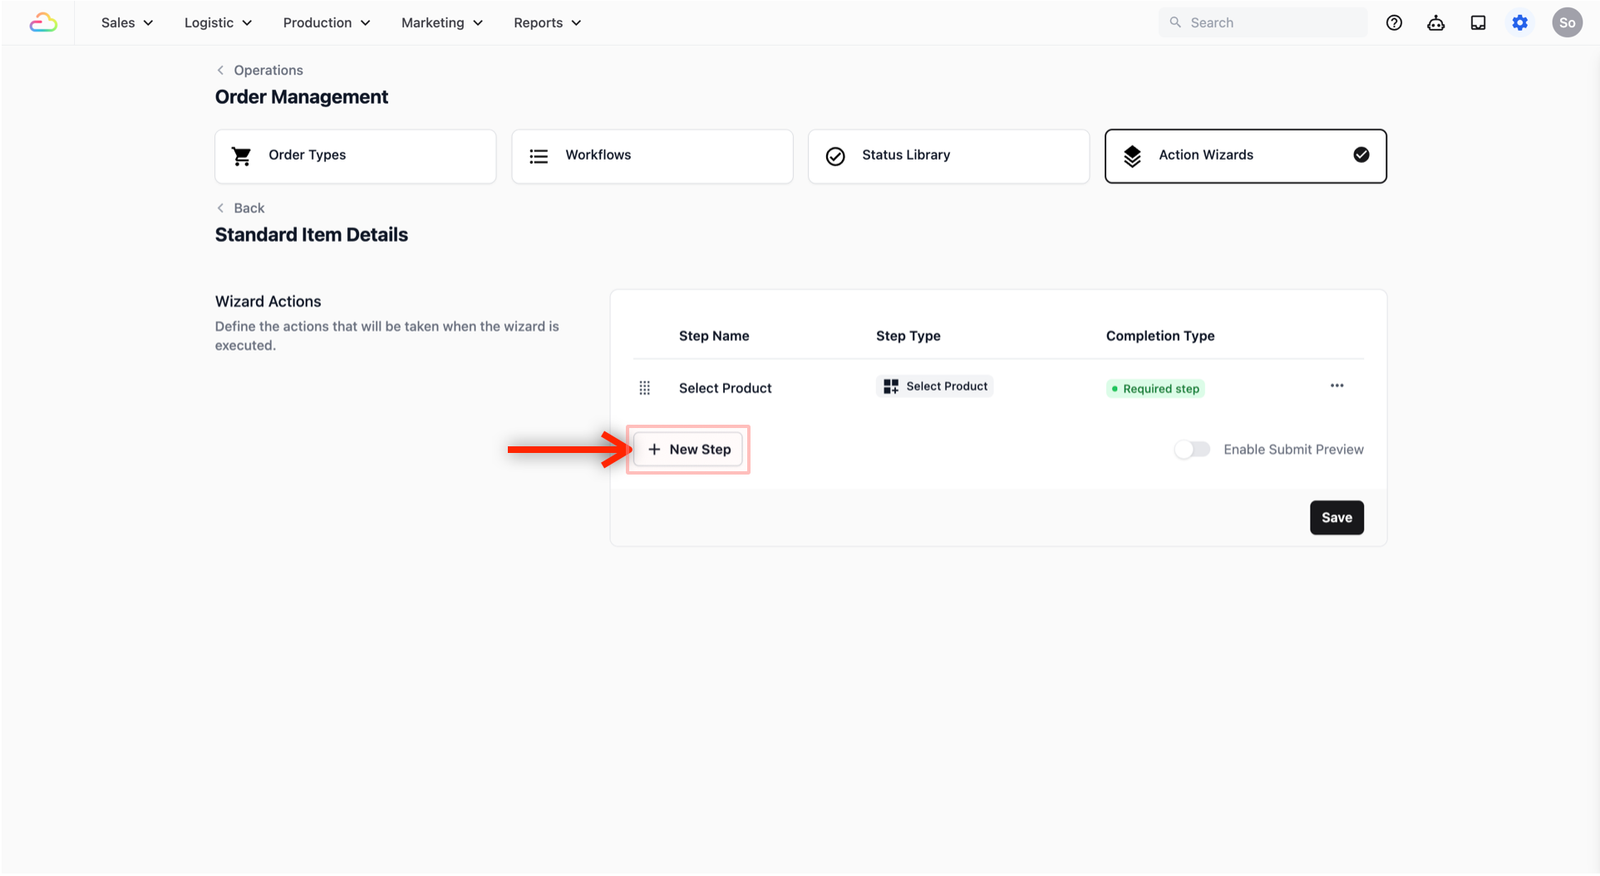
In the Wizard Actions section, click on the + New Step button.
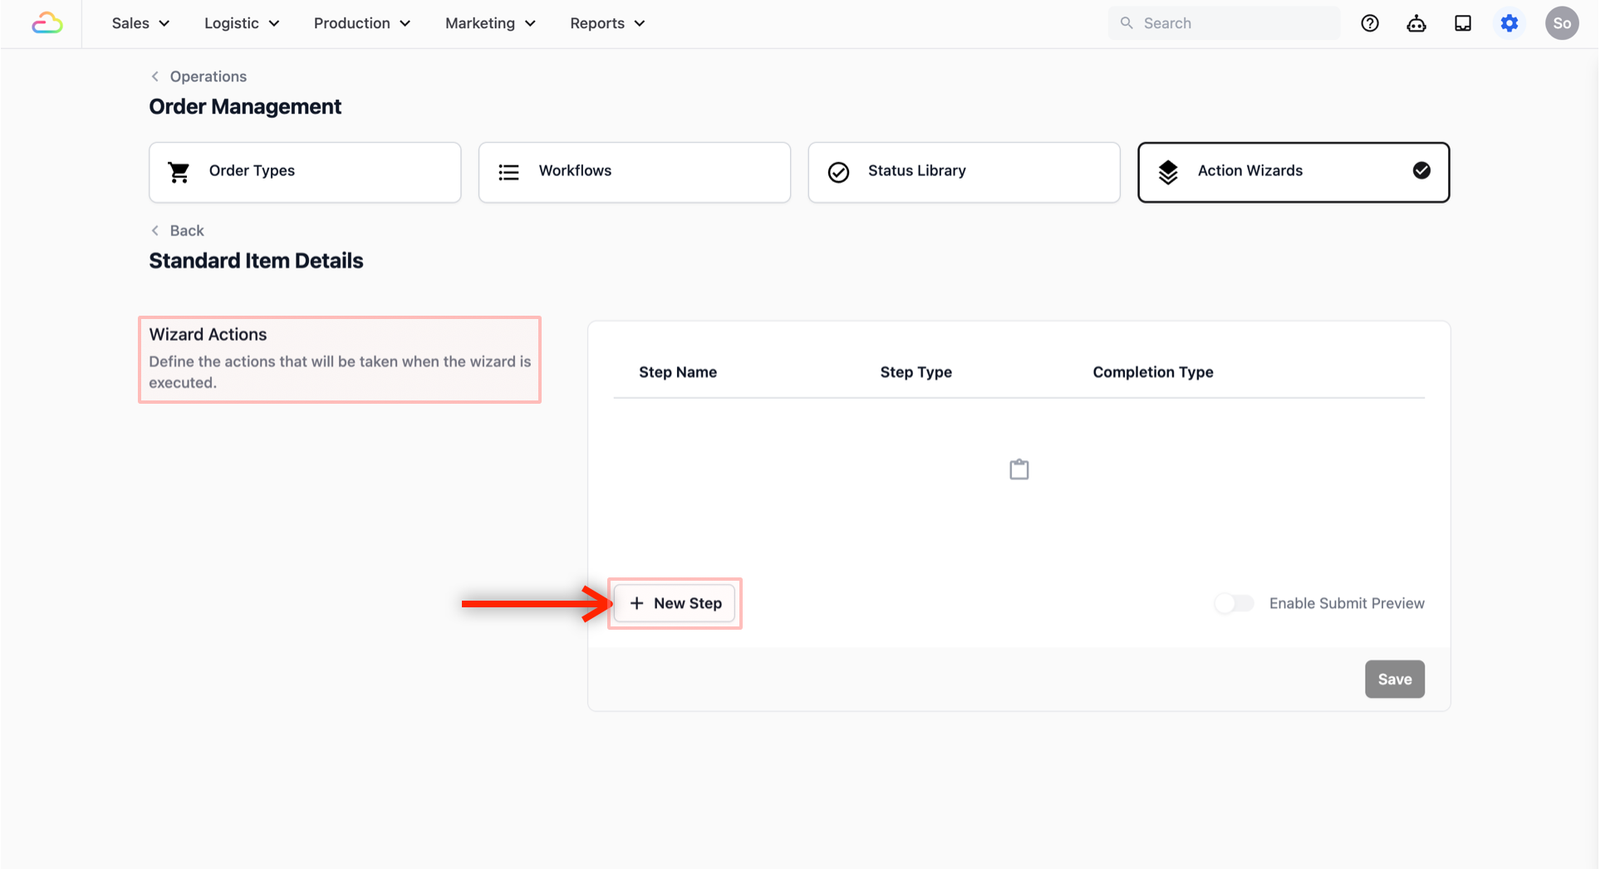
You should now see a list of steps which is available for you to choose from depending on the use case of your line item entry.
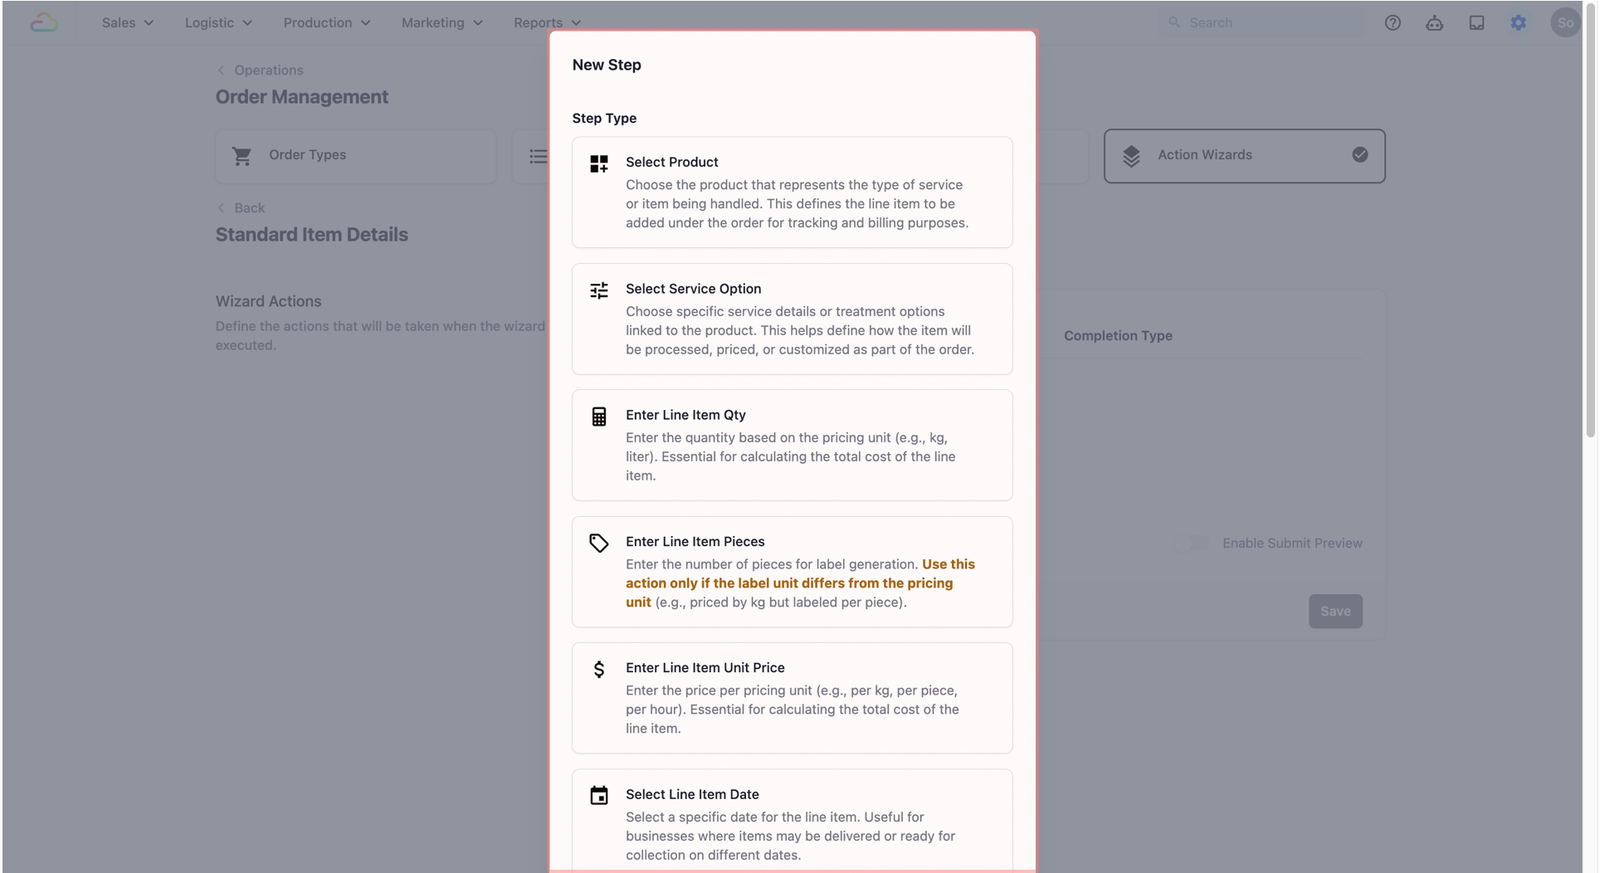
Select Product
We will begin by setting up the selection of a product. This step enables the user to choose the specific service or product the customer wants.
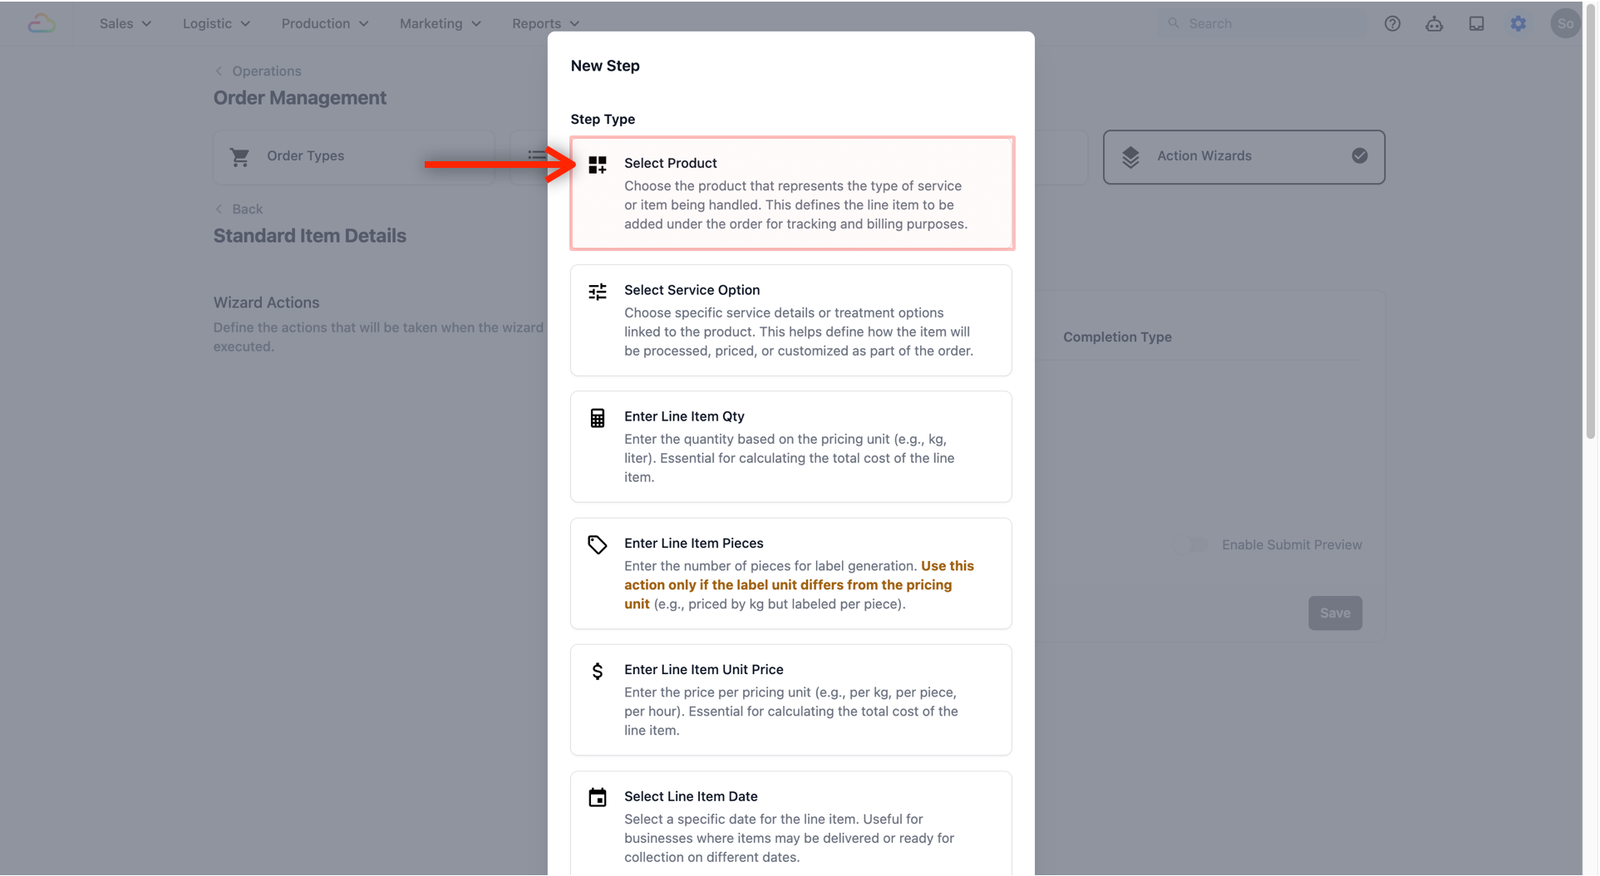
Select the Select Product as the step type.
A pop-up window will appear. Here is how to set up your fields in the pop-up window:
- Step Name: The name appearing as a step in the process. Leave blank to use the default name.
- Completion Type: This decides if the step is mandatory.
- Required step: Staff must do this.
- Optional step: Can be skipped.
- On-demand: Available if needed.
- Add Action Step Display Rule: Used for hiding/showing steps based on specific criteria.
- Enable "Add Other": Toggle this on if you want staff to be able to add custom items not explicitly listed.
- Limit Product Types: Choose "Service" or/and "Product" to fit your business.
- Limit Products: Leave blank to show all product categories. Select from the dropdown field to limit to a specific product only.
For this demonstration, we will leave everything as default and click on the Add button.

The new step should now show up in the table view of the Wizard Actions section.
Take Photo
Next, we will set up a step for your staff to document the condition of the item when it arrives. This is especially useful for service businesses — whether it is a bag with scratches, a garment with a stain, or shoes with visible wear. Having a photo on record protects both you and your customer.
- Once again, click on the + New Step button.
This time, select Take Photo from the Step Type list.
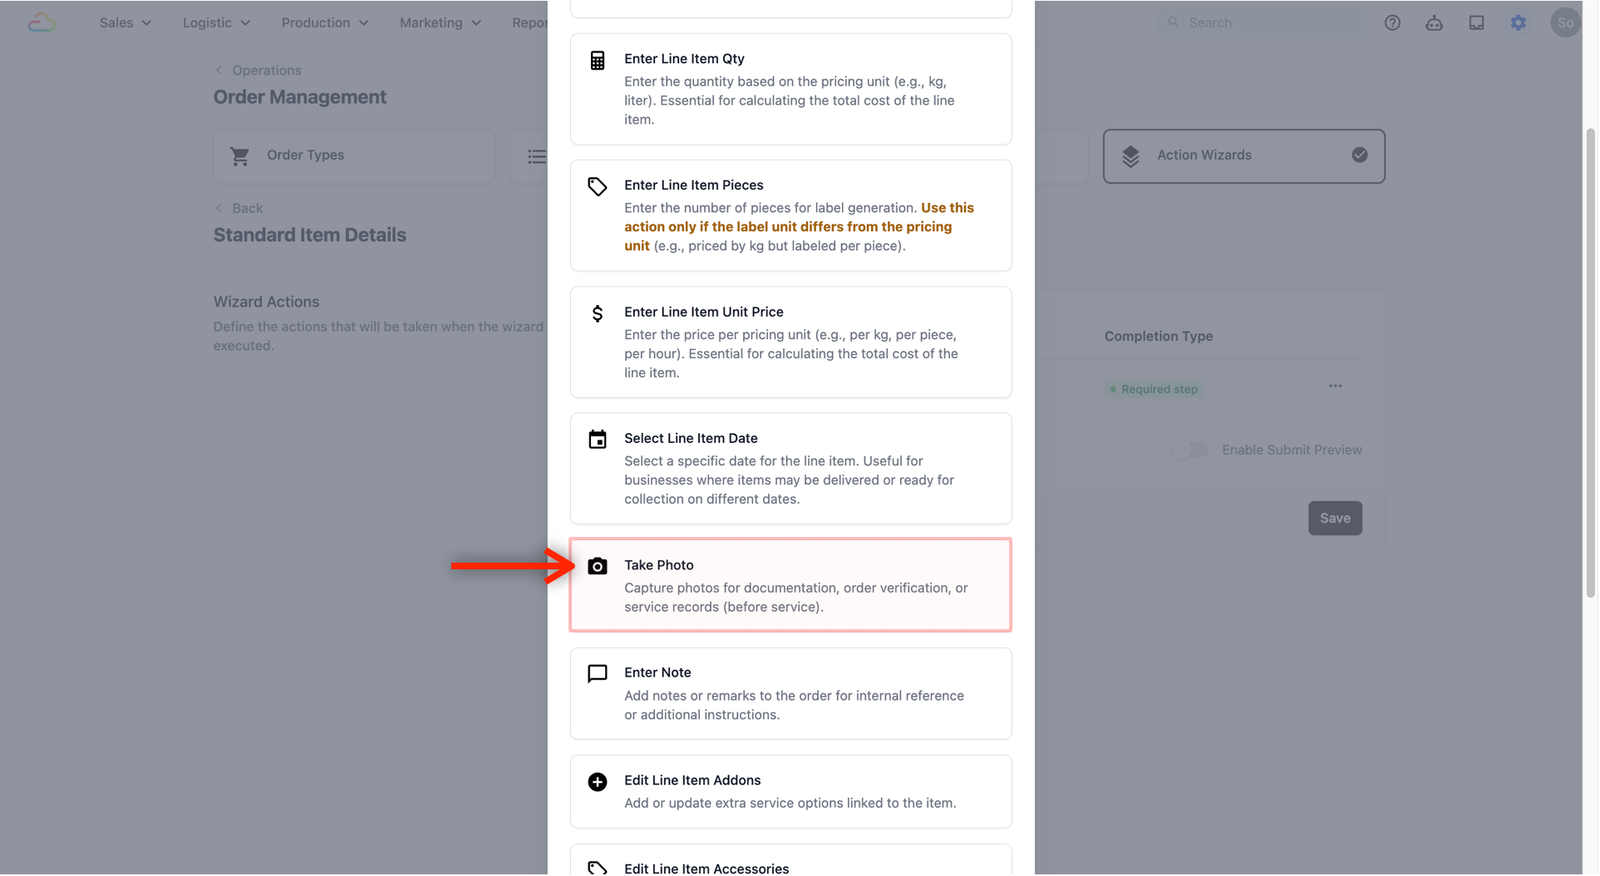
A pop-up window will appear. Here is how to set up your fields in the pop-up window:
- Step Name: The name appearing as a step in the process. Leave blank to use the default name.
- Completion Type: This decides if the step is required, optional, or on-demand.
- Add Action Step Display Rule: Used for hiding or showing steps based on specific criteria.
- Enable photo upload: Toggle this on if you want your staff to be able to upload photos from their device in addition to taking them with the camera.
Once again, for this demonstration, we will leave everything by default and click on the Add button.
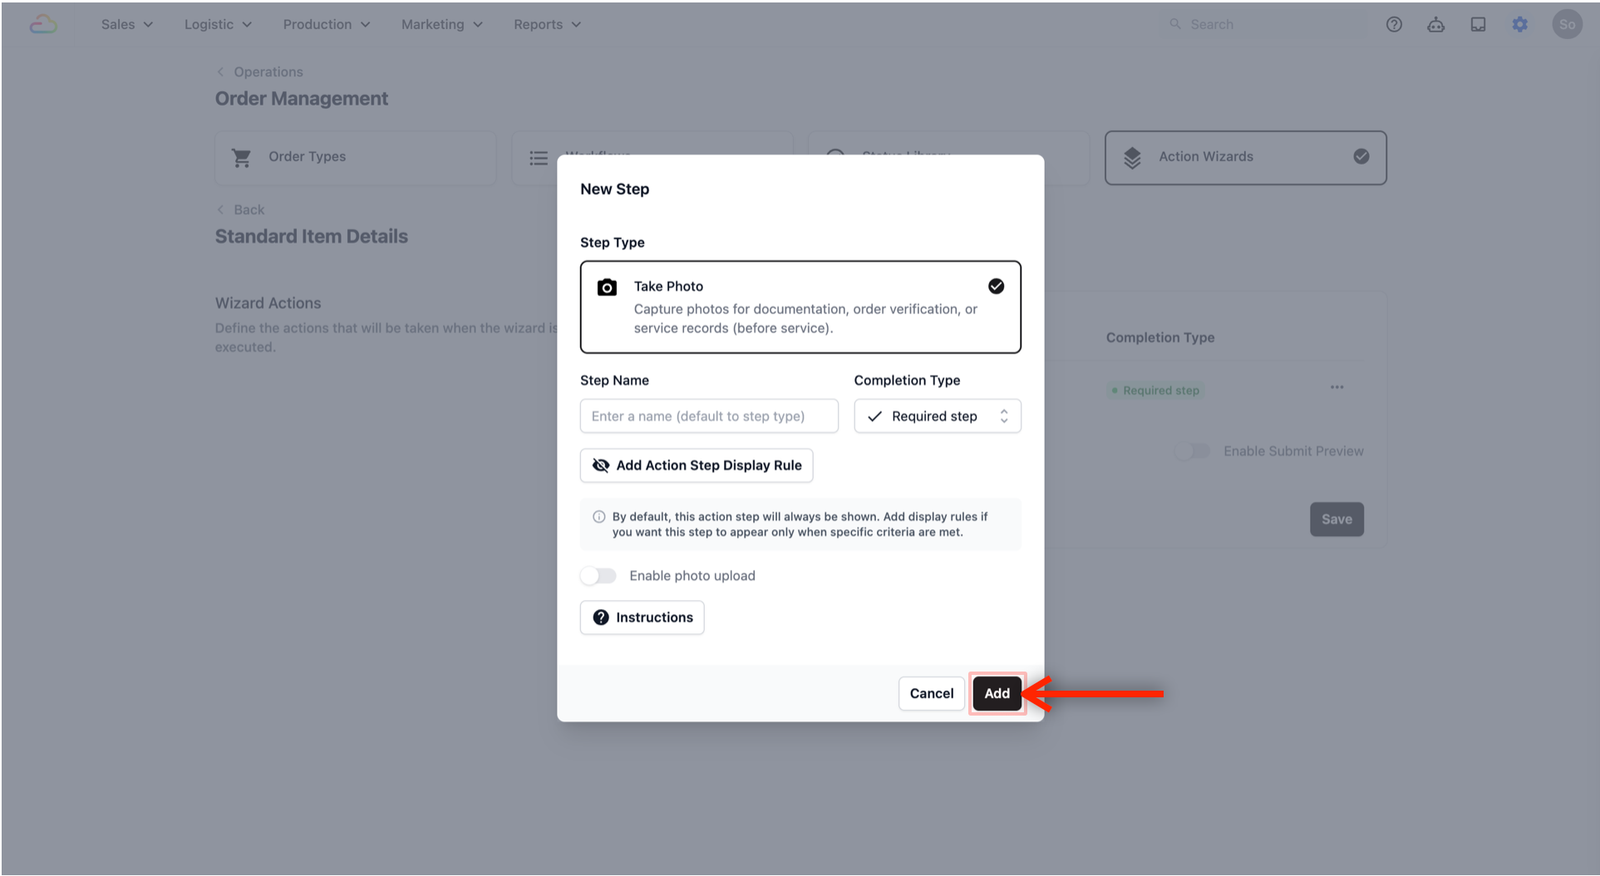
- The new step will now show up in the table view.
Closing the Line Item Entry Flow
To complete the common workflow of our line item entry, we need an area for the staff to be able to add additional notes or special instructions for the item.
The process for adding this is similar to the previous steps, except we want this step to be an optional one this time.
Enter Note:
- Click + New Step and select Enter Note.
- A pop-up window will appear. Here is how to set up your fields:
- Step Name: The name appearing as a step in the process. Leave blank to use the default name.
- Completion Type: This decides if the step is required, optional, or on-demand.
- Add Action Step Display Rule: Used for hiding or showing steps based on specific criteria.
- Click Add when done.
For a quick reference, we will show you how to find and add the Enter Note step inside of the Wizard Actions section.
Save your Line Item Entry Steps
Once you have added the steps necessary for your specific business use case, they will be listed in the Wizard Actions table.
- Rearrange: Simply drag and drop the steps if you want to change the order.
- Finalize: When you are done reviewing the list, click on the Save button at the bottom right to save your changes.
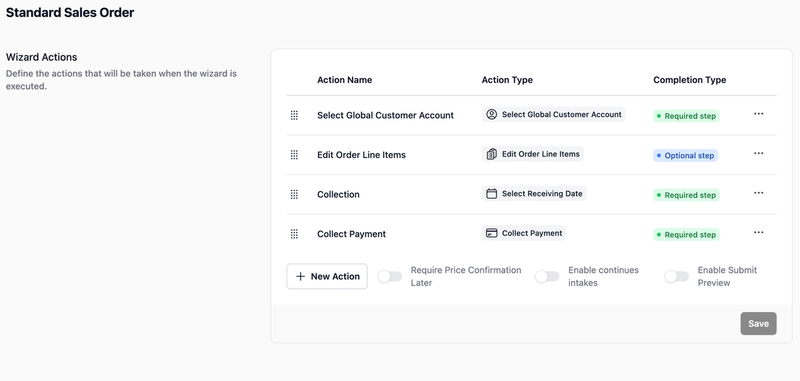
Step Types
When you clicked the + New Step button, you likely noticed many other options in the list. While we used the three most common steps for our demo, this section explains what each one does so you can choose the right steps for your line item workflow.
Product & Service Details
| Step Type | What It Does | When To Use It |
|---|---|---|
| Select Product | Your staff picks the item or service the customer is bringing in. | Use this when your staff needs to choose from a list of services or products (e.g., "Bag", "Shoes", "Jacket"). |
| Select Service Option | Your staff picks the specific service for the item. | Use this when the same item can have different services (e.g., a bag can need "Deep Cleanse", "Repair", or "Colour Restoration"). |
| Edit Line Item Addons | Add extra service options to the item. | Use this if you offer add-on services (e.g., adding waterproofing on top of a regular clean). |
| Edit Line Item Accessories | Record additional physical items that come with the main item. | Use this when customers hand over accessories with their item (e.g., a belt, chain, or dust bag that came with a handbag). |
Pricing & Quantity
| Step Type | What It Does | When To Use It |
|---|---|---|
| Enter Line Item Qty | Your staff enters the quantity based on the pricing unit. | Use this when you charge by weight, volume, or count (e.g., 3 kg of laundry, 2 pairs of shoes). |
| Enter Line Item Unit Price | Your staff enters the price per unit manually. | Use this when the price is not fixed and needs to be assessed per item (e.g., repair cost depends on the damage). |
| Enter Line Item Pieces | Your staff enters the number of pieces for label printing. | Use this only if your label unit differs from how you price (e.g., you charge by kg but label each piece individually). |
Logistics & Documentation
| Step Type | What It Does | When To Use It |
|---|---|---|
| Select Line Item Date | Your staff picks a date for the individual item. | Use this when items in the same order may be ready on different dates (e.g., a quick clean is done in 1 day but a full restoration takes 2 weeks). |
| Take Photo | Your staff takes a photo to document the item's condition. | Use this to record the state of an item before work begins — protects both you and your customer. |
| Enter Note | Your staff adds remarks or special instructions. | Use this for anything extra your staff needs to record (e.g., "Customer wants colour matching" or "Handle with care — sentimental item"). |
Advanced Customization
| Step Type | What It Does | When To Use It |
|---|---|---|
| Data Entry | Capture data using system fields (e.g., signature) or custom data fields you have created for your business. | Use this when you need to collect specific information — such as a signature, an estimated completion date, or any custom fields you have set up. If your business has unique requirements, you can create your own fields and they will appear here. Click here to learn how to set up Custom Data Fields → |
| Block | Use a flow block to define what this step does. | Use this when you need your staff to complete a specific action during the line item entry — such as capturing a signature, filling in a text field, or taking a photo. Blocks are flexible and can be configured for different purposes depending on your business needs. |
Give feedback
Up next
Set up the Order Entry StepsDefine the steps your team follows when creating a new order.
Read more