Creating Message Templates
In this article
WhatsApp has a rule: businesses cannot send the first message to a customer using free-form text. Instead, you need to use a message template — a pre-written message that WhatsApp has reviewed and approved in advance.
Contents
Contents
Think of templates as your standard messages that you use over and over — things like "Your order is ready for collection", "Here's your payment reminder", or "Thank you for your booking." Once approved, these can be sent automatically by EasyBiz or manually by your staff at any time.
How to Access Templates
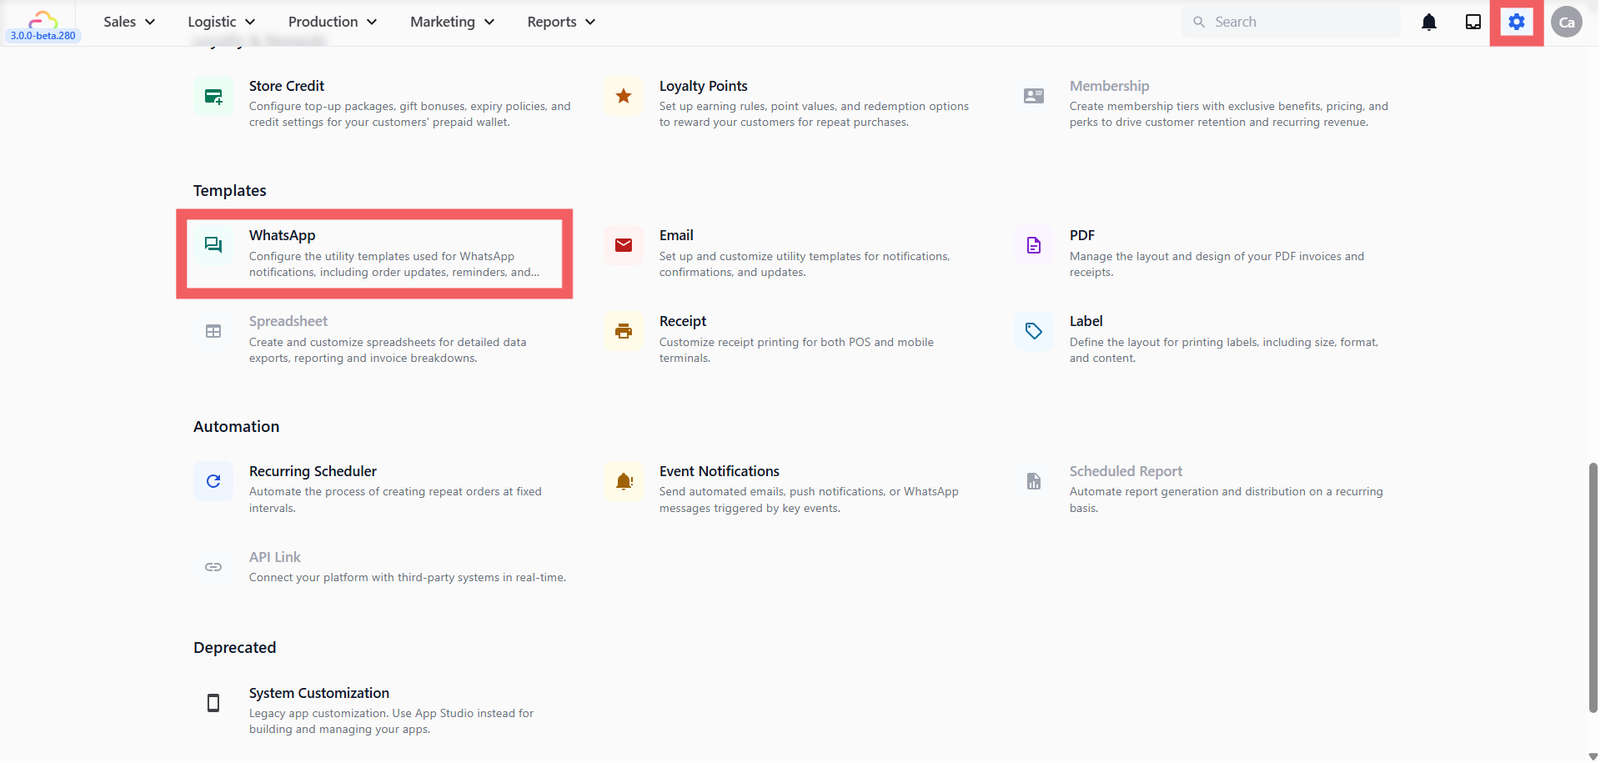
- Go to Settings
- Scroll down to the Templates section
- Click on WhatsApp
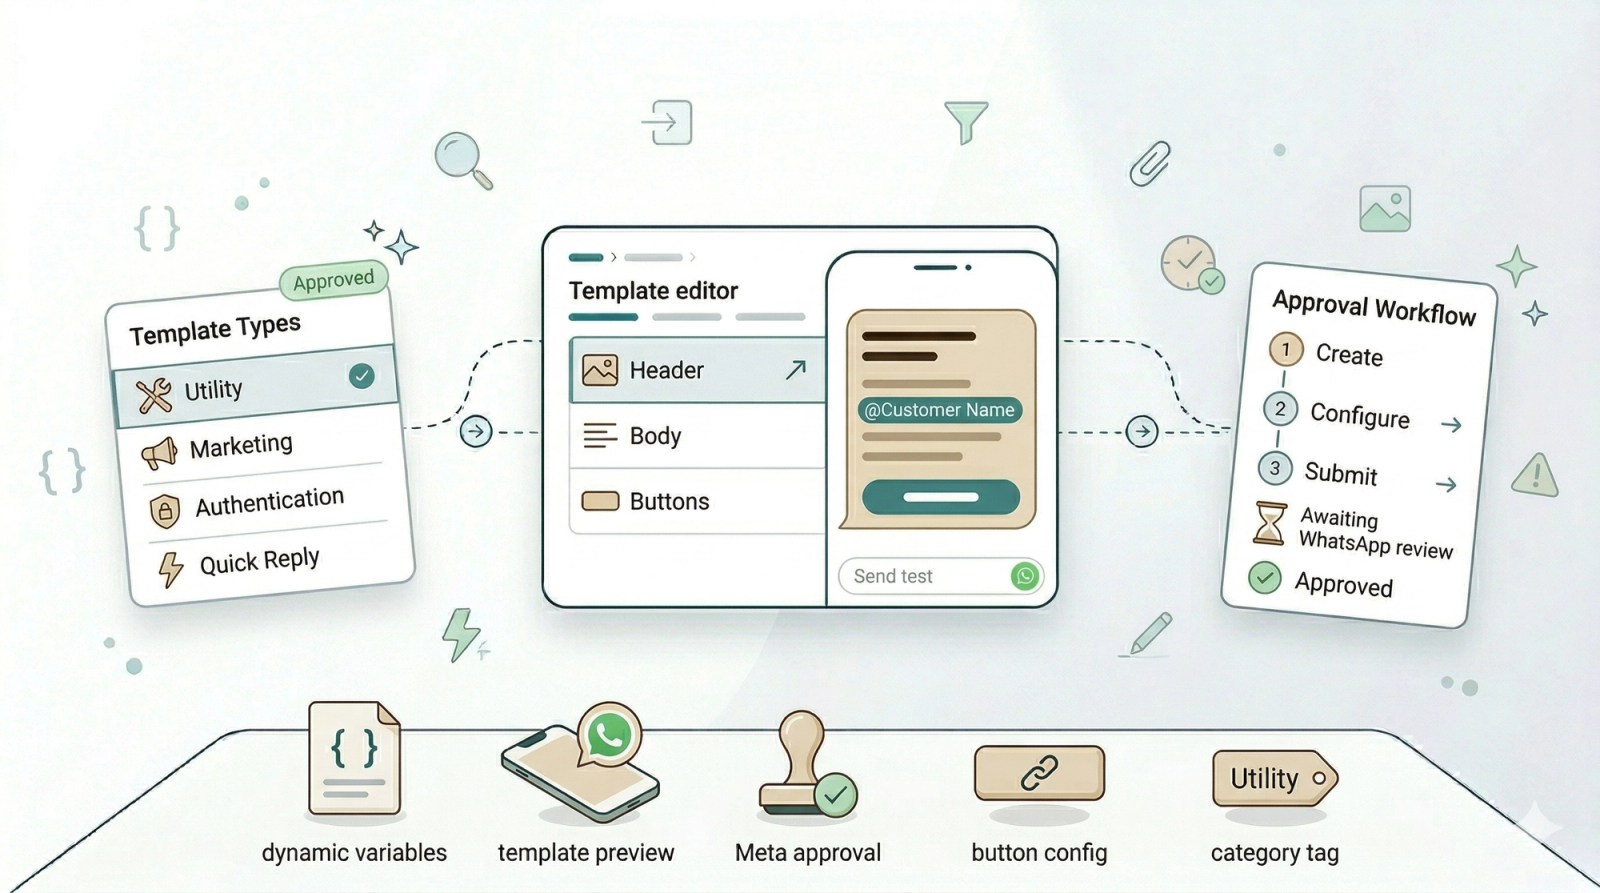
Types of Templates
When you create a new template, you'll need to choose a category:
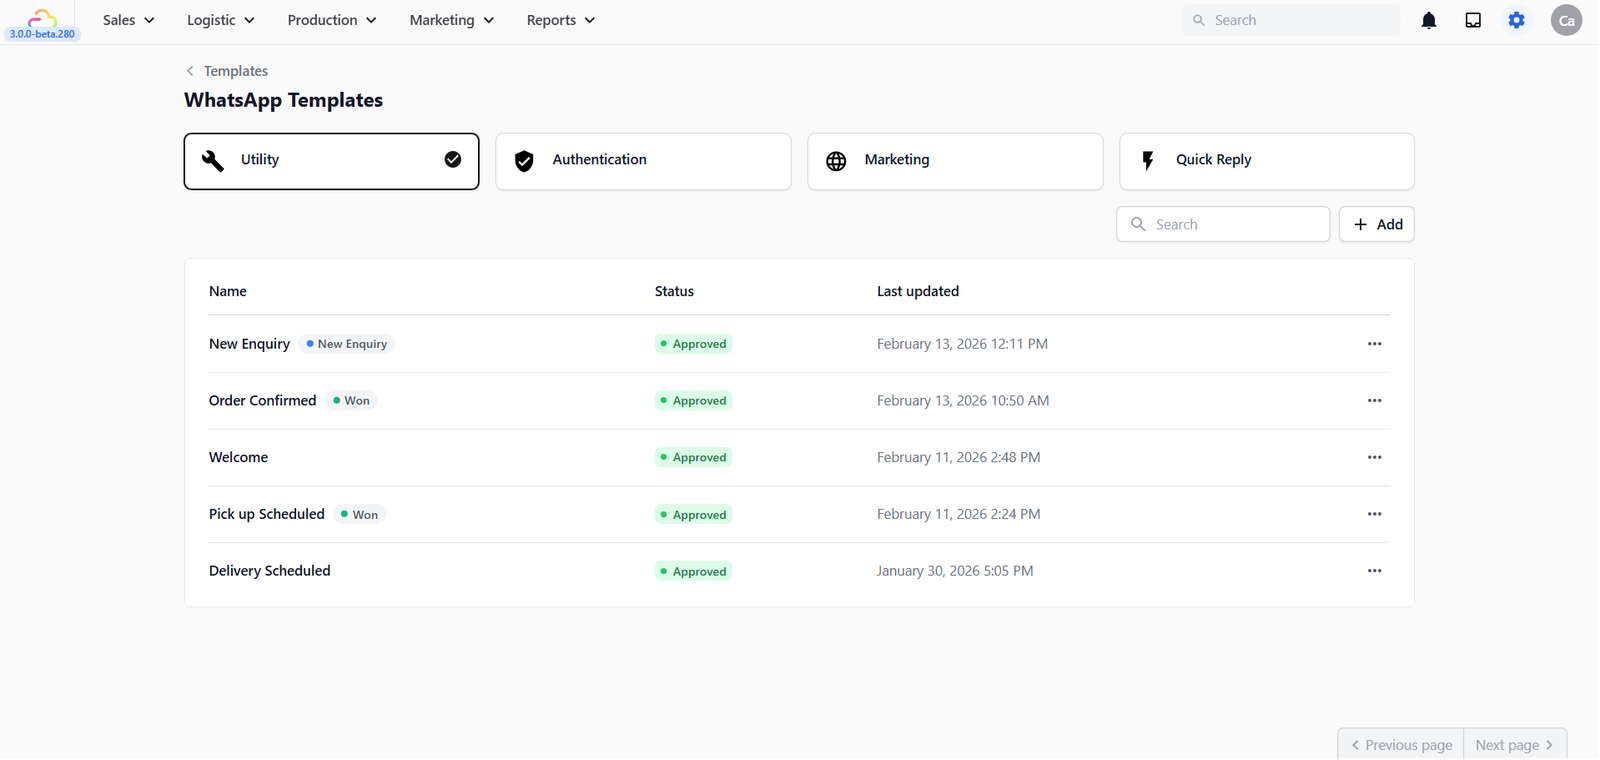
- Utility — For order and service updates. Use this for things like order confirmations, collection notices, payment reminders, and receipts. These are the most commonly used templates for service businesses.
- Marketing — For promotions and offers such as discounts, seasonal promotions, or announcing a new service. If Meta decides your Utility template sounds promotional, it will be moved here after approval.
- Authentication — For sending one-time passwords (OTPs) to verify a customer's identity. This is used when customers log in to your online store and need to verify their account.
- Quick Reply — Short, pre-written replies to common questions (e.g. "Our operating hours are Mon–Fri 9am–6pm"). These can only be sent when a customer has recently messaged you within the last 24 hours.
Step 1 — Start a New Template
1. Click the tab for the template type you want to create (e.g. Marketing)
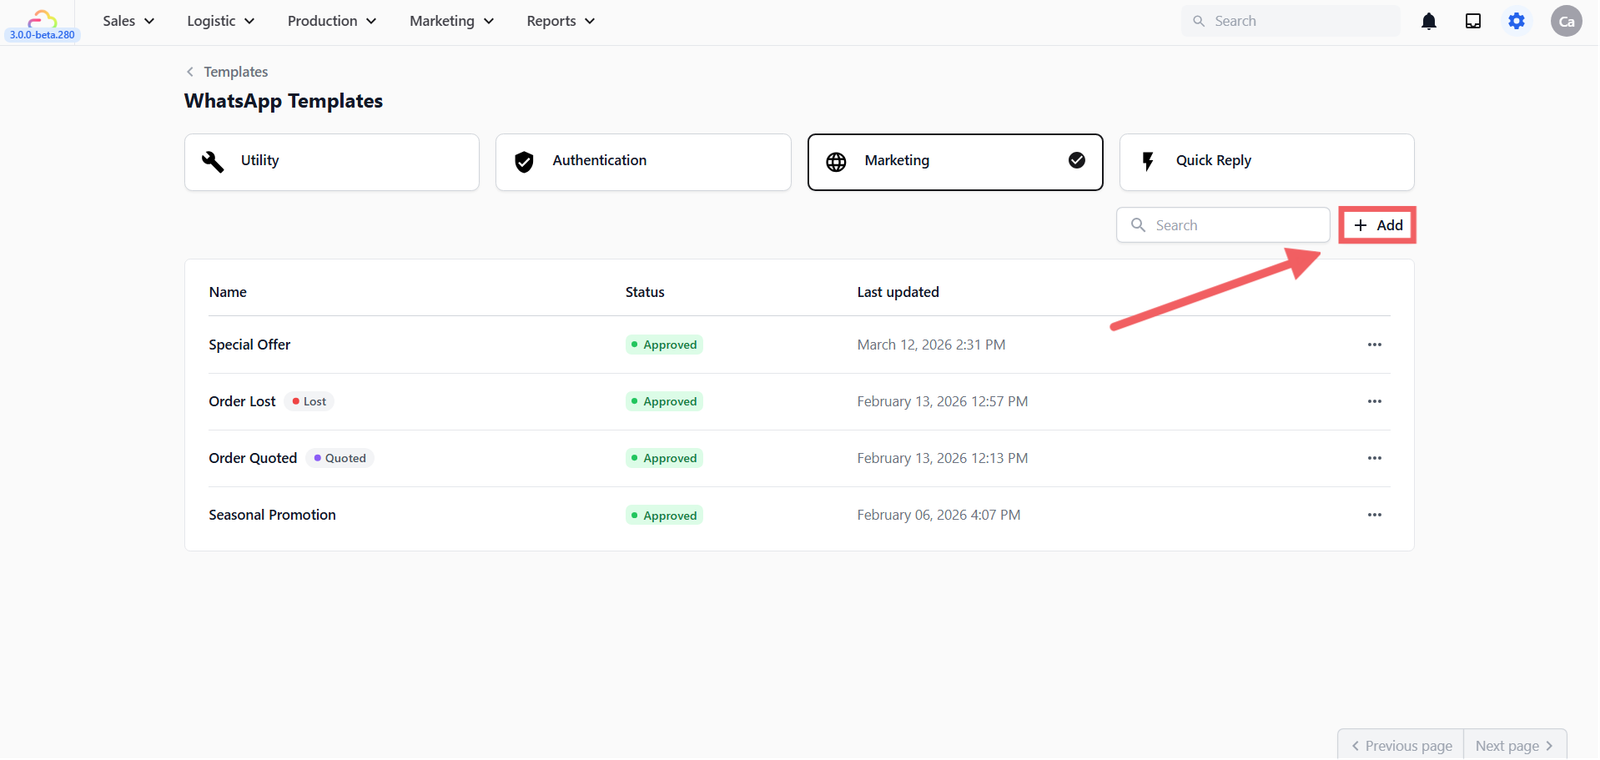
2. Click + Add
3. A dialog will open — fill in the following:

- Template name — An internal label for your team (e.g. Special Offer, Collection Ready). This is not shown to customers.
- Auto-move deal to stage — When this template is sent, EasyBiz can automatically move the customer to a specific stage in your sales pipeline (e.g. Quoted, Pending Payment). Leave as None if you don't need this.
- Default reply status — Choose what happens to the conversation after this template is sent:
- Replied — The conversation is marked as done for now. It moves out of your Pending list.
- Pending — The conversation stays in your Pending list, reminding your team this customer still needs follow-up.
- Template content — Choose a starting layout for your message. EasyBiz provides several pre-built options depending on the template type — pick the one closest to what you need. You'll be able to customise the content in the next step.
4. Click Create to open the template editor.
Quick Reply Templates — Additional Setup
Quick Reply templates require one extra step before you can create them — you need to set up a category first to organise your replies.
1. Click the Quick Reply tab
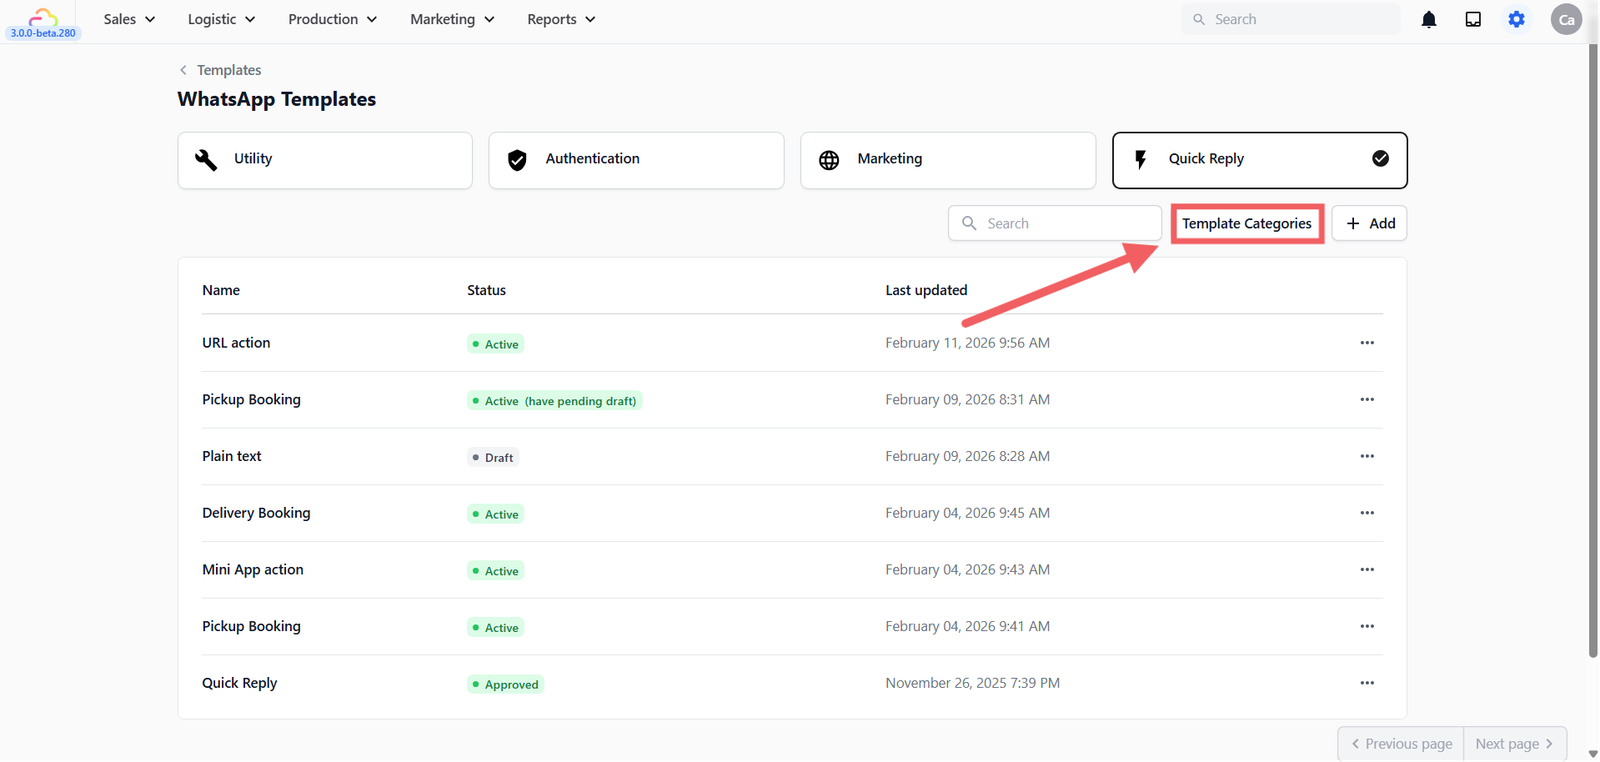
2. Click Template Categories
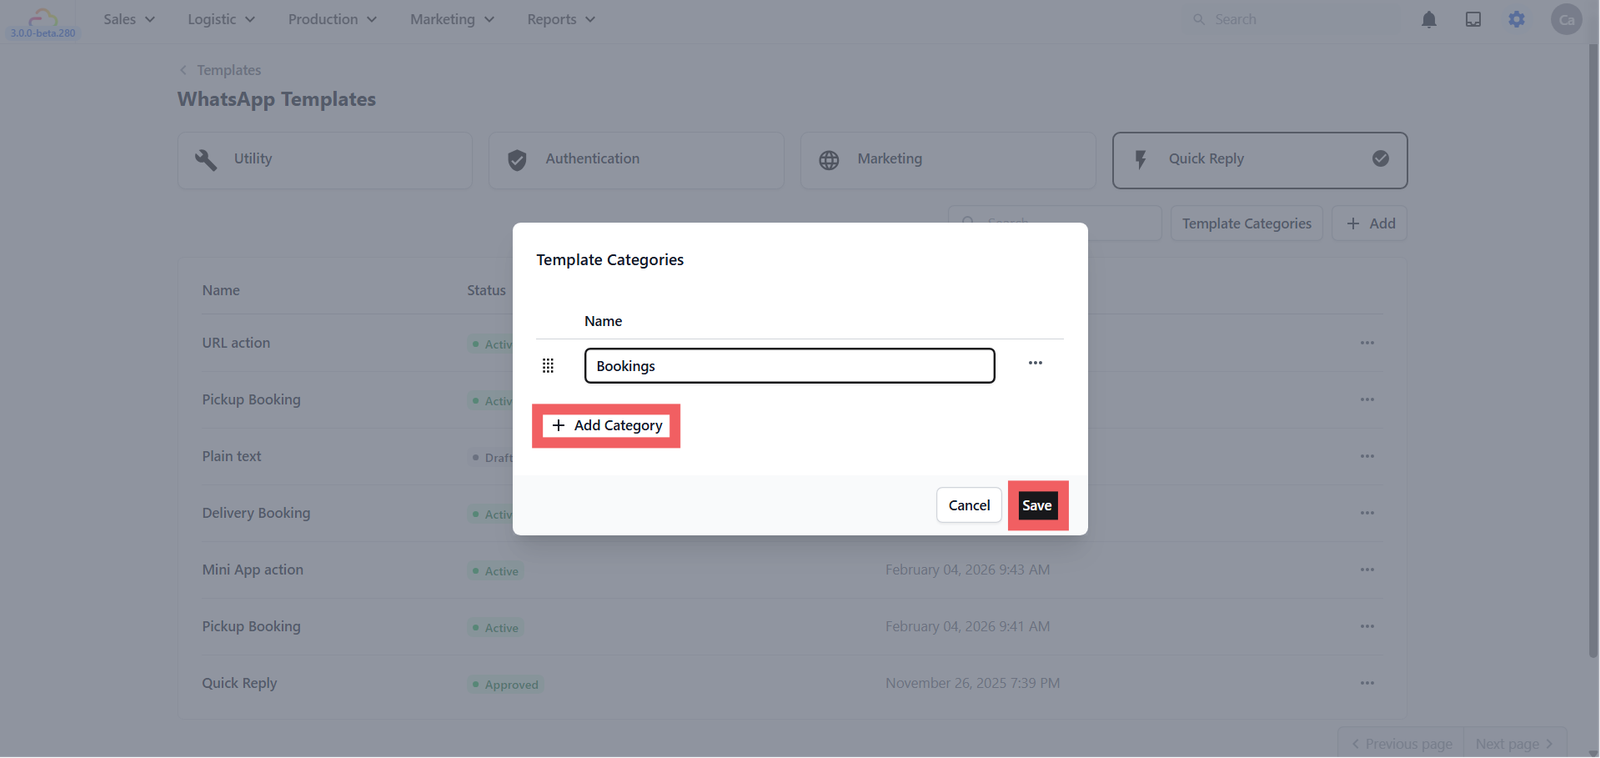
3. Click + Add Category, give it a name (e.g. Bookings, General FAQs), and click Save
4. You can now click + Add to create templates under that category
Step 2 — Configure Your Message
Once you click Create, you'll enter the template editor. On the left you'll see two tabs: WhatsApp and Block.
- The WhatsApp tab shows your template's approval status, and is where you configure Header, Body, and Buttons — click each section to expand it.
- The Block tab shows a more detailed view of the individual content blocks.

Header
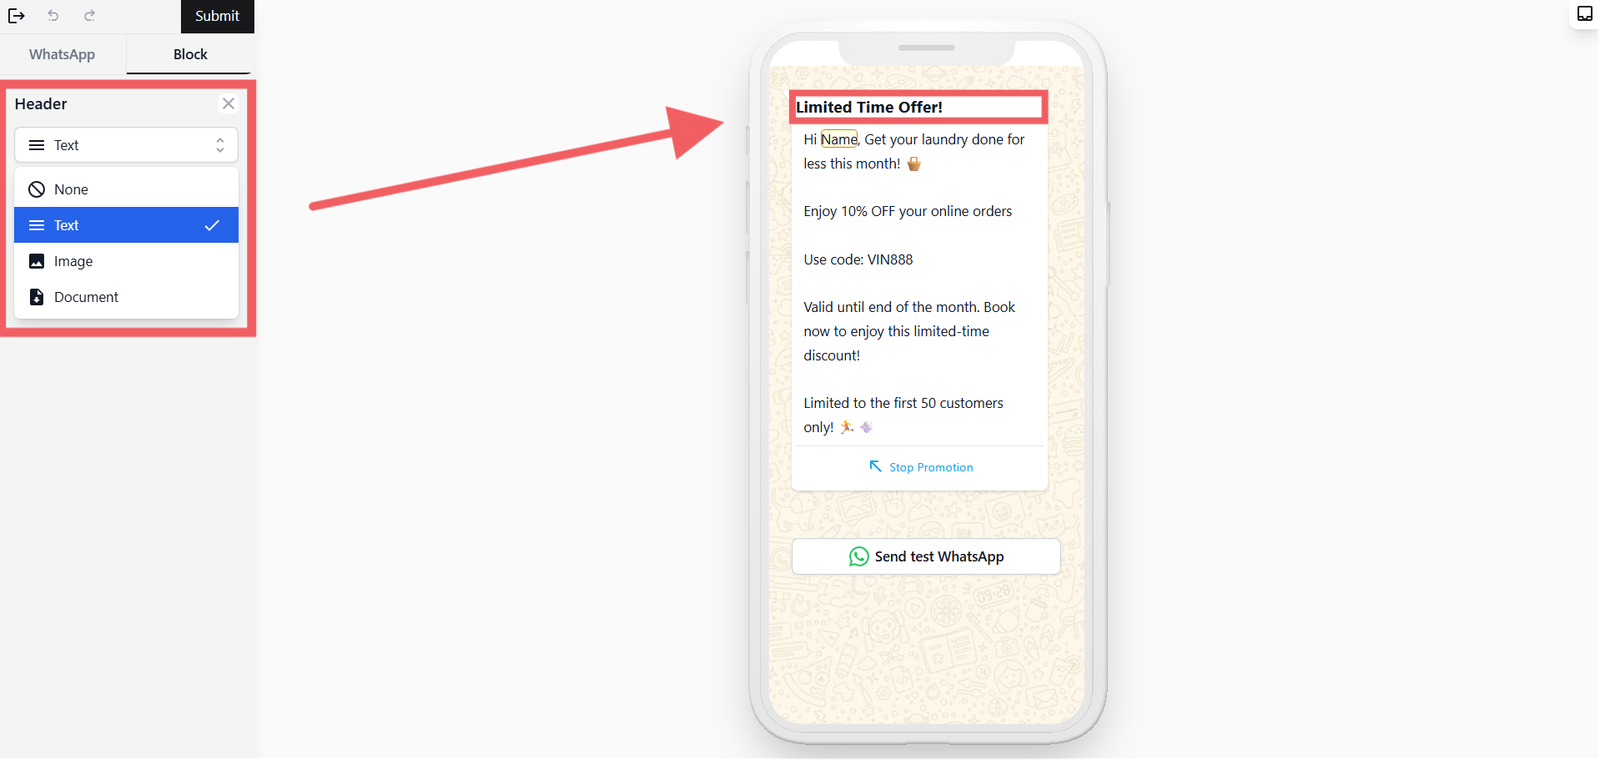
The Header appears at the top of your message. Choose one of:
- None — No header
- Text — A short bold title (e.g. Ready for Collection!)
- Image — A photo or banner
- Document — A PDF or file attachment
Body
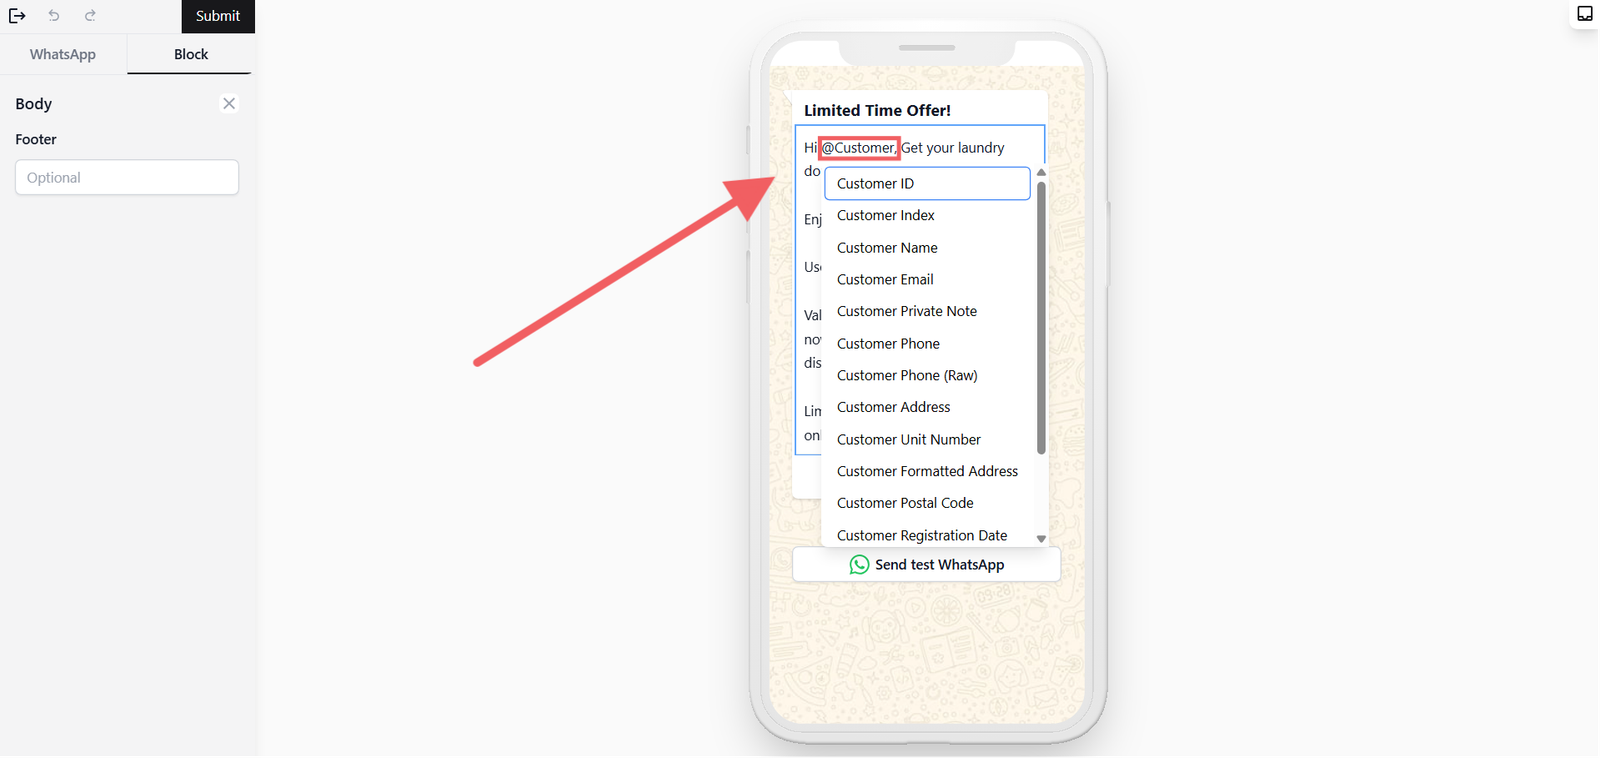
The Body is the main message your customer will read. Write it clearly and keep it short.
To personalise the message automatically, type @ to insert a placeholder — a spot that EasyBiz fills in with real information when the message is sent. For example, @Customer Name becomes "John" and @Order Number becomes the actual order number, so every customer gets a personalised message without your staff typing it manually.
The Footer field is also in this section — use it for a short closing line like your business name. Footers cannot contain placeholders.
Buttons (optional)
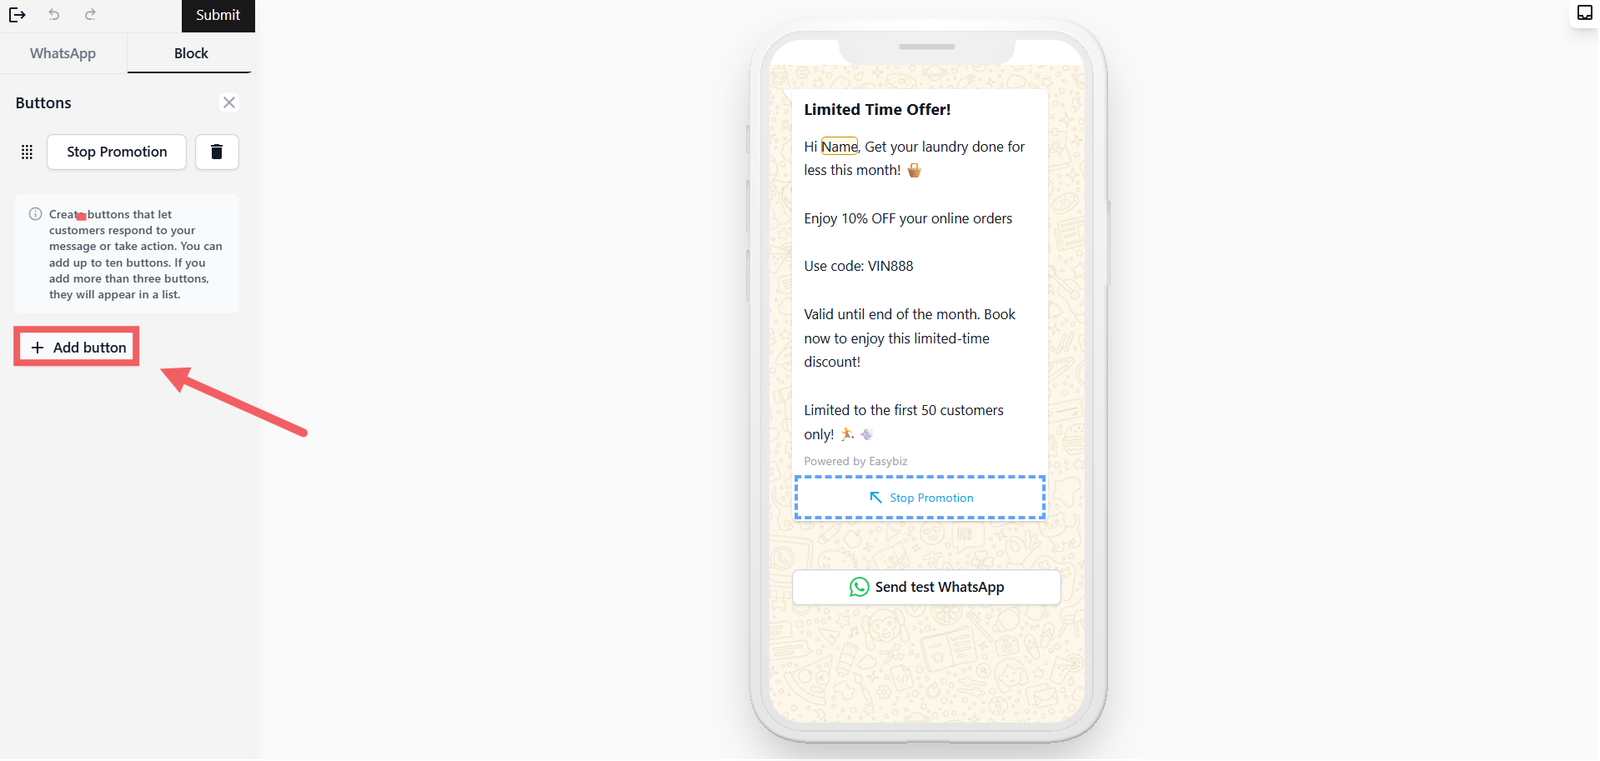
Buttons let customers take action directly from the message without having to type a reply. You can add up to 10 buttons. If you add more than 3, they'll appear as a list.
Click + Add button and choose a button type:

- Quick reply — A pre-set reply button the customer can tap (e.g. "Yes, confirm" or "Stop Promotion")
- Visit website — Opens a link you specify (e.g. your online store)
- Call phone number — Dials a phone number you enter
- Open Mini App — Opens a booking or order form inside WhatsApp — configure your Mini App here
If you are creating a Quick Reply template, you will see an Action section here instead of Buttons. It works the same way but includes additional options like Select Options and Media Carousel.

Step 3 — Submit for Approval
When you're happy with the template, click Submit at the top of the page. WhatsApp will review it — approval usually takes a few minutes but can take up to 24 hours.
Tips to Keep Your Template Approved as Utility
Meta's system automatically detects whether a message sounds like a notification or a sales pitch. Here's how to keep your template in the Utility category:
- Tie it to a specific customer action. A message like "Your order #1234 is confirmed" is clearly a response to an action. "Don't forget to book your next service!" is not.
- No promotional content — not even one line. Adding "Enjoy 10% off your next visit!" at the end of a receipt will move the entire template to Marketing.
- Be specific, not generic. Vague messages like "Congratulations!" or templates with only variables and no context are automatically classified as Marketing.
- Avoid open-ended questions. Phrases like "Let us know if you need help" or "Do you have any questions?" signal engagement intent to Meta's system.
- Use neutral, factual language. Write like a system notification. Stick to order number, status, date, amount — just the essentials.
Why This Matters — Marketing Templates and Message Delivery

If your Marketing messages suddenly stop being delivered, it's because WhatsApp has temporarily paused them due to low engagement from your recipients. — this is Error 131049, Meta's way of preventing spam.
Utility templates are not affected by this block because they are tied to customer actions, not unsolicited outreach. This is why it's worth writing your templates correctly as Utility from the start.
If you see Error 131049, create a new template as Utility and follow the tips above to make sure Meta keeps it in that category after review.
Give feedback
Up next
WhatsApp TemplatesPre-written messages for every stage of your customer journey — from first hello to final receipt.
Read more