
Setting Up Booking Options
In this article
This article walks you through the Booking Option dialog one field at a time, from picking the type to setting lead time, surcharge, and rescheduling rules. You will then save the option, assign it to a business unit, and check it on the preview calendar before customers see it. The steps are the same for all four types, with only a few fields differing between them.
Contents
Contents
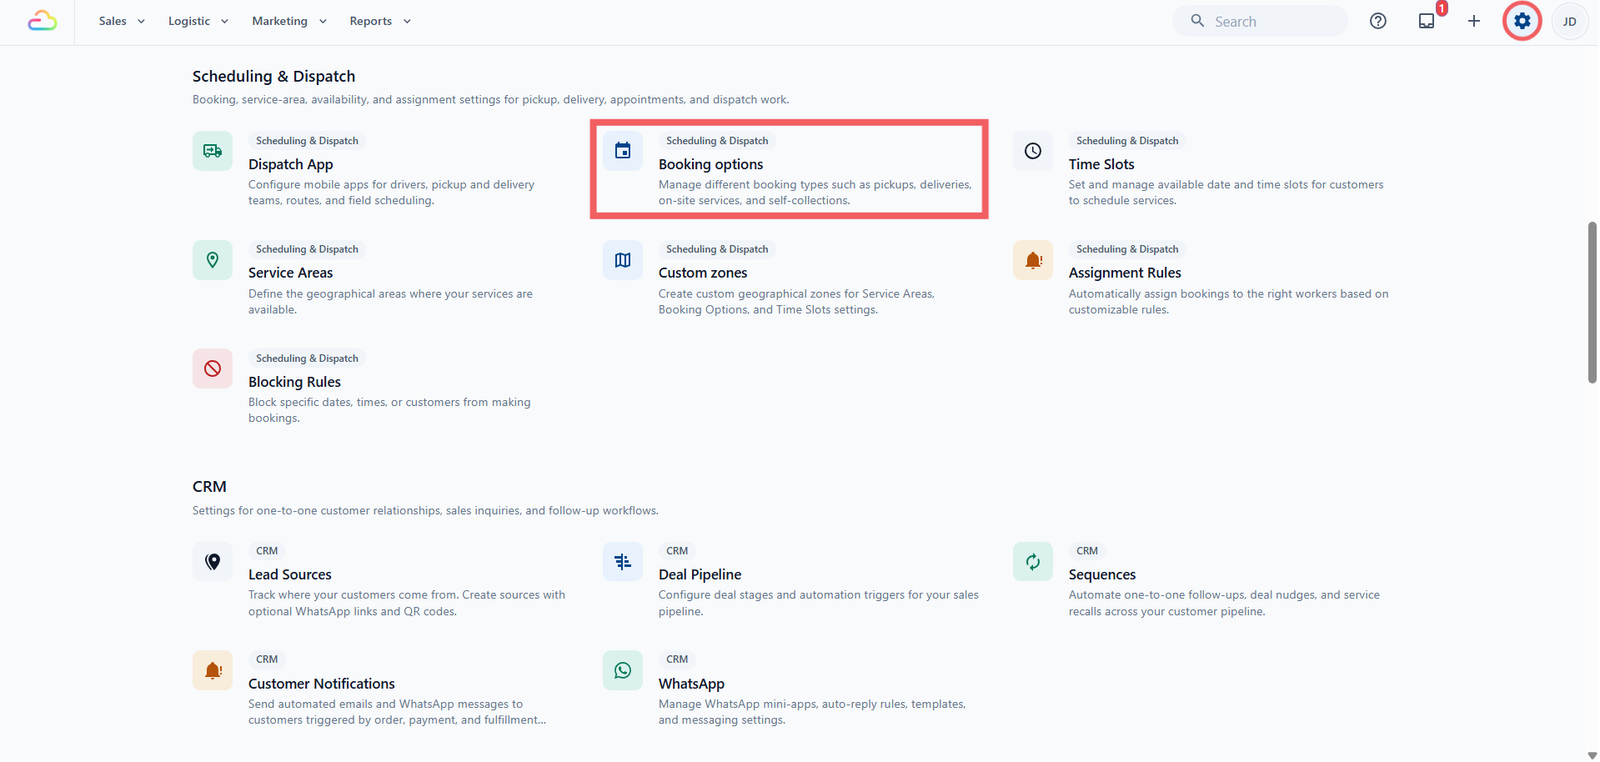
Where to Find It
- Click the ⚙️ Settings icon in the top-right corner.
- Under the Scheduling & Dispatch section, click Booking Options.
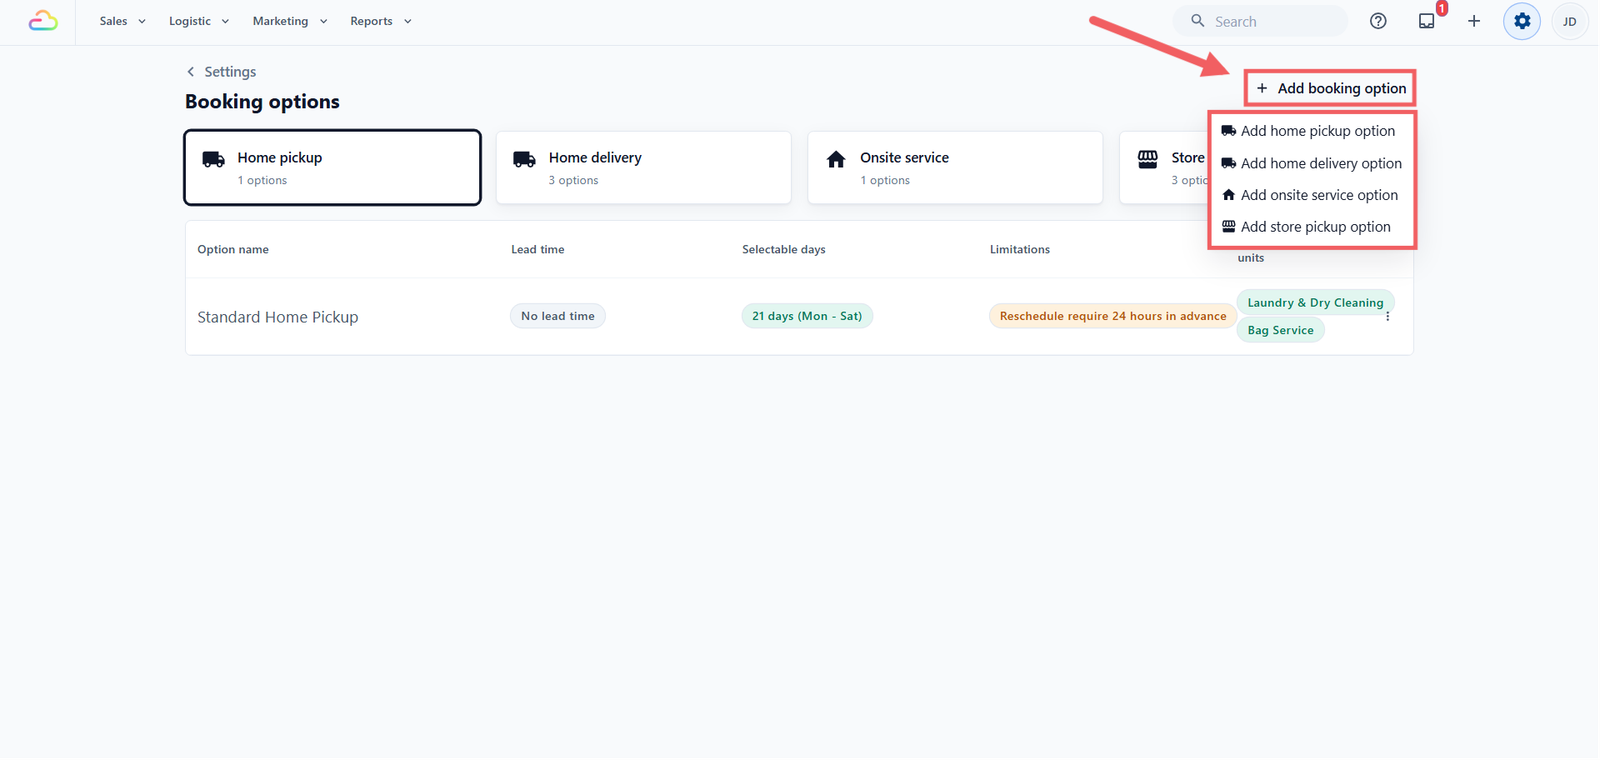
- Click Add booking option in the top right.
- From the dropdown, choose Add home pickup option, Add home delivery option, Add onsite service option, or Add store pickup option.
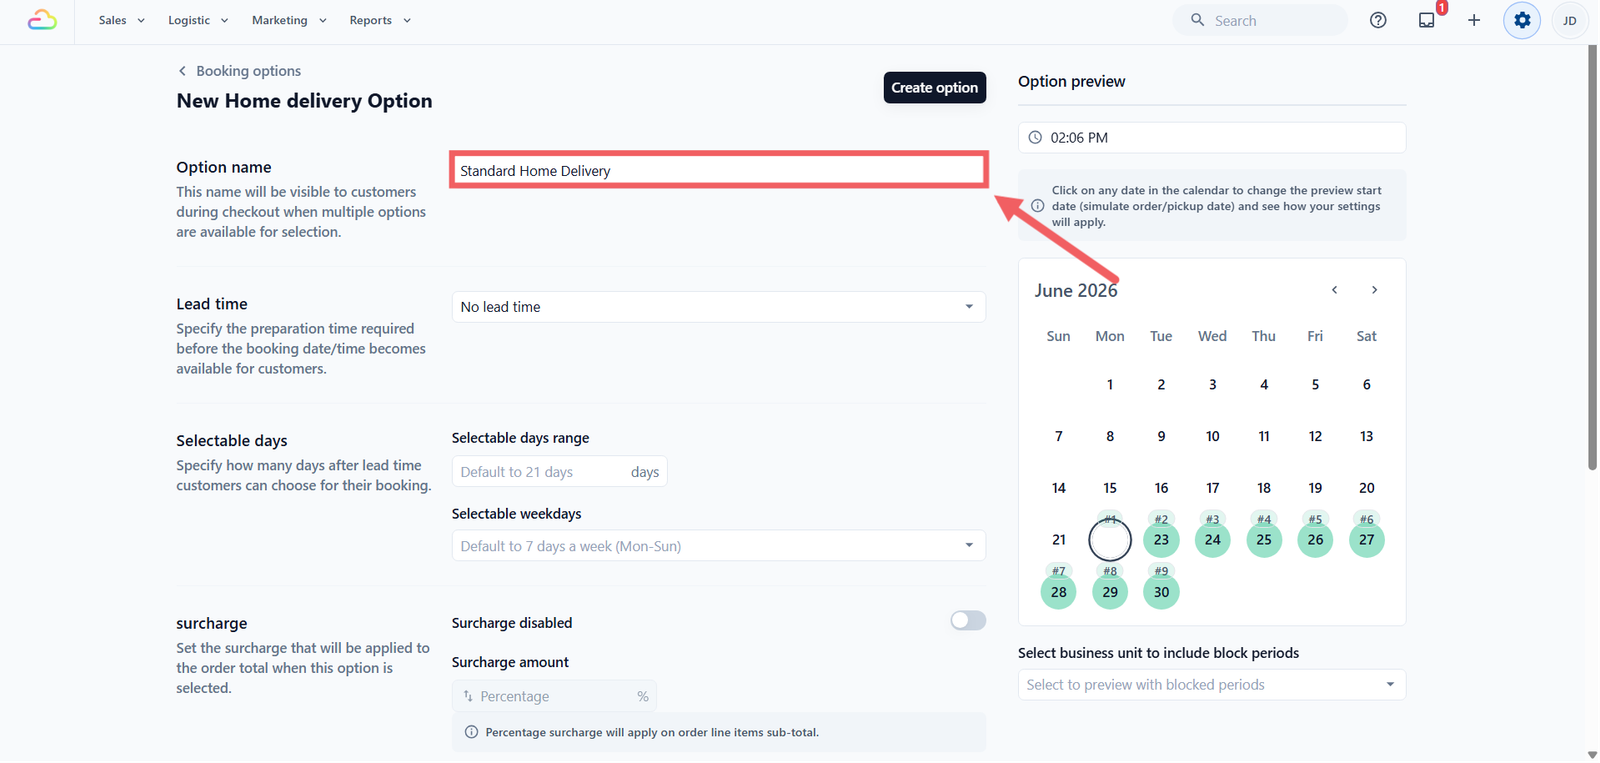
Once you choose a type, the option editor opens. The type is fixed after you save, so pick the right one. Each field in the editor is explained below.
Option Name
This is the label the customer sees at checkout when more than one option is available, so use plain words they will recognise, like "Standard Home Pickup", "Express Same-Day Delivery", or "Walk-In Drop-Off".
Lead Time
Lead time is the minimum notice you need before a customer can book. The dropdown offers four modes, and the easiest way to understand each is with a real example.
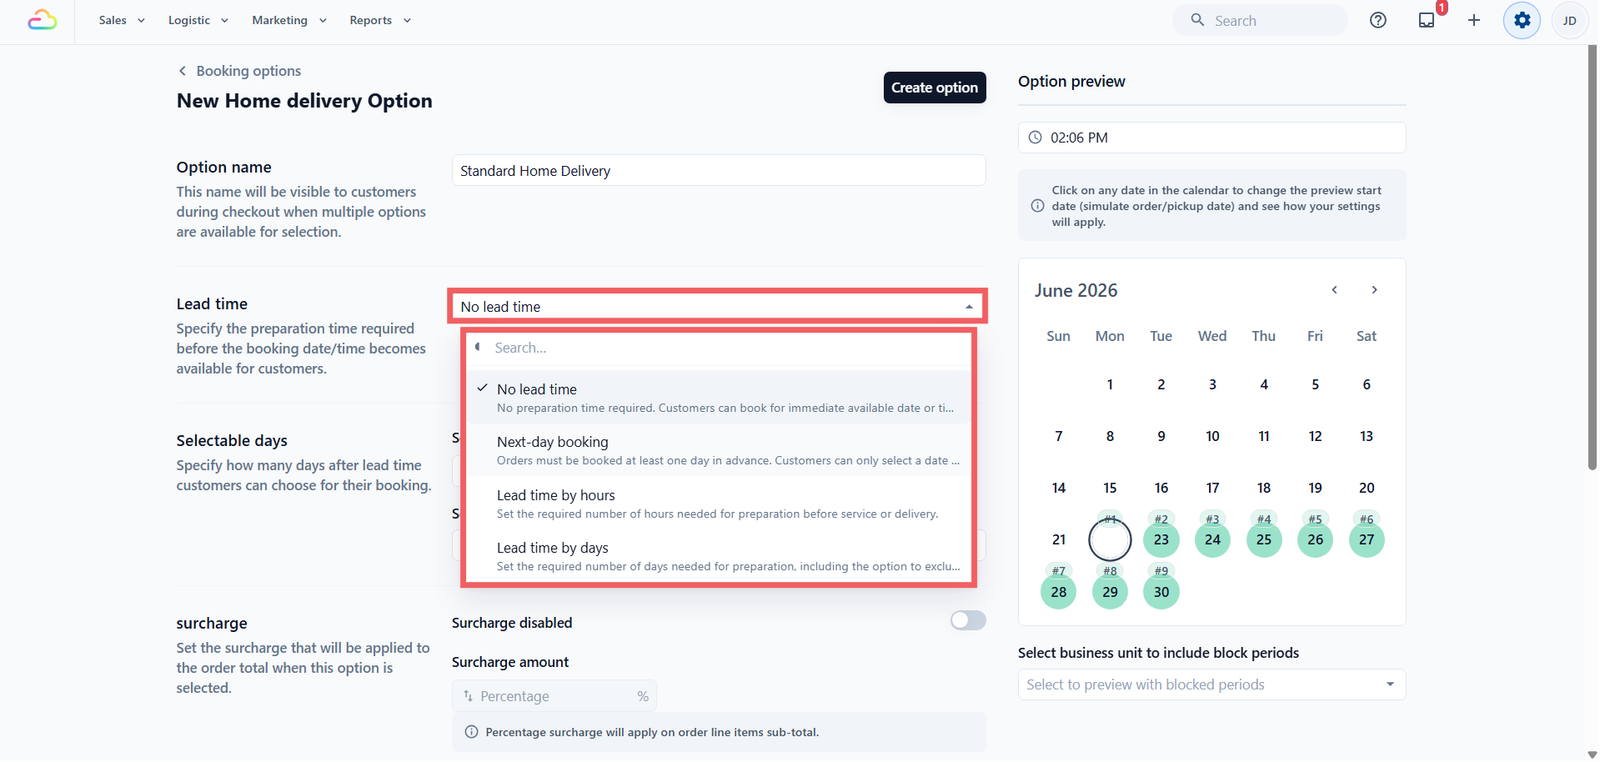
| Mode | What it means | Example |
|---|---|---|
| No lead time | The customer can book right away, including the earliest slot today | A customer at 10 AM can book a slot later that morning |
| Next-day booking | The earliest date is always tomorrow, whatever time they book | A customer at 10 AM today gets tomorrow as their earliest date |
| Lead time by hours | The customer must give a set number of hours' notice | With 3 hours, a customer booking at 10 AM can be served from 1 PM |
| Lead time by days | The customer must give a set number of working days' notice | With 1 day, a customer booking today gets tomorrow at the earliest |
Lead Time by Days: Workdays and Cut-Off
These two fields appear only when you choose "Lead time by days". Together they decide exactly when the countdown starts.
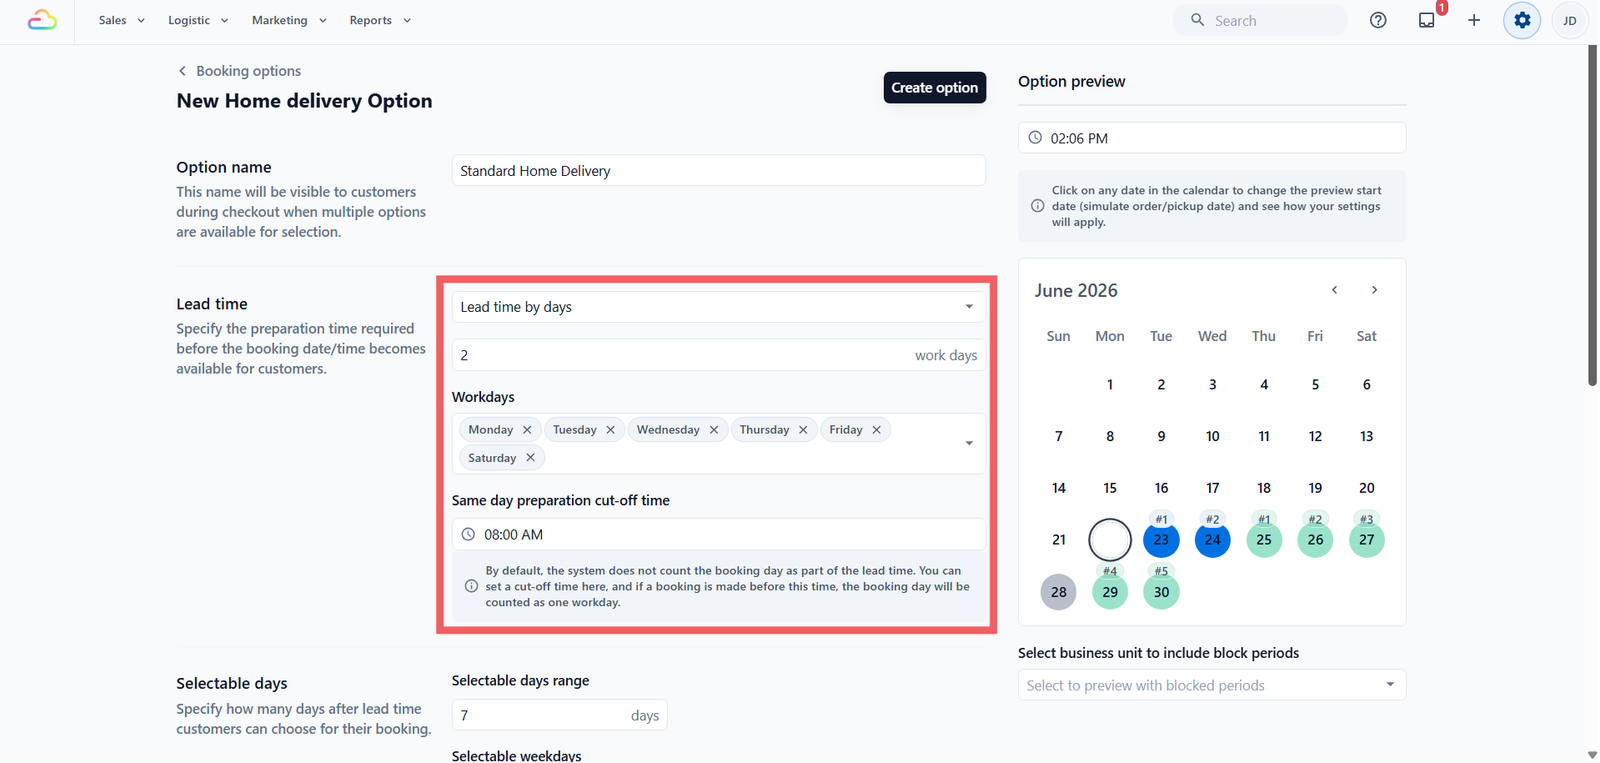
- Workdays -> Tick the weekdays your shop counts toward the lead time, and untick the days you are closed.
- Same day preparation cut-off time -> This decides whether today counts as the first day. Left empty, today never counts, so the countdown starts tomorrow. Set to a time like 08:00, a booking placed before 8 AM lets today count as day one, while a booking after 8 AM starts counting from tomorrow.
Here is how it works together. Say your shop is open Monday to Saturday (Sunday unticked), with Lead time by days set to 1 and the cut-off at 08:00:
- A customer books Friday at 7 AM. Today counts, so the one-day countdown lands on Saturday.
- A customer books Friday at 9 AM. Today no longer counts, so the countdown starts Saturday and lands on Monday, because Sunday is skipped.
Selectable Days
This controls how far ahead customers can choose, after lead time is applied.
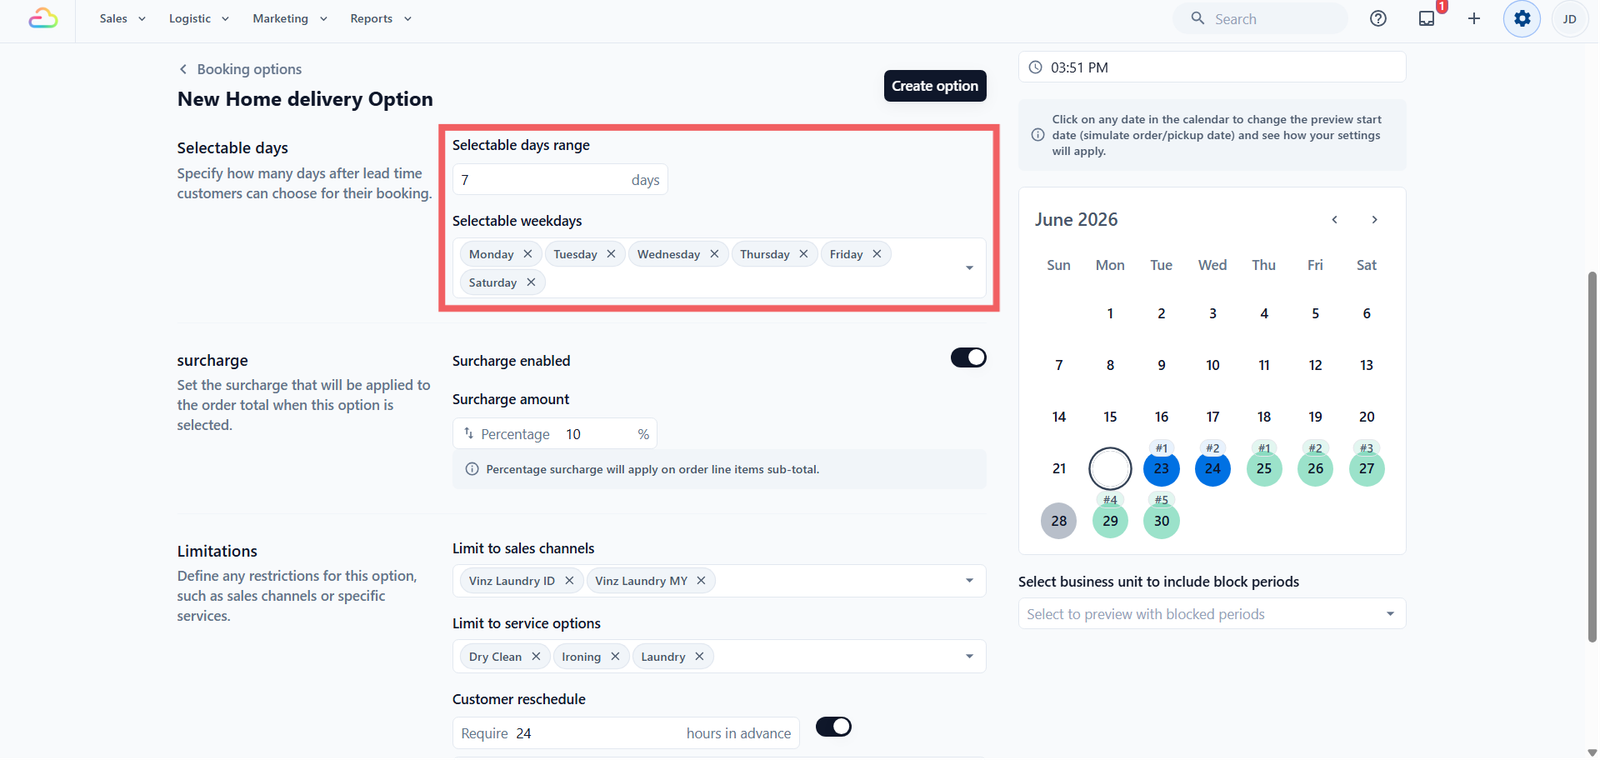
- Selectable days range -> A number, defaulting to 21. This counts bookable days, not calendar days. So if Sundays unticked, a range of 21 gives 21 actual Monday-to-Saturday dates.
- Selectable weekdays -> Tick the weekdays you accept bookings on. Untick Sunday and Sundays never appear in the customer's date picker.
Surcharge
Home delivery, Onsite service, and Store pickup can each carry an optional surcharge, while Home pickup cannot.
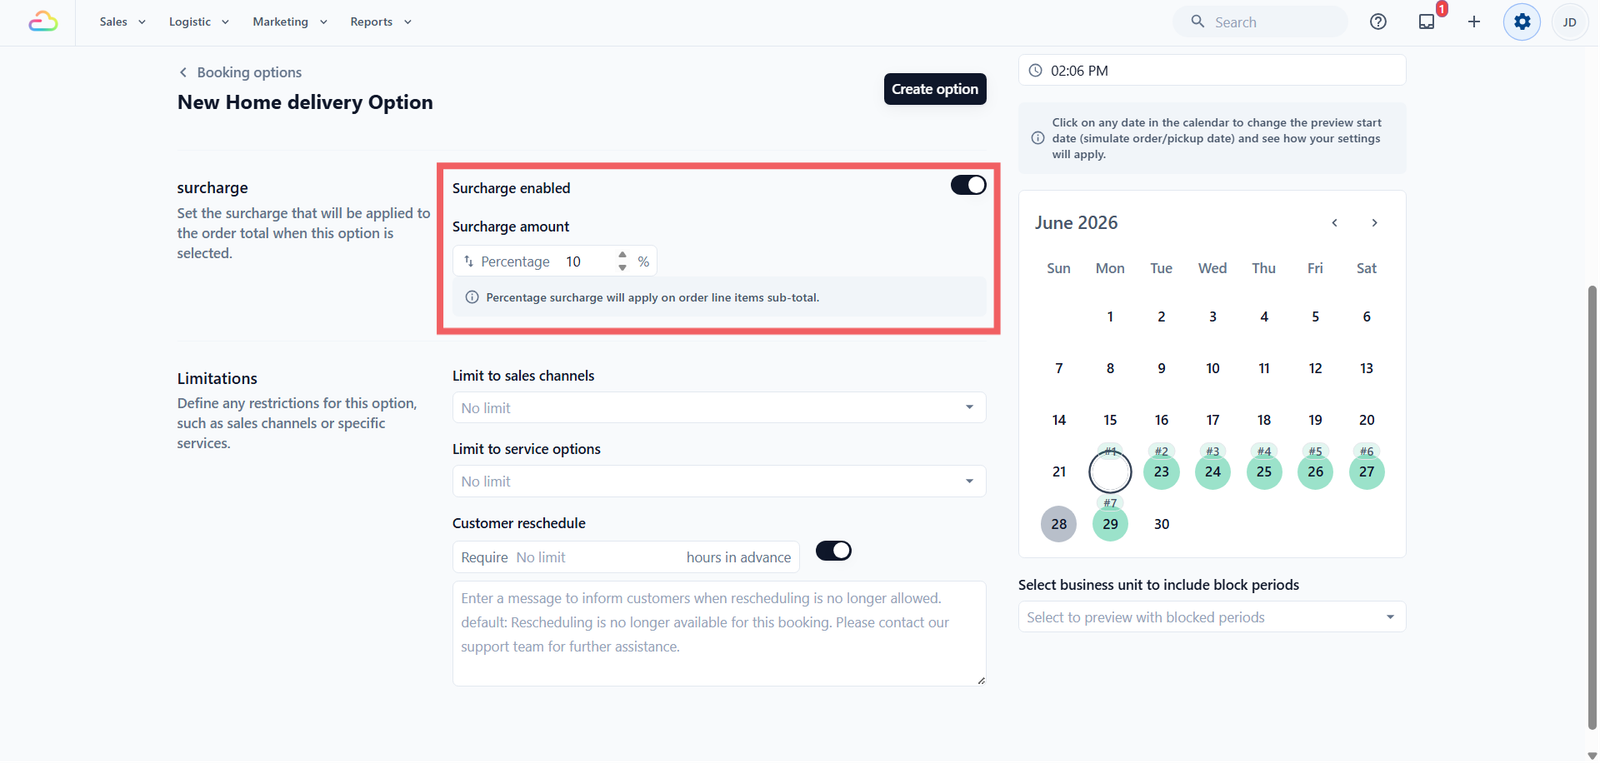
Turn the toggle ON and a value field appears. You can set it as a percentage of the line items subtotal, or a flat amount in your currency, switching between the two by clicking the unit indicator next to the number.
| Mode | What the customer pays on a $50 order |
|---|---|
| Off | $50 |
| 10% | $55 |
| 50% | $75 |
| Flat $5 | $55 |
Limitations
These three settings are all optional. Leave them empty for the widest reach.
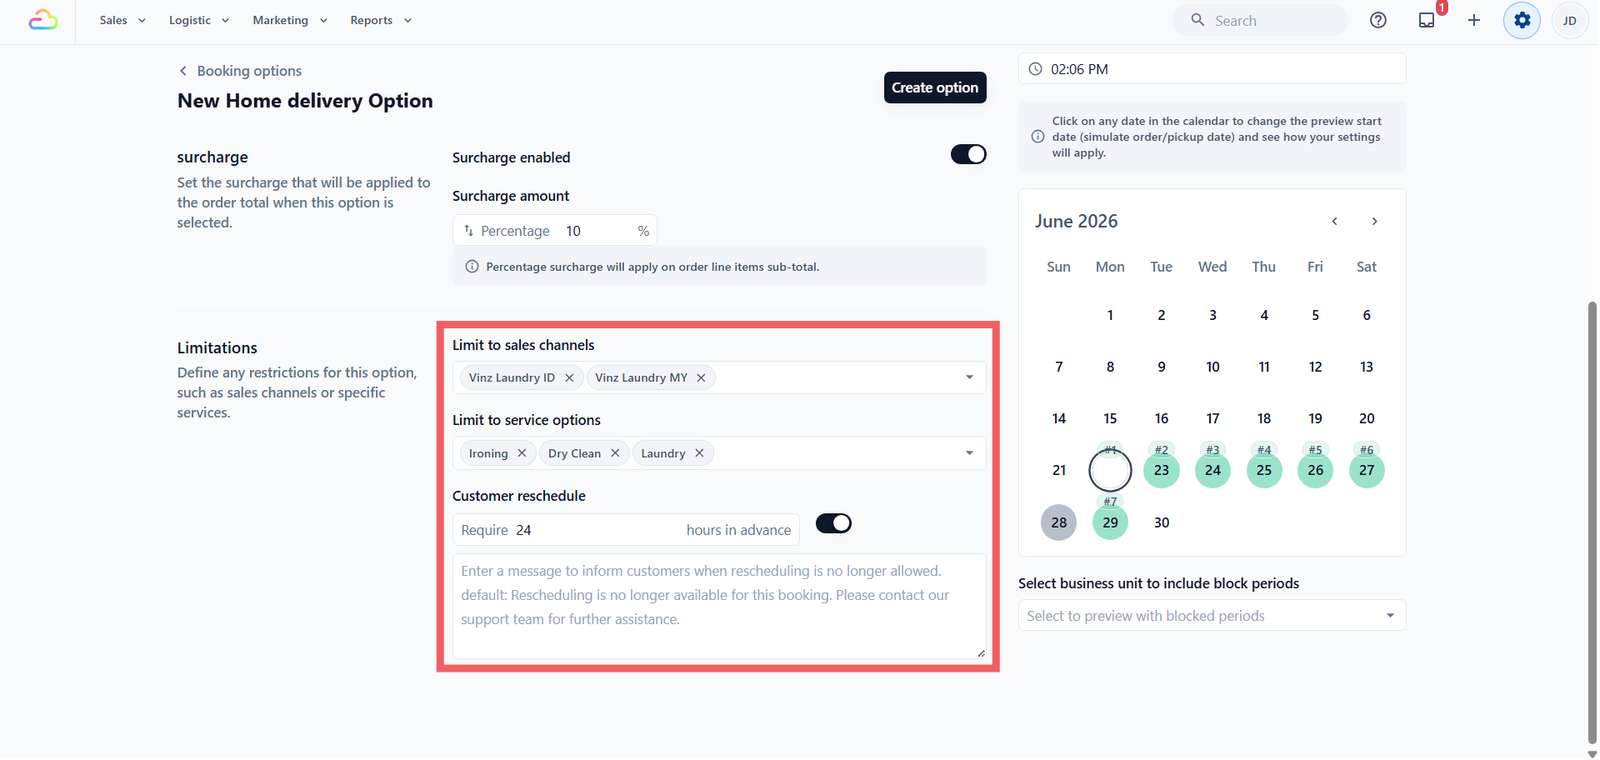
- Limit to sales channels -> Choose which stores or online stores show this option. Empty applies it to all.
- Limit to service options -> A Service Option is a sub-variant of a service, like "Dry Clean" versus "Wash and Fold" under one Laundry business unit. Use this to show the option only when the customer's cart includes certain service variants. Empty applies it to all.
- Customer reschedule -> This row, labelled with "Require ... hours in advance" and a toggle, controls whether customers can change the date after booking. It is on by default.
| Configuration | Result |
|---|---|
| Toggle on, hours empty | Customer can reschedule up to the moment of pickup |
| Toggle on, hours set | Customer must give that much notice |
| Toggle off | Customer cannot reschedule, and sees the message you type below |
Below the toggle is a free-text message shown when rescheduling is off. Leave it empty to use the system's default.
Saving and Assigning to a Business Unit
The save button shows Create option for a new option, and shows Save updates when editing existing.
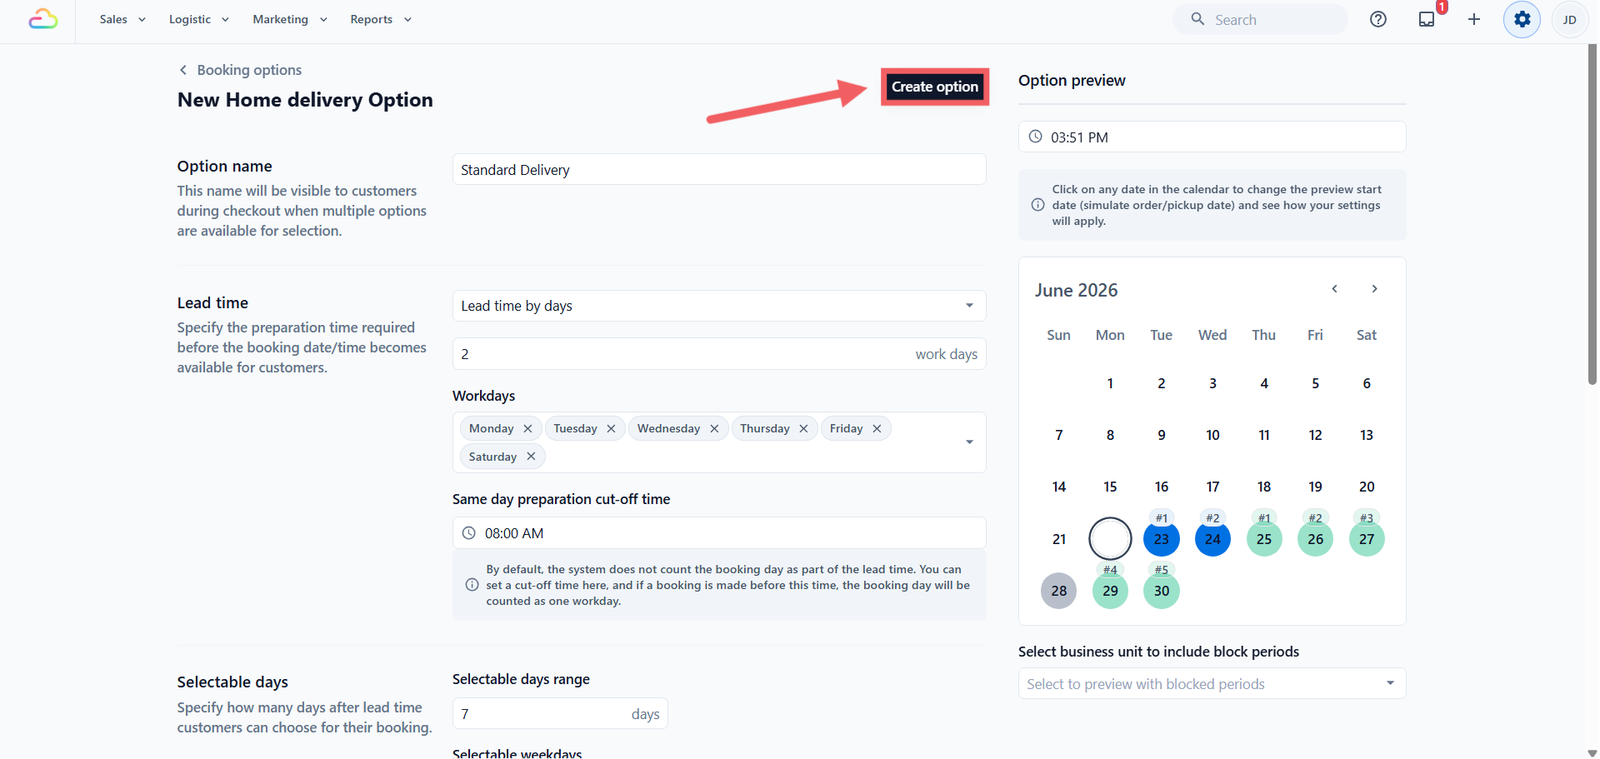
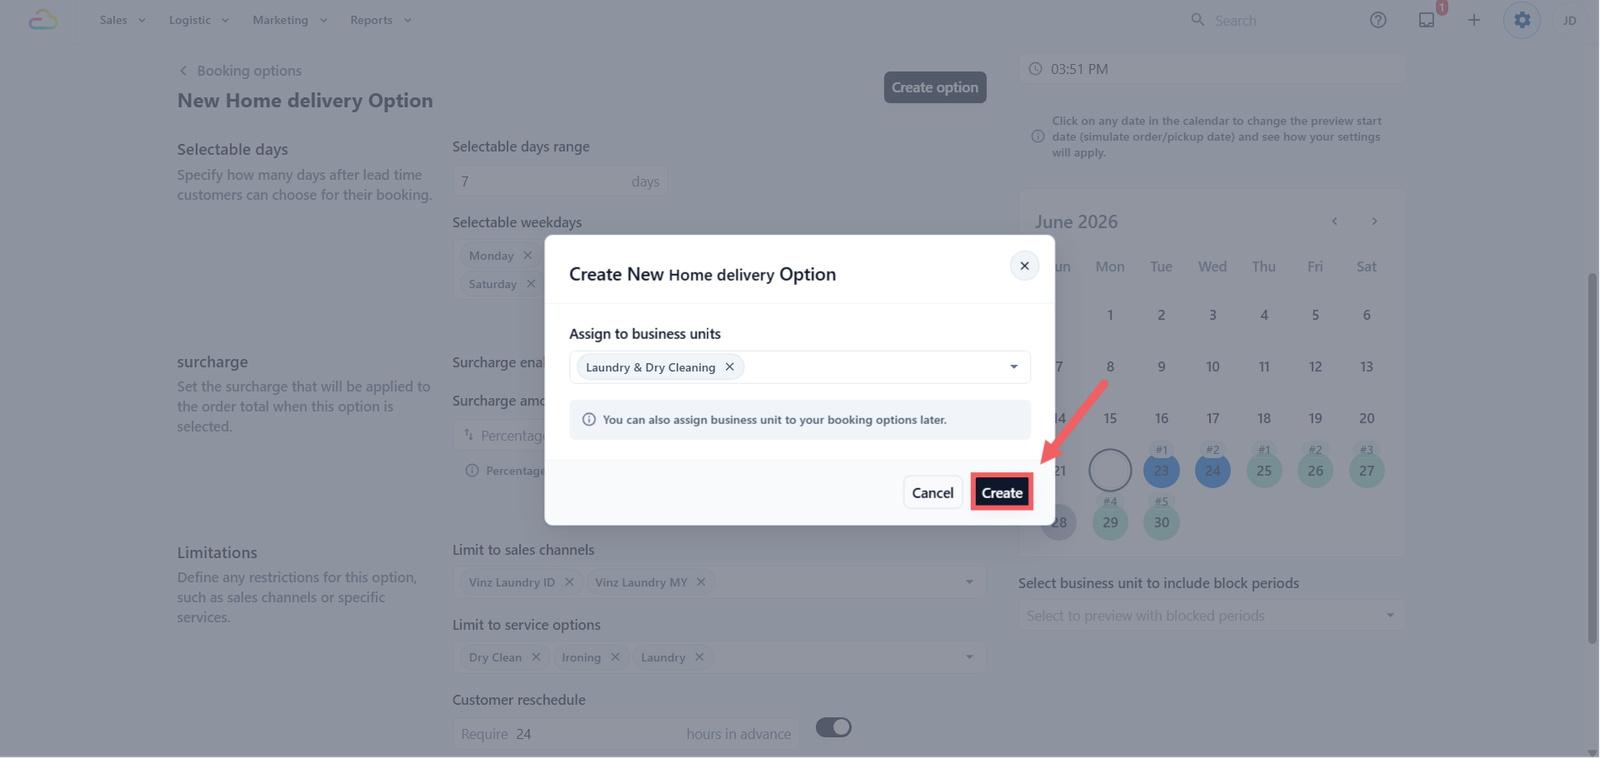
When you click Create option, a dialog asks which business units to assign the option to. You can pick one or more now and click Create, or close the dialog and assign later from the row menu.
Preview Before Going Live
The right side of the edit page has a preview calendar with your selectable days shaded in. Use it to check how lead time, workdays, and selectable days combine before you assign the option.
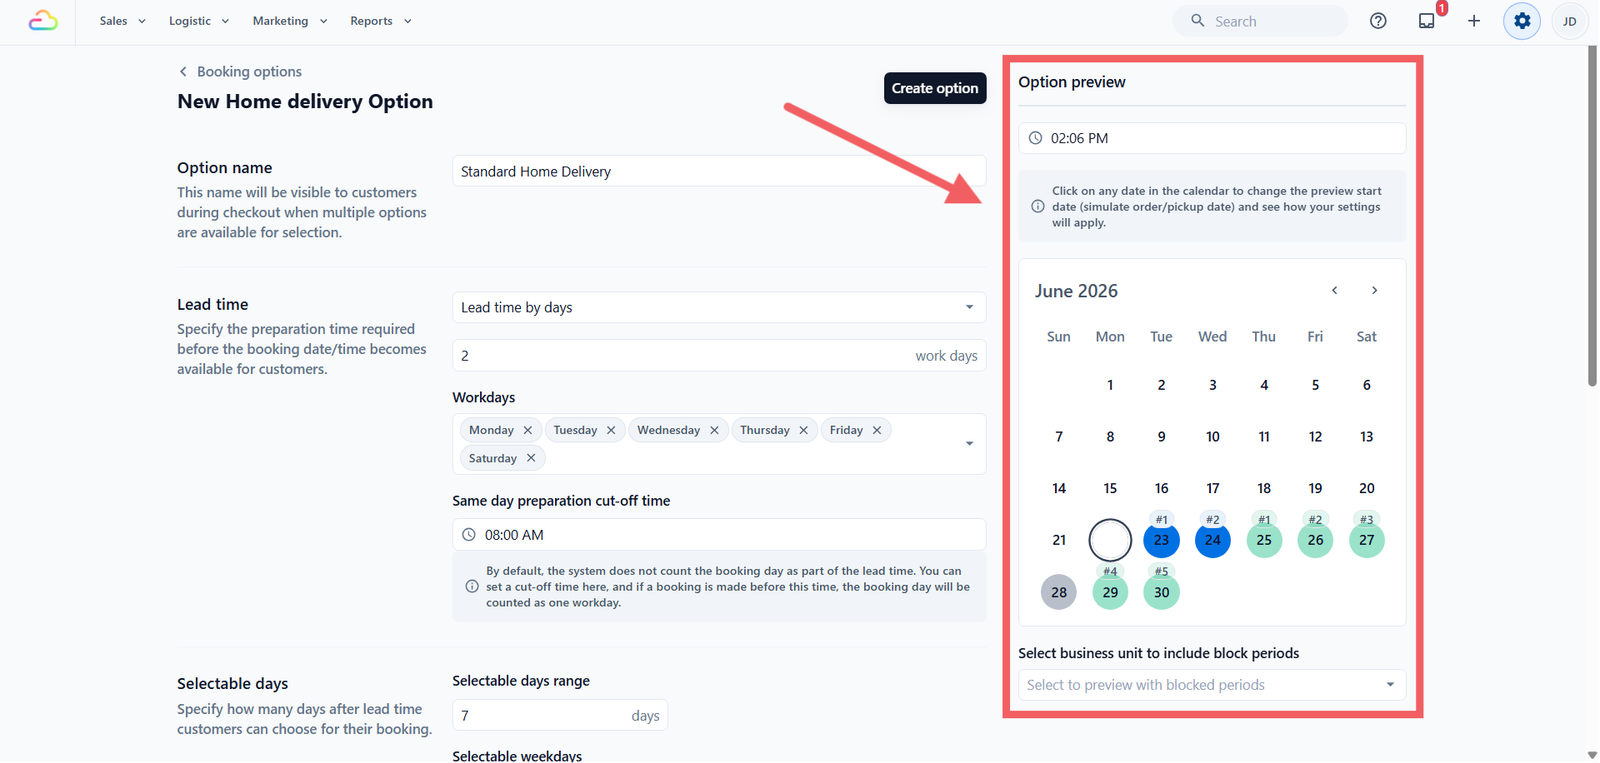
The preview shows a calendar with three colour indicators:
- Blue (Workday) -> days counted as preparation time based on your lead time setting
- Green (Selectable) -> days the customer can actually pick
- Grey (Off Day) -> blocked days, unchecked weekdays, or dates outside the selectable range
You can manually adjust the Preview Time and Date at the top right of the calendar to test different conditions:
- Change the time to before your cut-off versus after to see how the first available date shifts
- Click a different date on the calendar to simulate a booking made on a future day
The List View and Row Menu
On the main Booking Options page, your options are grouped by type, with each row showing the name, lead time, selectable days, limitations, and the business units it serves, or an Inactive badge if none. The row three-dots menu on the right offers:
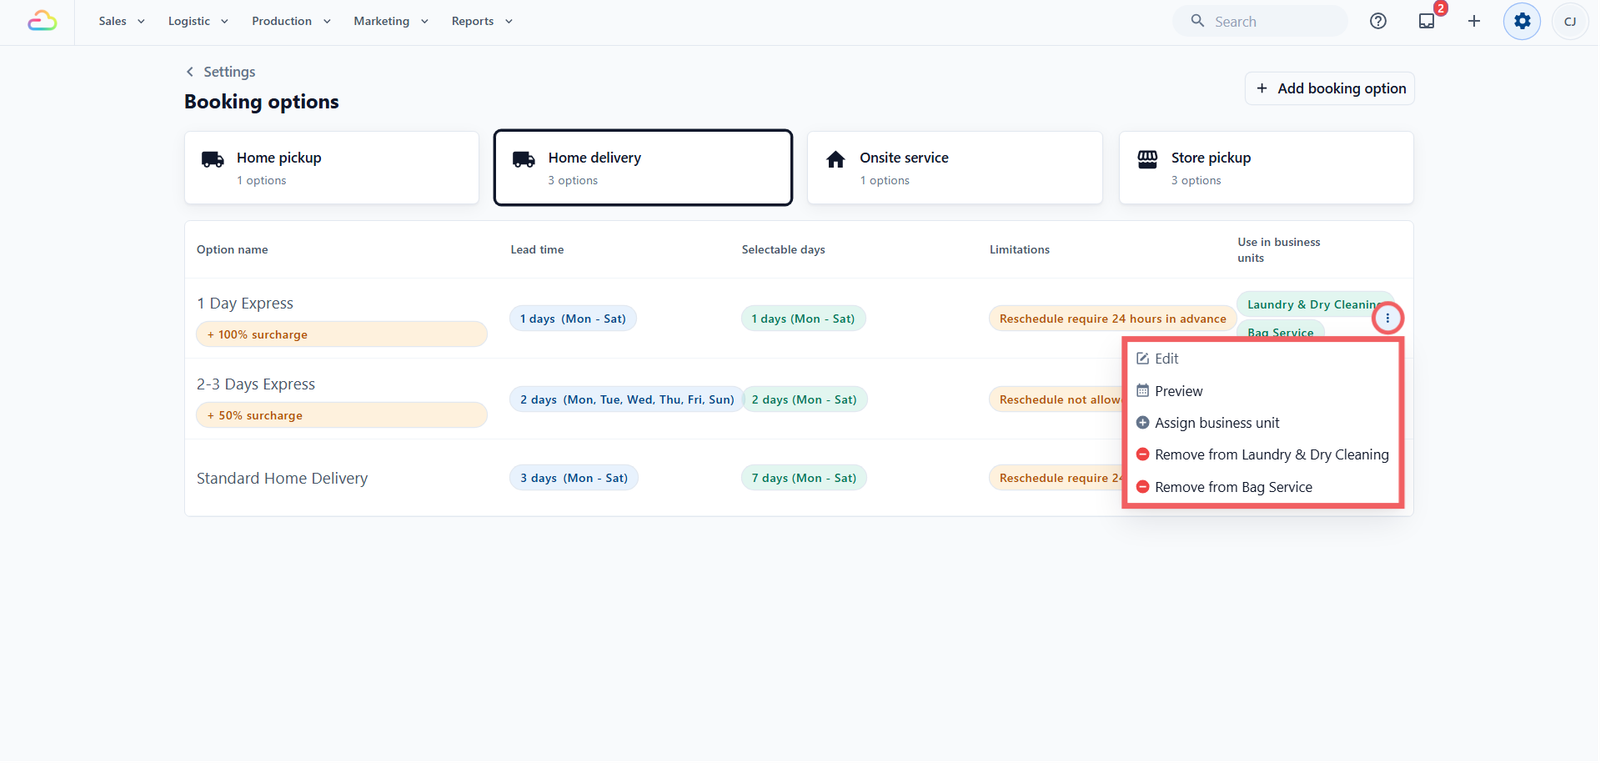
| Action | What it does |
|---|---|
| Edit | Opens the edit page for this option |
| Preview | Opens the calendar in a side drawer |
| Assign business unit | Adds another business unit to this option |
| Remove from business unit | Detaches the option from one business unit |
To delete an option, first remove it from every business unit it serves. The Delete option entry then appears in the menu. When you delete, the system warns you if the option is linked to any Time Slots and removes that link for you. Orders already placed are never affected.
FAQs
If I offer both a home pickup and a home delivery option, will the customer be charged twice?
No. Home pickup cannot carry a surcharge at all. If you want an express fee for fast delivery, you set it on the delivery option, and only that option carries it.
Can I have more than one delivery option with different speeds?
Yes. A common setup is "Standard Home Delivery" with a two-day lead time and no surcharge, alongside "Express Home Delivery" with same-day lead time and a surcharge. Both appear at checkout as buttons, and the customer picks one. They are told apart by their names, so make the names clear.
If I limit an option to one sales channel, does my POS staff still see it?
Only if you include that POS store in the list. If you limit it to your online store only, staff taking a booking at the counter will not see it.
If I change the lead time after a customer has already booked, does their booking change?
No. The existing booking keeps its original date and time. Only new bookings follow the updated settings, and the same is true for surcharge, rescheduling, and selectable days.
Why does my new option not show up at checkout even though I saved it?
It is most likely still Inactive, meaning saved but not assigned to a business unit. Open the row menu, click Assign business unit, and it becomes live for customers on their next page load.
What's Next
If you serve every customer the same way, you can skip Custom Zones and continue to [Introduction to Time Slots] to set your booking time windows. If different areas need different coverage, minimums, time windows, or drivers, continue to [Introduction to Custom Zones].
Give feedback
Up next
Business Process ManagementCreate smarter workflows by connecting suppliers and work orders in one place, acting as an "invisible manager" that automates repetitive tasks.
Read more