Set up your Inbox on your POS

In this article
This guide walks you through setting up the Inbox page on your POS. Once configured, your staff will be able to view and reply to customer messages — from WhatsApp and other channels — without leaving the POS. The Inbox also comes with AI-powered reply suggestions to help your team respond faster.
Contents
Contents
What Is the Inbox Page?
The Inbox page lets your staff manage customer conversations directly from the POS. Instead of switching between WhatsApp, email, and your POS system, your team can see all incoming messages in one place and reply without leaving the screen.
Here is what the Inbox screen looks like on your POS:
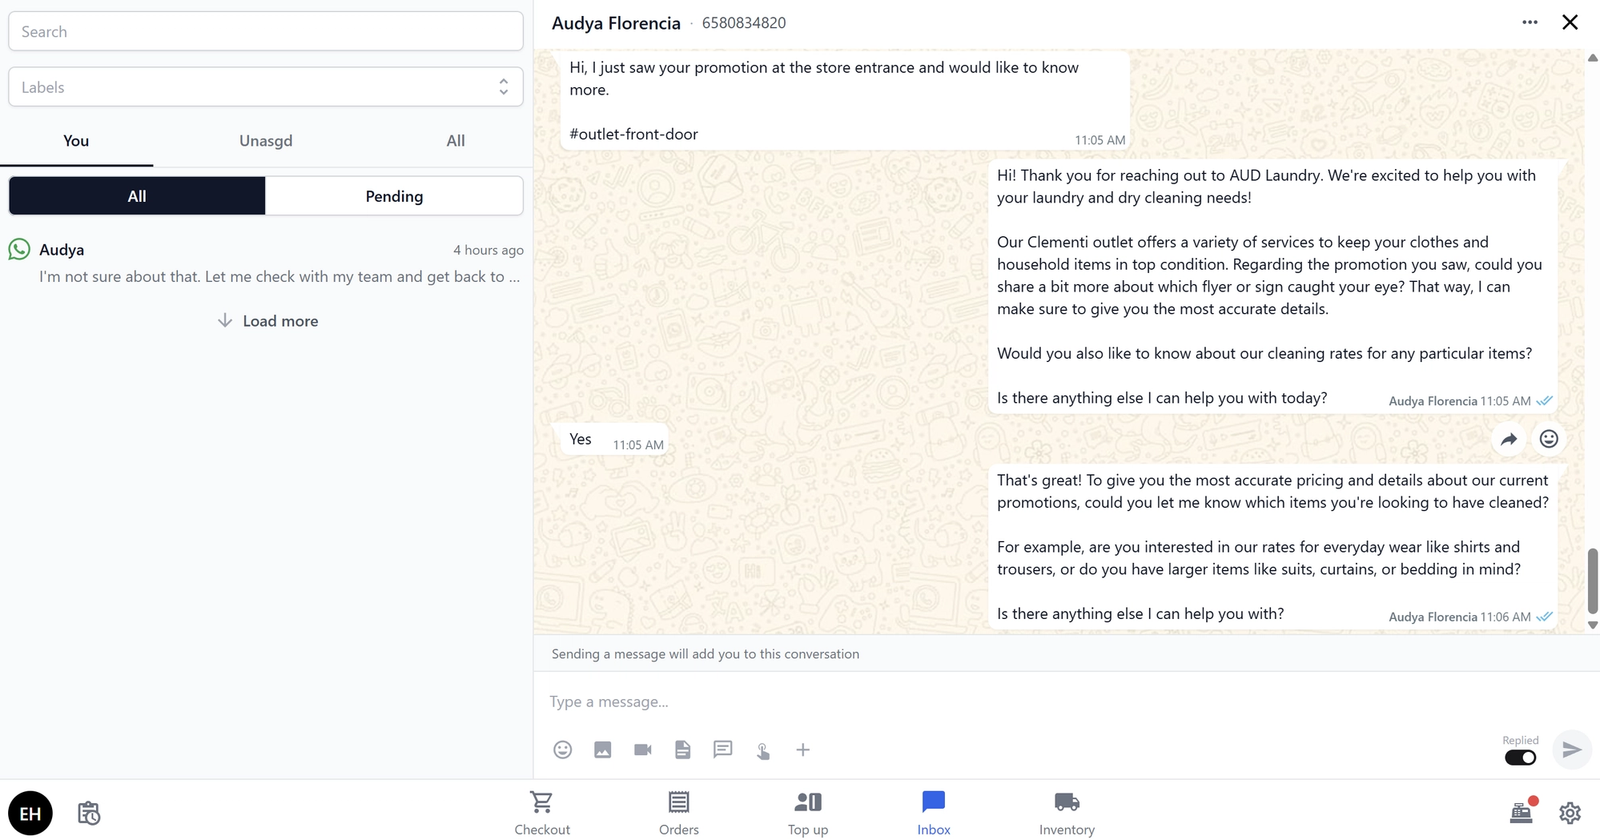
The screen is split into two panels: the conversation list on the left (showing all your customer chats) and the active conversation on the right (where your staff reads and replies to messages). It also comes with AI-powered reply suggestions that help your staff respond to common questions quickly.
This is especially useful for businesses where customers message ahead — for example, asking about repair estimates, checking on order status, or scheduling a pickup.
Before You Start
Before setting up the Inbox, make sure you have the following ready:
- Your POS app is already created — You should have completed the main POS setup guide first. If you have not set up your POS yet, follow our Set up your Laundry POS/Set Up Your Bag Repair POS guide (or the equivalent guide for your business type) before continuing.
- A messaging channel is connected — The Inbox pulls conversations from your connected messaging channels (like WhatsApp Business). If you have not connected a messaging channel yet, the Inbox will appear but will be empty. Follow our Connect WhatsApp to Your Business guide to set this up.
Configure the Inbox Block
The Inbox block controls the left panel of your Chat screen — this is the conversation list that shows all your customer chats.
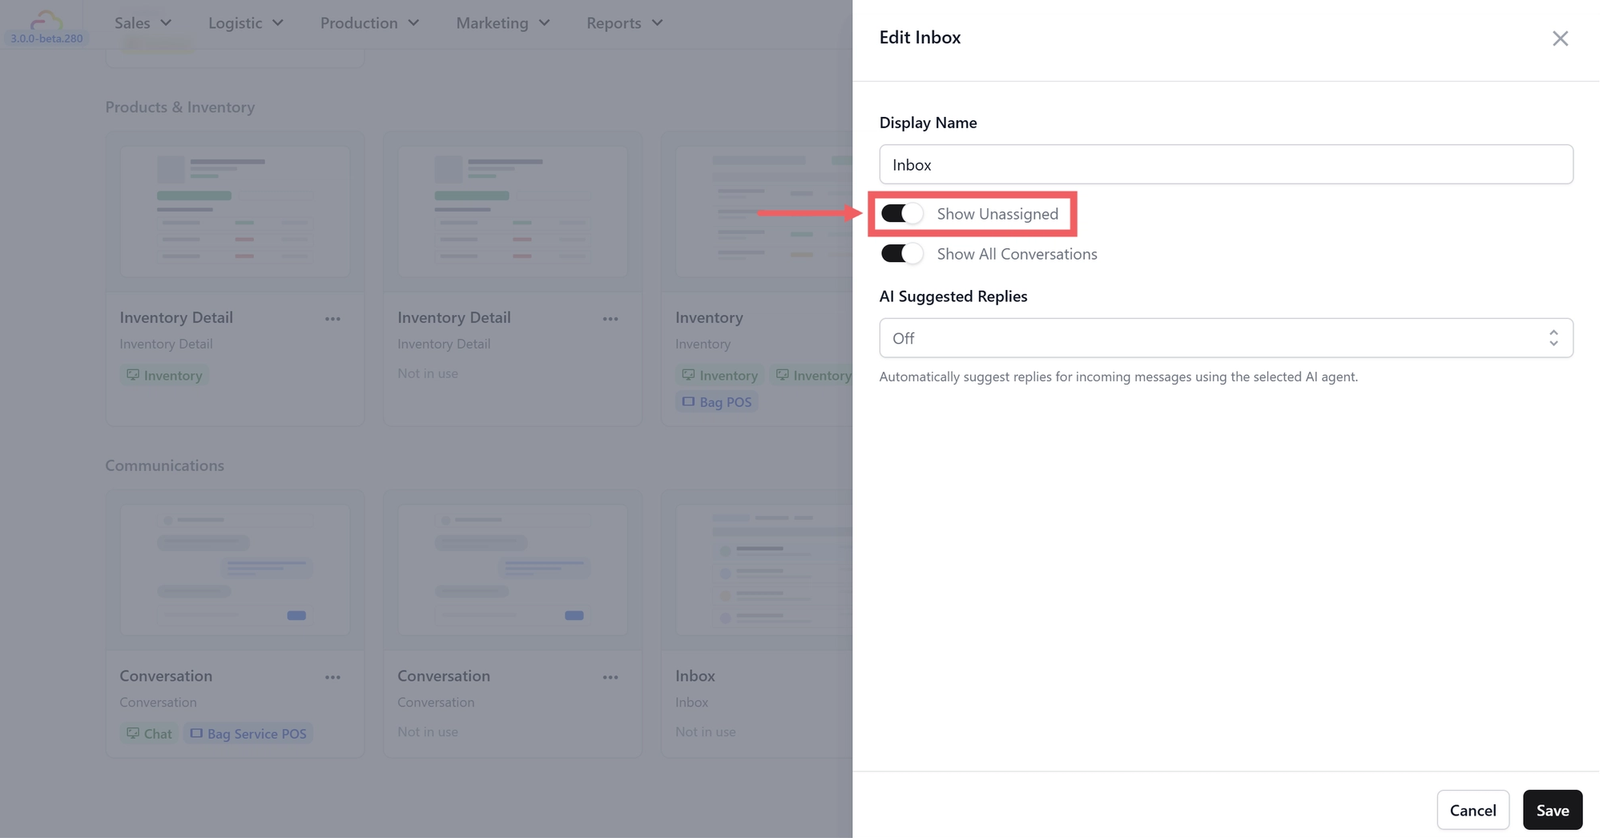
Go to the Blocks tab. Create a block called Inbox, then click on it to open its settings.
You will see the following settings:
Display Name
- Display Name:
Inbox(or any name you prefer — this is just for your reference in App Studio)
Show Unassigned
- Show Unassigned: ON
When this is turned on, the conversation list will include messages that have not been assigned to a specific staff member. This means any staff member can see and pick up unassigned conversations.
If you turn this off, your staff will only see conversations that are specifically assigned to them. This is useful in larger teams where you want each person to handle their own customers, but for most small businesses it is better to leave it on so no messages get missed.
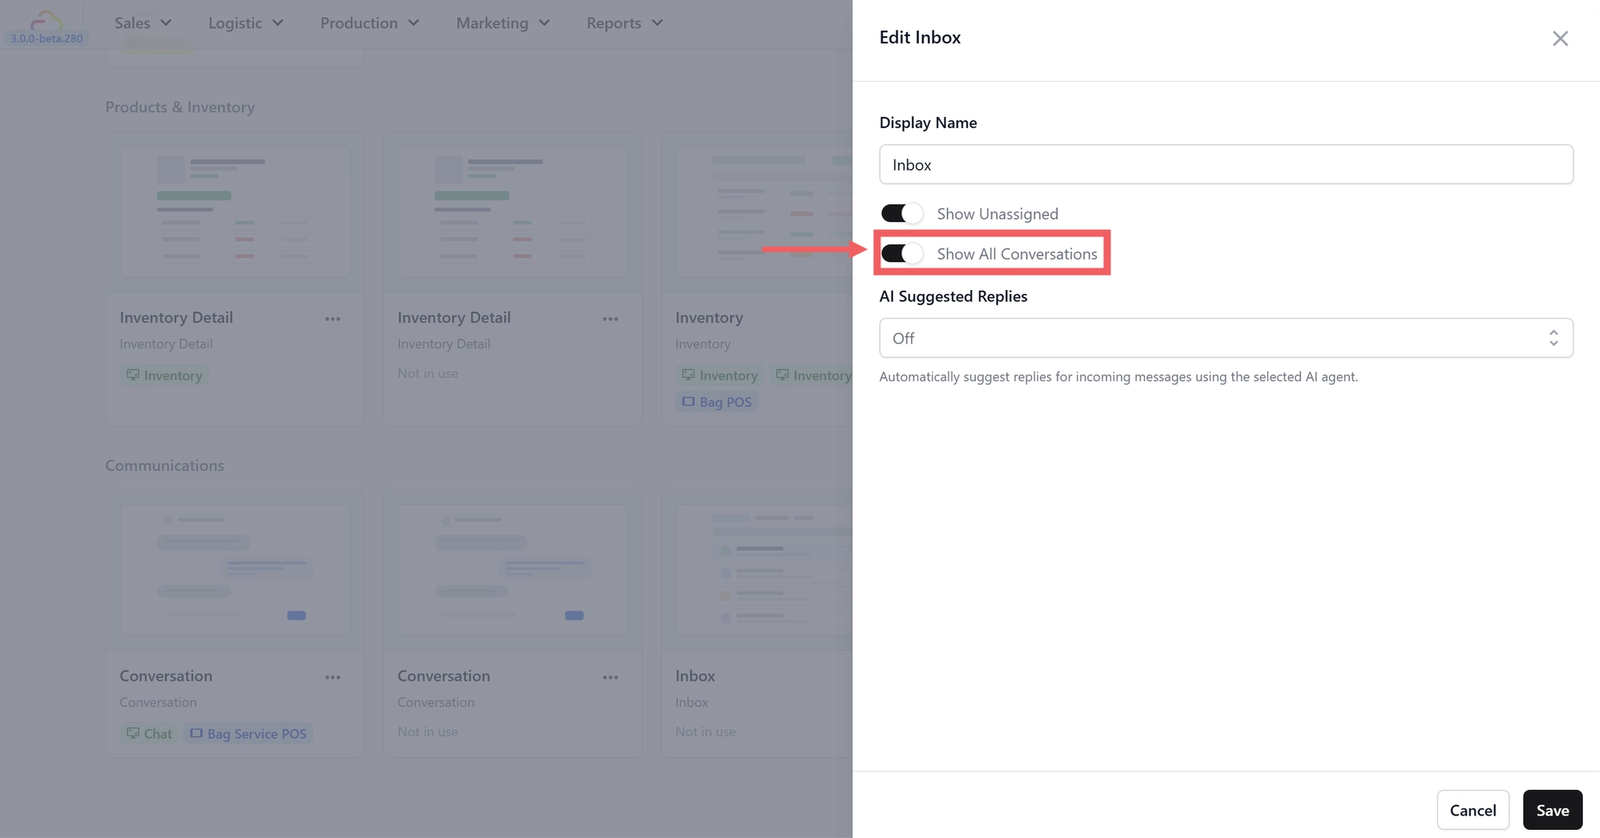
Show All Conversations
- Show All Conversations: ON
When this is turned on, every staff member can see all conversations — not just the ones assigned to them. This gives your team full visibility into customer communications.
If you turn this off, each staff member only sees their own assigned conversations. This is useful for privacy in larger teams, but for small teams it is better to leave it on so everyone can see what is going on and jump in when needed.
AI Suggested Replies
- AI Suggested Replies: Use your customized AI Agent
This is where you select which AI agent powers the automatic reply suggestions.

When a customer sends a message, the AI will analyse it and suggest a reply that your staff can send with one tap, edit before sending, or ignore entirely. This speeds up response times especially for common questions like:
- "How much does bag cleaning cost?"
- "Is my order ready for pickup?"
- "What are your opening hours?"
- "Can you fix a broken zipper?"
- And many more questions based on the customized knowledge you have provided to the AI Agent.
Your staff always has the final say — the AI suggests, but your staff decides whether to send the suggestion, modify it, or write their own reply from scratch.
The Conversation Block
The Conversation block controls the right panel of your Chat screen — this is where your staff reads message threads and types replies.
Go to the Blocks tab. Create a block called Conversation, then click on it to open its settings.
You will see that this block has no configurable settings — it works out of the box. The Conversation panel automatically shows the full message thread for whichever conversation your staff selects from the Inbox on the left.
Your staff can:
- Read the full message history with the customer
- Type and send replies
- See AI-suggested replies (if enabled) and tap to send or edit them
- View customer details associated with the conversation
[Screenshot/Video: The Conversation panel showing a customer message thread with a reply input field at the bottom and an AI-suggested reply bubble]
Review the Inbox Page Setup
Your POS template already comes with a Chat page pre-configured. Let us check that it is set up correctly.
Go to App Studio in your EasyBiz Console and open your POS app. Click on the Pages tab and find the page called Chat.
You should see the following:
- Type: Custom
- Layout: Split
- Split Ratio: 1:2
- Left Block: Inbox
- Right Block: Conversation

How the Inbox page on your POS looks
The 1:2 split ratio means the right panel (the active conversation) is twice as wide as the left panel (the conversation list). This gives your staff more room to read and type messages. You do not need to change anything here unless you prefer a different layout.
Link the Inbox Page to Your POS
Now that your Inbox blocks and page are configured, you need to make sure the Chat page is linked as a tab in your POS app so your staff can access it.
Go to the App tab in App Studio. You will see a Navigation Tabs section — this is where you control which tabs appear at your POS screen.
Check if there is a tab with the following:
- Icon: (chat/messaging icon)
- Label:
Inbox - Linked Pages: Chat
If the Inbox tab is not listed, click + Add Tab at the bottom of the list to add it. Choose a chat icon, set the label to "Inbox", and link it to the Chat page you just reviewed.
You can also drag the tabs to reorder them — the order here is the order your staff will see at the bottom of the POS.
How the Inbox Works in Practice
Once everything is set up, here is how your staff will use the Inbox day to day:
Viewing incoming messages:
- A customer sends a WhatsApp message (for example, "Hi, is my bag ready for pickup?").
- The message appears in the Inbox conversation list on the left panel.
- If the conversation is unassigned, any staff member can see and open it.
Replying to a message:
- Your staff taps on the conversation in the list.
- The full message thread opens in the right panel.
- The AI suggests a reply (for example, "Hi! Let me check the status of your order. One moment please.").
- Your staff can tap to send the suggestion as-is, edit it, or type their own reply.
- The reply is sent to the customer through WhatsApp (or whatever channel they used).
Managing conversations across your team:
- If multiple staff members are logged in, they can all see the same conversation list (when Show All Conversations is on).
- Unassigned conversations can be picked up by whoever is available first.
- Once a staff member starts replying, they can assign the conversation to themselves to avoid duplication.
Quick Reference
Here is a quick summary of the Inbox settings:
- Page layout — 1:2 split. Conversation list on the left, active conversation on the right.
- Inbox block (left panel) — Show Unassigned: ON (see unassigned chats), Show All Conversations: ON (see everyone's chats), AI Suggested Replies: Pico Support (AI-powered suggestions).
- Conversation block (right panel) — No settings needed. Works out of the box.
- AI replies — The AI reads incoming messages and suggests replies. Staff can send, edit, or ignore suggestions.
- Channels — Messages come from your connected channels (WhatsApp, etc.). Connect channels in your EasyBiz Console settings.
What's Next?
Your Inbox page is set up and ready to go. Here are some other optional POS features you might want to set up:
- Set up your Credit Top-Up page — Let customers prepay for services by loading store credit.
- Set up your Inventory page — Track stock levels for physical products you sell alongside your services.
- Connect WhatsApp to your business — If you have not connected a messaging channel yet, set this up so messages start flowing into your Inbox.
Give feedback
Up next
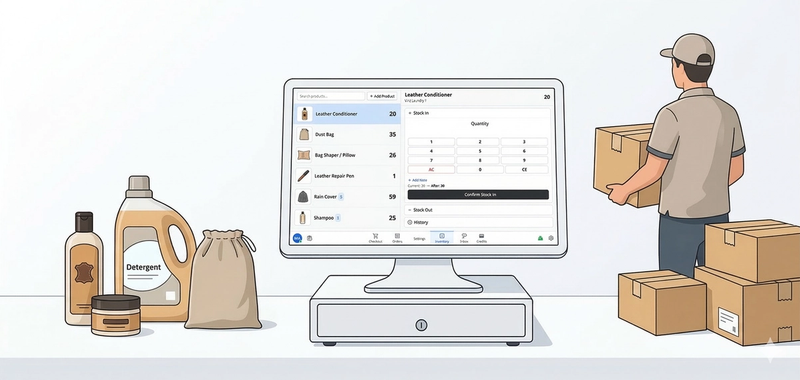
Set up Inventory Tracking on your POSTrack your stock levels for physical products directly from your POS. This guide shows you how to set up the Inventory page so your staff can manage stock in and stock out.
Read more