Set up your Bag Repair POS ref

In this article
This guide walks you through how to set up your Bag Repair POS in the EasyBiz Console. You will learn how to create a new POS app using the Bag Service POS template, understand what comes pre-configured for you, and review the app settings so that your POS is ready for daily use at your bag repair or leather care shop.
Contents
Contents
What You Will Be Setting Up
Here is what your finished Bag Repair POS will look like, so you know what you are working towards:
Your Bag Repair POS will have two main screens your staff can tap between at the bottom:
- Checkout – where you take orders.
- Orders – where you view and manage past orders.
- Cash Drawer – used to track cash payments.
- Daily Sales – used to review sales and close out each day.
By the end of this guide, all of this will be set up and ready to go.
Before You Start
Before setting up your POS, make sure you have the following ready:
- An EasyBiz Cloud account — You need to be able to log in to your EasyBiz Console.
- Your bag repair services and prices — These are the items your customers will order, like bag cleaning, leather restoration, wallet refresh, hardware customisation, and so on. They need to be added as products in EasyBiz Cloud first so that they appear in your POS catalog later.
If you have not added your services yet, please do so first before continuing with this guide. You can follow our guide on how to add your services and products.
Create Your Bag Repair POS App
The first thing you need to do is create a new POS app. EasyBiz gives you a ready-made Bag Service POS template so you do not have to build anything from scratch — it comes with a checkout screen, order tracking, payment processing, and other features already set up for you.
Log in to your EasyBiz Console. In the top navigation bar, click on the Settings icon (the gear icon), then select App Studio.
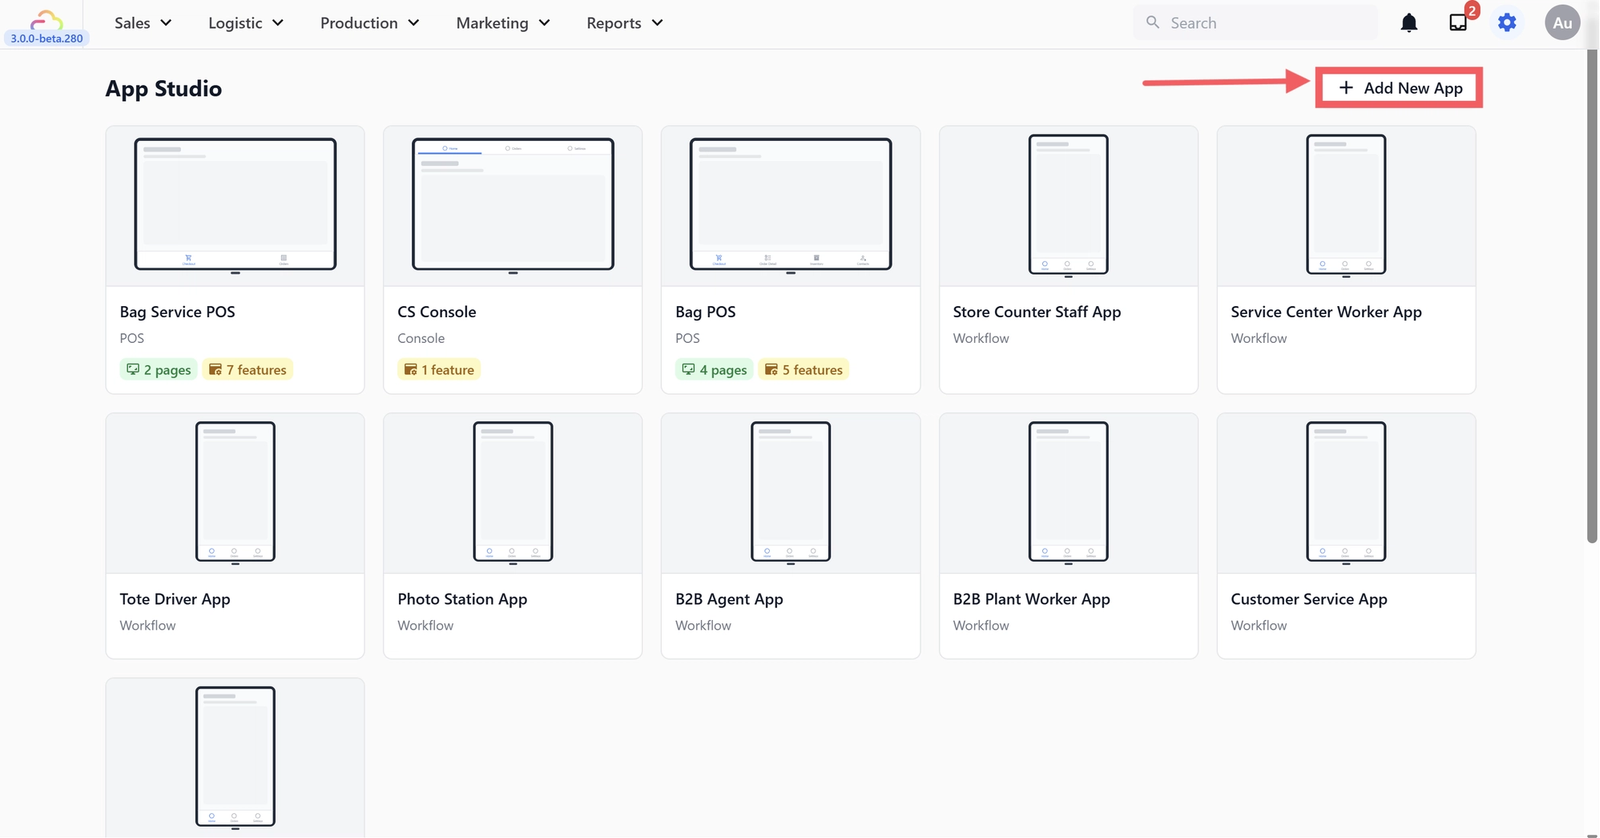
On the App Studio page, click the + Add New App button in the top right corner.
A window will appear with a list of ready-made templates. Make sure the Client Type at the top is set to POS. You will see these template options:
- Laundry POS — For laundry and dry cleaning businesses
- Bag Service POS — For bag repair and leather care businesses
- Retail POS — For retail shops
- Blank App — Start from scratch (not recommended for beginners)
Click on Bag Service POS.
You will see an App Name field. It is pre-filled with "Bag Service POS" — you can keep this name or change it to something that suits your shop (for example, "Maison Luxury Care" or "BagDoc Repairs"). When you are ready, click Create App.

Your new app will appear in the App Studio list. Click on it to start configuring it.
Set Up Your Checkout Screen
The Checkout screen is the main screen your staff will use every day. It has two parts:
- Catalog on the left (which shows your bag repair services)
- Cart on the right (where you build each order).
Both need to be connected to your business unit — this is simply the part of your EasyBiz account that holds your bag repair services and prices (you would have set this up when you added your products). Once connected, the Checkout screen will know which services and prices to display.
Configure the Catalog Block
The Catalog block controls what your staff sees on the left side of the Checkout screen — your bag repair services organised by category.
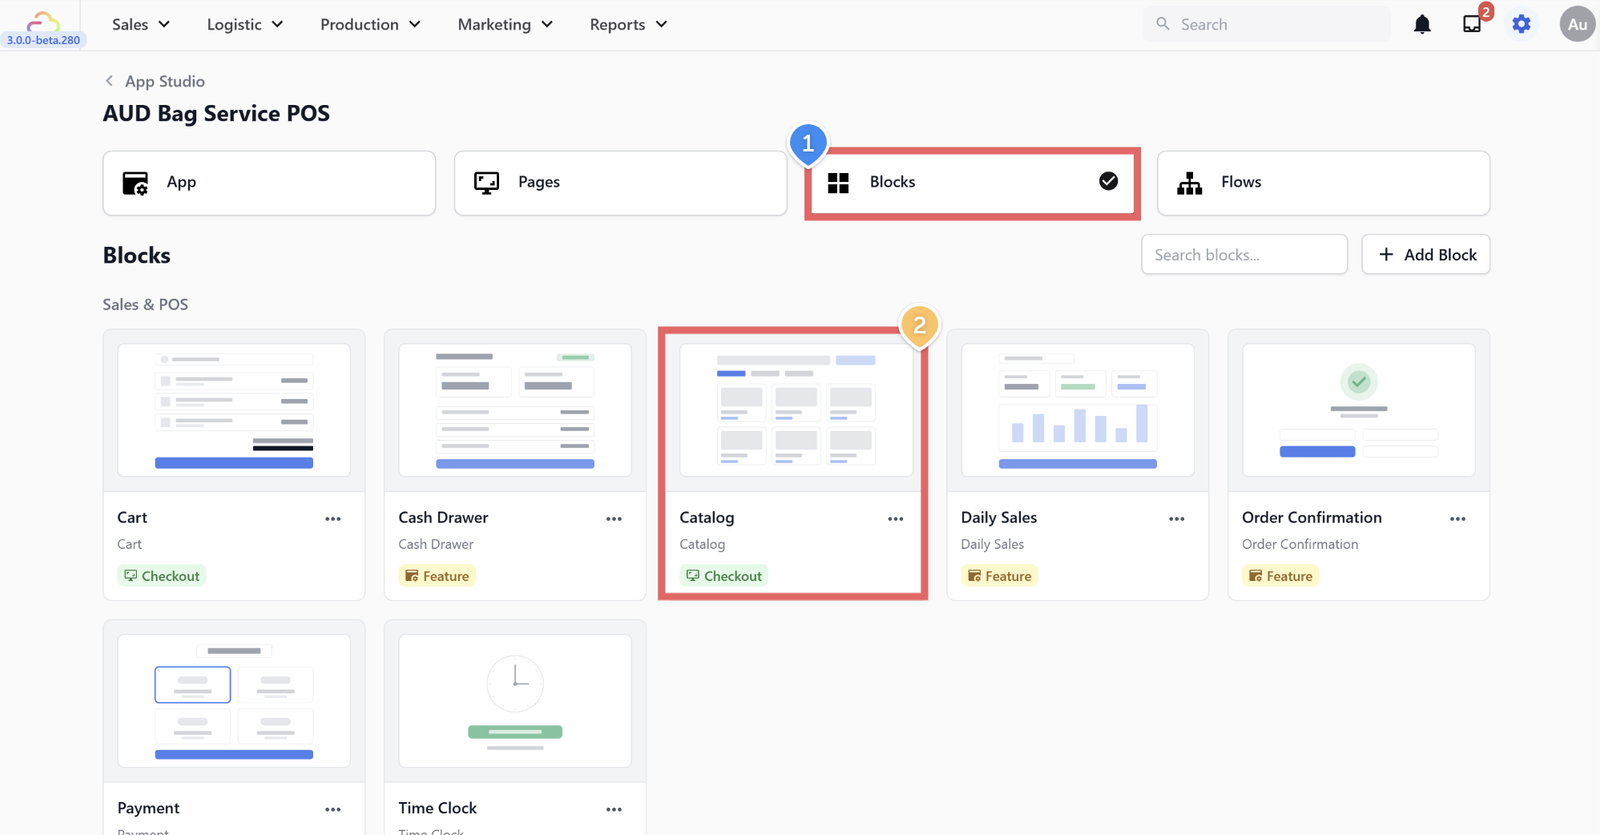
Go to the Blocks tab in App Studio. Find the block called Catalog and click on it to open its settings.
Set the following:
- Display Name:
Catalog(or any name you prefer — this is just for your reference in App Studio) - Business Units: Select your bag service business unit from the dropdown. This is what tells the catalog which services and prices to show.
- Product Sources:
By Collections— This means the catalog will show items based on the collections you have set up in EasyBiz Cloud. - Collections: Select your bag service collection (for example, "BAG SERVICE"). This groups all your bag repair services together in the catalog.
- Group by Service Option: Turn this on so your services are organised by their service type (for example, all wallet services together, all bag services together).
- Line Item Flows: If you have set up a line item flow (for example, "BAG LINE ITEM"), assign it here. This adds a step-by-step process when your staff adds a service to the cart — useful for capturing details like bag condition, photos, or special instructions. Set it to apply to Service Item and All units.
- View Mode:
Grid— This shows your services as a grid of cards, which is easier to browse than a list. - Card Size:
Medium— A good balance between showing enough items on screen and keeping them easy to read. - Show Prices: Turn this on so your staff can see the price of each item.
- Show Images: Turn this on if you have uploaded images for your services. This makes it easier to identify items quickly.
- Show Search Bar: Turn this on so your staff can search for items by name instead of scrolling through categories.
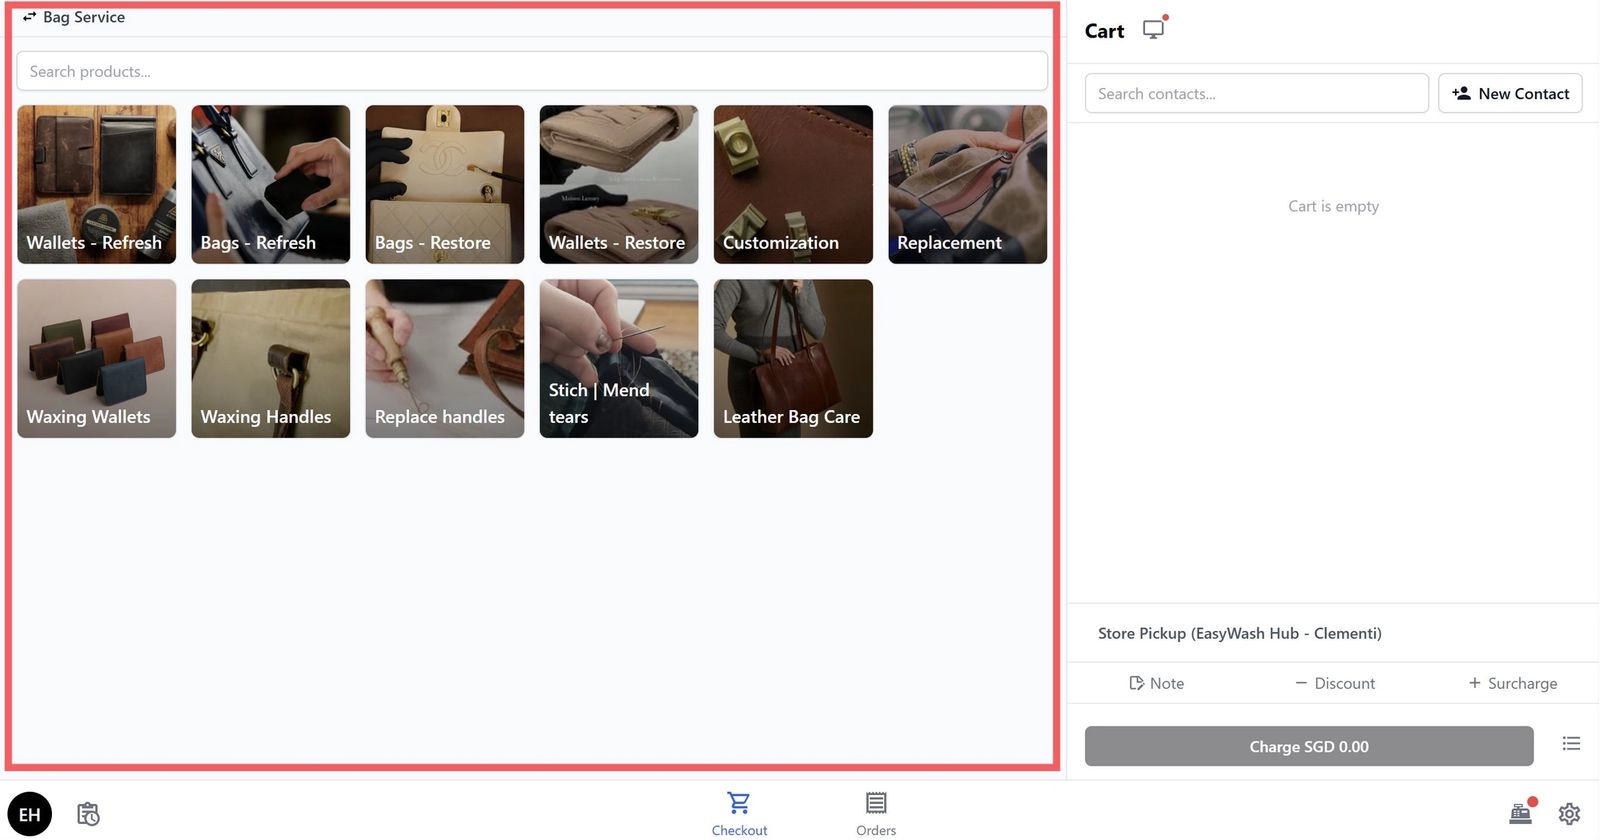
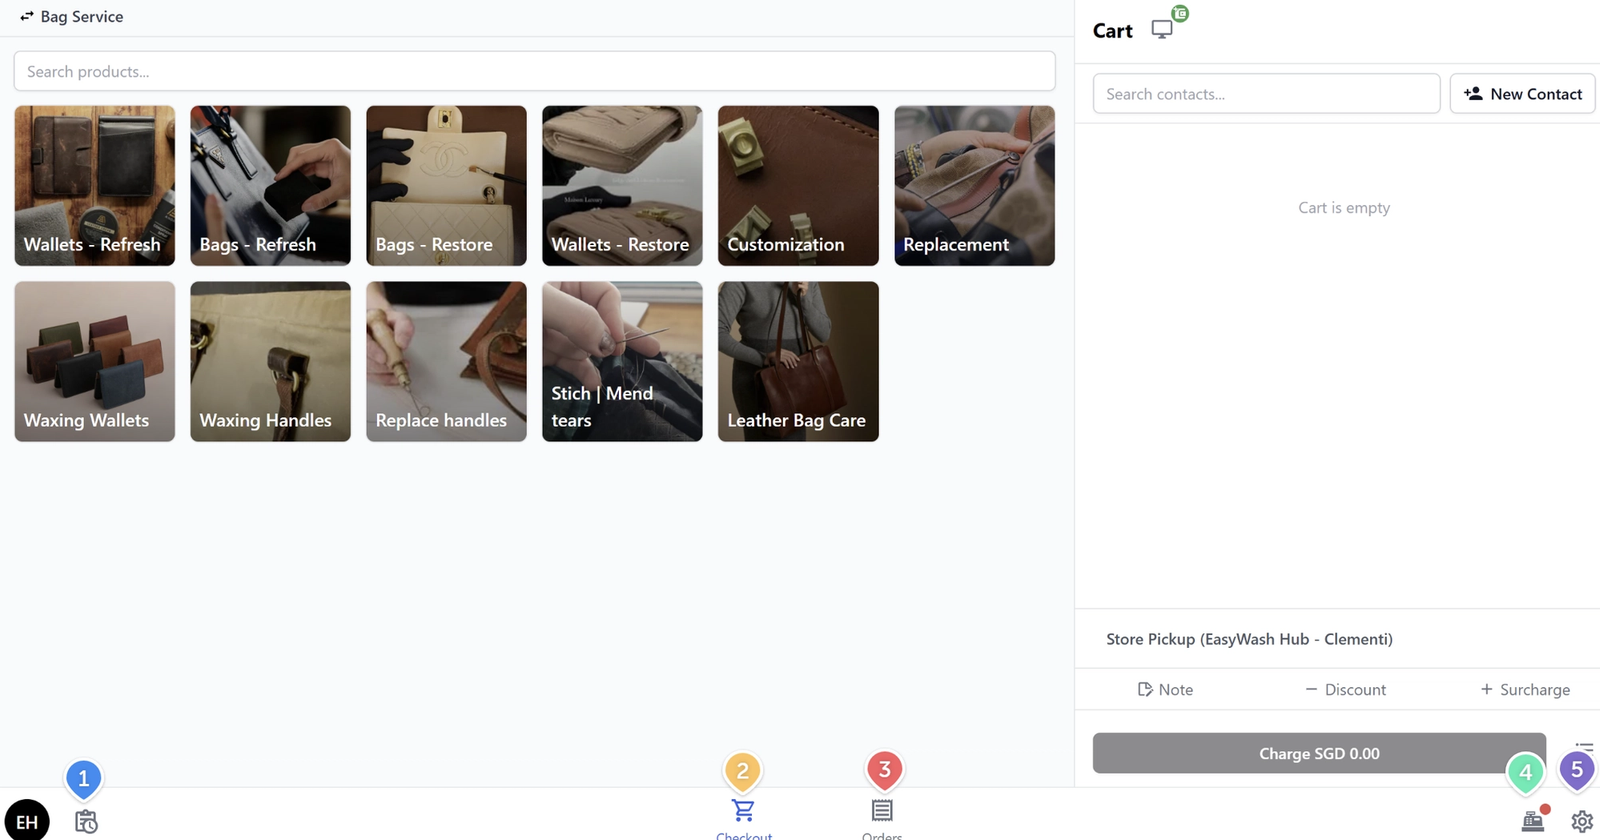
How the catalog block you have configured looks on your POS
Configure the Cart Block
The Cart block controls the right side of your Checkout screen — this is where each order is built before payment. It needs to know which business unit to use and how you want orders to behave.

Go back to the Blocks tab. Find the block called Cart and click on it to open its settings.
Set the following:
- Display Name:
Cart(or any name you prefer) - Store Pickup Options — Business Units: Select the same bag service business unit you chose for the Catalog. This ensures the cart matches your catalog.
- Store Pickup Options: You will see a list of pickup/delivery options. These are the turnaround time options your customers can choose from when placing an order. Your Bag Repair POS comes with several options pre-configured: Standard Store Pickup, 2-3 Days Express, 1 Day Express, and others. You can add, edit, or remove these later in your business unit settings.
- Contact Selector: Defaults to Optional — your staff can assign a customer to an order but are not required to. Depending on how your shop works, you can change this:
- None — No customer needs to be assigned. Use this if you do not track orders by customer at all.
- Optional — Staff can assign a customer if they want, but can also skip it. Useful for walk-in customers who do not want to give their details.
- Mandatory — Staff must assign a customer before the order can be completed. Recommended for bag repair businesses, since every bag needs to be linked to a customer record so you always know whose bag is whose — especially when multiple bags from different customers are in the shop at the same time.
- Line Item Description:
Line Item Name— This controls how each item appears in the cart. The default format is empty. You can enter the line item description you need and use @ to insert placeholders.
You will also see several toggles. Here is what each one does:
- Show Order Notes: Turn this on if you want your staff to be able to add notes to an order (for example, "Customer wants colour matching" or "Handle with care — vintage bag").
- Show Promo Code: Turn this on if you plan to use promotional codes for discounts.
- Show Discounts: Turn this on if you want your staff to be able to apply manual discounts.
- Show Surcharges: Turn this on if you charge extra for things like express service or specialty materials.
- Allow Empty Checkout: Leave this off unless you have a reason to allow orders with no items.
- Allow Pay Later: Turn this on if you want to let customers pay when they collect their bag instead of paying upfront. This is common for bag repair businesses since work is usually done over several days.
- Loyalty Points Redemption: Turn this on if you have a loyalty programme set up and want customers to redeem points at checkout.

How the cart block you have configured looks on your POS
Link the Blocks to Your Checkout Page
Now that your Catalog and Cart blocks are configured, you need to make sure they are linked to your Checkout page.
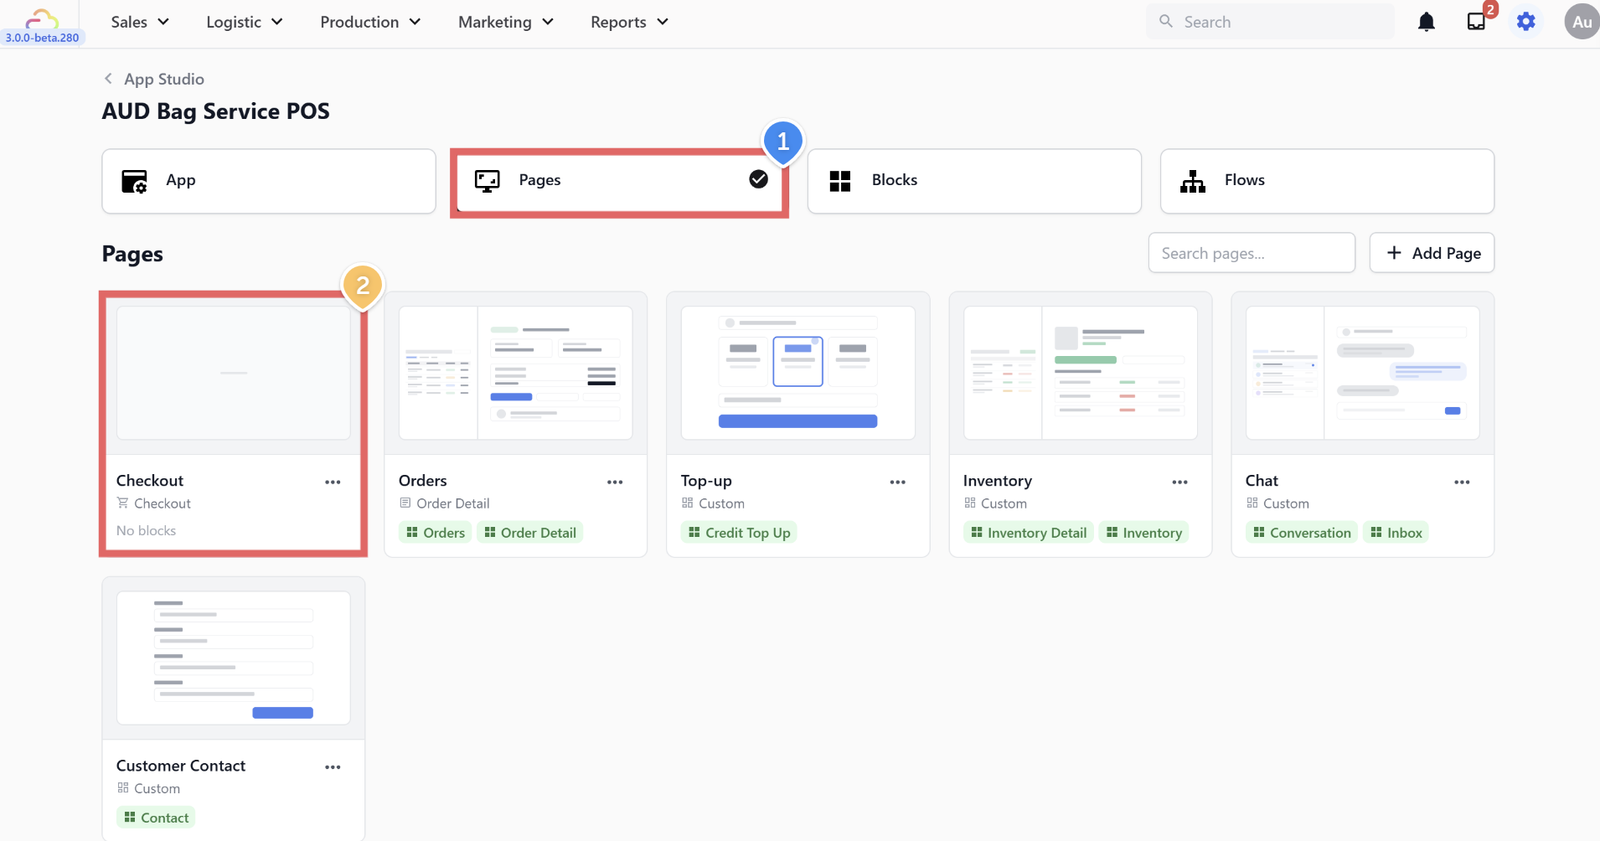
Go to the Pages tab. Find the page called Checkout and click on it.
You should see a split layout with a 2:1 ratio — the left side (the larger panel) should be linked to your Catalog block and the right side should be linked to your Cart block. If the template has already set this up for you, you do not need to change anything. If not, select the correct block for each side.
Set Up Your Orders Screen
The Orders screen lets you view and manage all the orders placed through your POS. The template has already set this up for you, so it works right away — you will see a list of orders on the left, and the full details of each order on the right.
The Orders page uses a 1:2 split layout, giving more space to the order details on the right side. The left panel shows the Orders block (your order list) and the right panel shows the Order Detail block.
Configure the Orders Block
Go to the Blocks tab. Find the block called Orders and click on it.
You will see the following settings:
- Order Listing Detail:
Order Business Unit ID-Order Number— This controls how each order appears in the list. The default format shows the business unit ID and order number. - Filter Presets: These are the quick-filter tabs your staff can use to find orders. Your POS comes with three presets:
- Today — Shows all orders placed today
- Unpaid — Shows orders that are unpaid or partially paid
- All — Shows all orders regardless of status
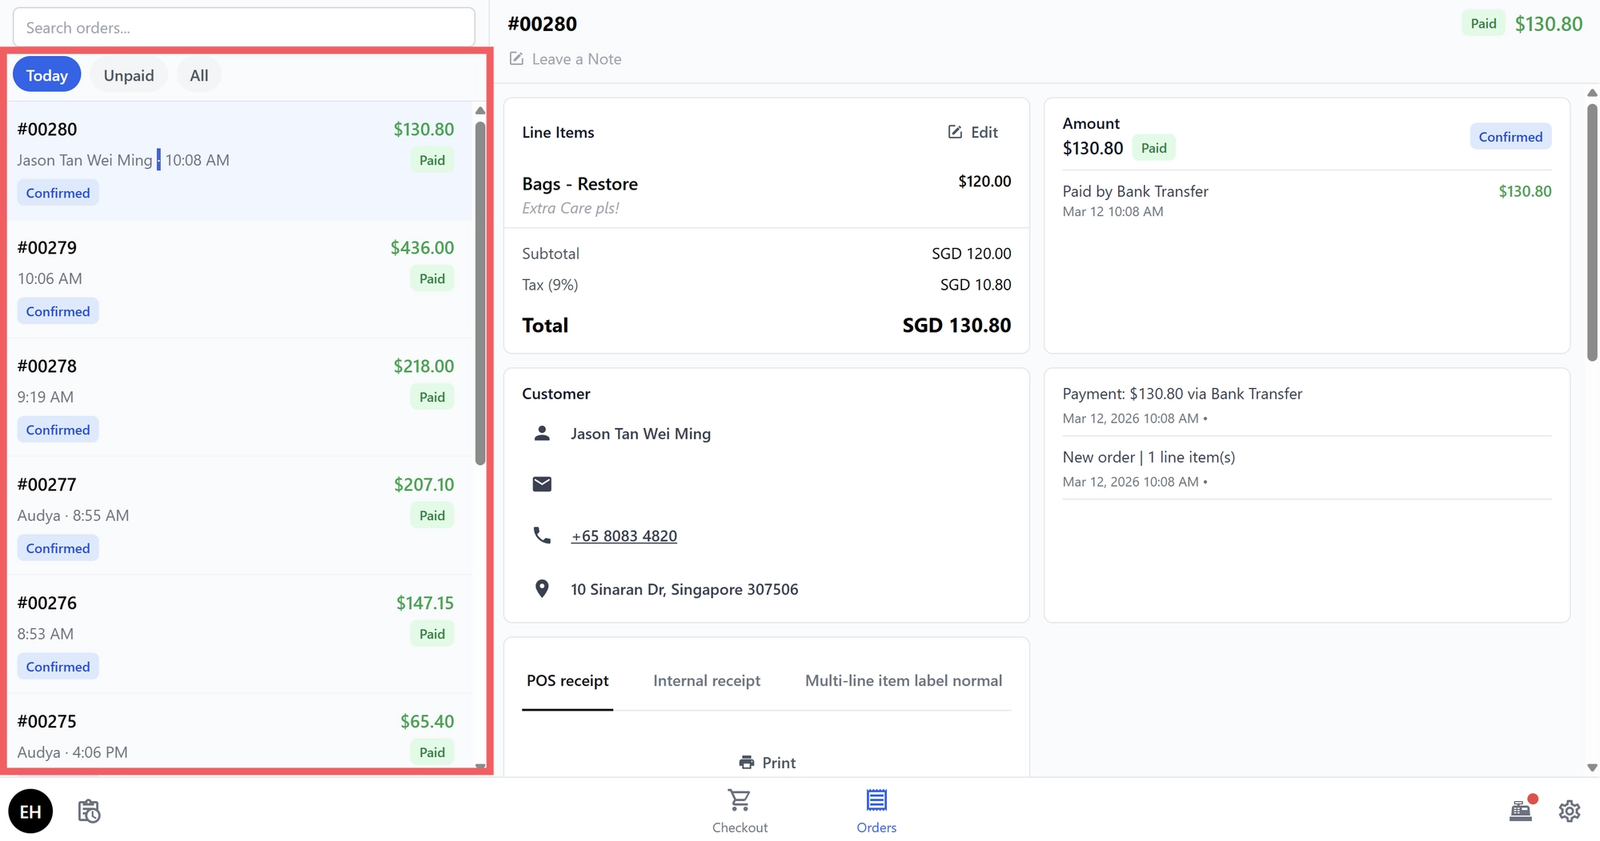
How the orders block you have configured looks on your POS
Configure the Order Detail Block
The Order Detail block controls what your staff sees when they tap on an order. It includes several sections that display different information about the order.
Go back to the Blocks tab. Find the block called Order Detail and click on it.
You will see a list of sections that are already included:
- Line Items — Shows what the customer ordered (which bag services and items)
- Payment — Shows payment status and history
- Customer — Shows the customer's details (Name, Phone, Email, Address)
- History — Shows the order timeline (when it was created, updated, completed)
- Photos — Allows your staff to attach photos of the bags (useful for documenting condition before and after repair)
- Print — Allows your staff to print receipts and labels directly from any order. This section includes two templates: POS receipt and Internal receipt.
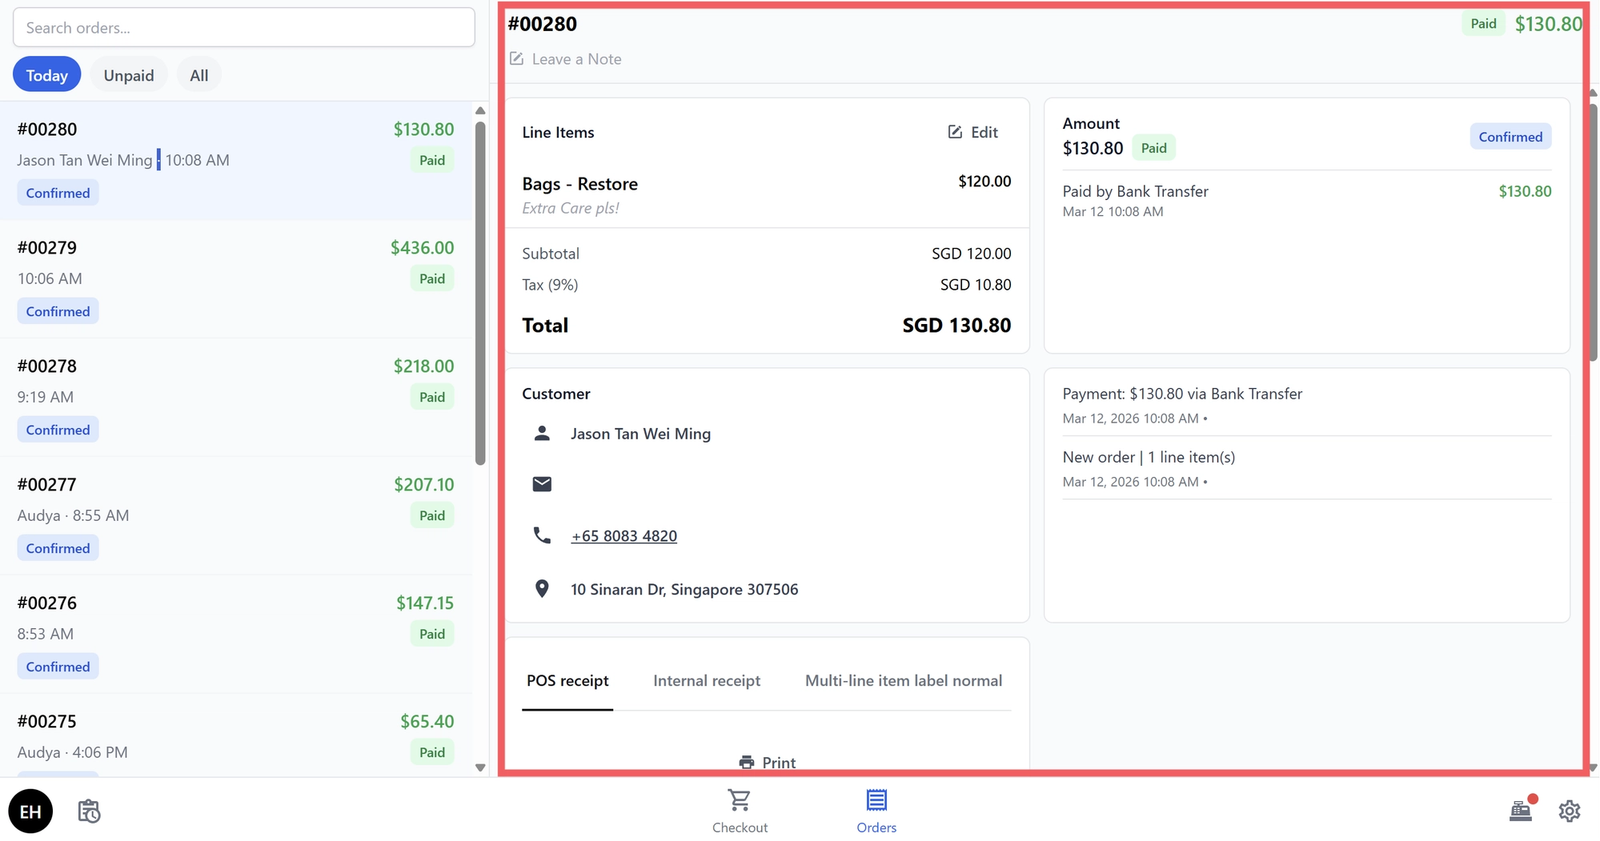
How the order detail block you have configured looks on your POS
Set Up Your Order Confirmation Screen
After your staff completes an order, the POS can show a confirmation screen with quick actions — like printing labels, sending a WhatsApp message, or emailing a receipt. This is controlled by the Order Confirmation block.
Go to the Blocks tab. Find the block called Order Confirmation and click on it.
Your Bag Repair POS comes with the following confirmation actions pre-configured:
- Print Labels — Prints item labels using your label template (Template: Multi-line item label normal). Auto-print is off by default, so your staff taps to print.
- WhatsApp — Sends the order confirmation to the customer via WhatsApp.
- Print Receipt — Prints a POS receipt (Template: POS receipt). Auto-print is off by default.
- Email — Sends an order receipt to the customer by email (Template: Order receipt).
- Direction — Opens a map with directions to the customer's address.
- Call — Lets your staff call the customer directly.
- Page Link — Links to another page in the POS.
- Payment — Allows payment to be taken from the confirmation screen.
- Server Action — Triggers a server-side action (for advanced workflows).
The actions are displayed in 2 columns on the confirmation screen. You can rearrange, add, or remove actions to suit your workflow.

How it looks on POS
Link the Order Confirmation to Your Checkout Page

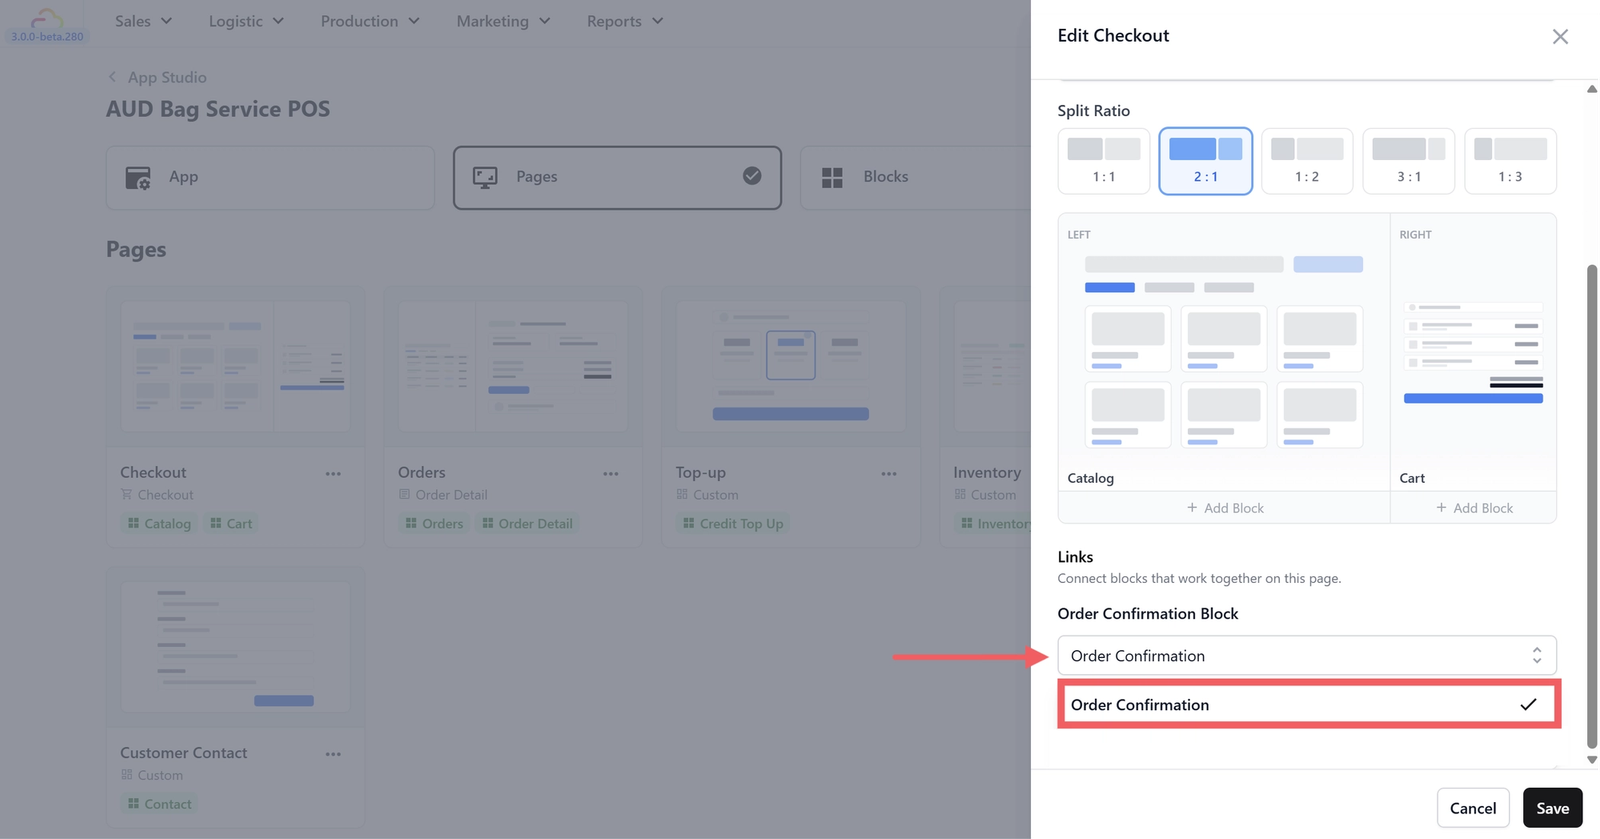
Go to the Pages tab and open the Checkout page.
At the bottom of the page settings, you will see a Links section with an Order Confirmation Block field. Select the Order Confirmation block here so that the confirmation screen appears after each successful order.
Set Up Your Payment Methods
The Payment block controls which payment methods your staff can offer customers at checkout. Your Bag Repair POS comes with a wide range of payment options pre-configured.

Go to the Blocks tab. Find the block called Payment and click on it.
You will see the following settings:
- Payment methods columns:
1— This controls how payment options are displayed on the payment screen. - Payment method icon size:
Small - Payment methods which are grouped into three categories.
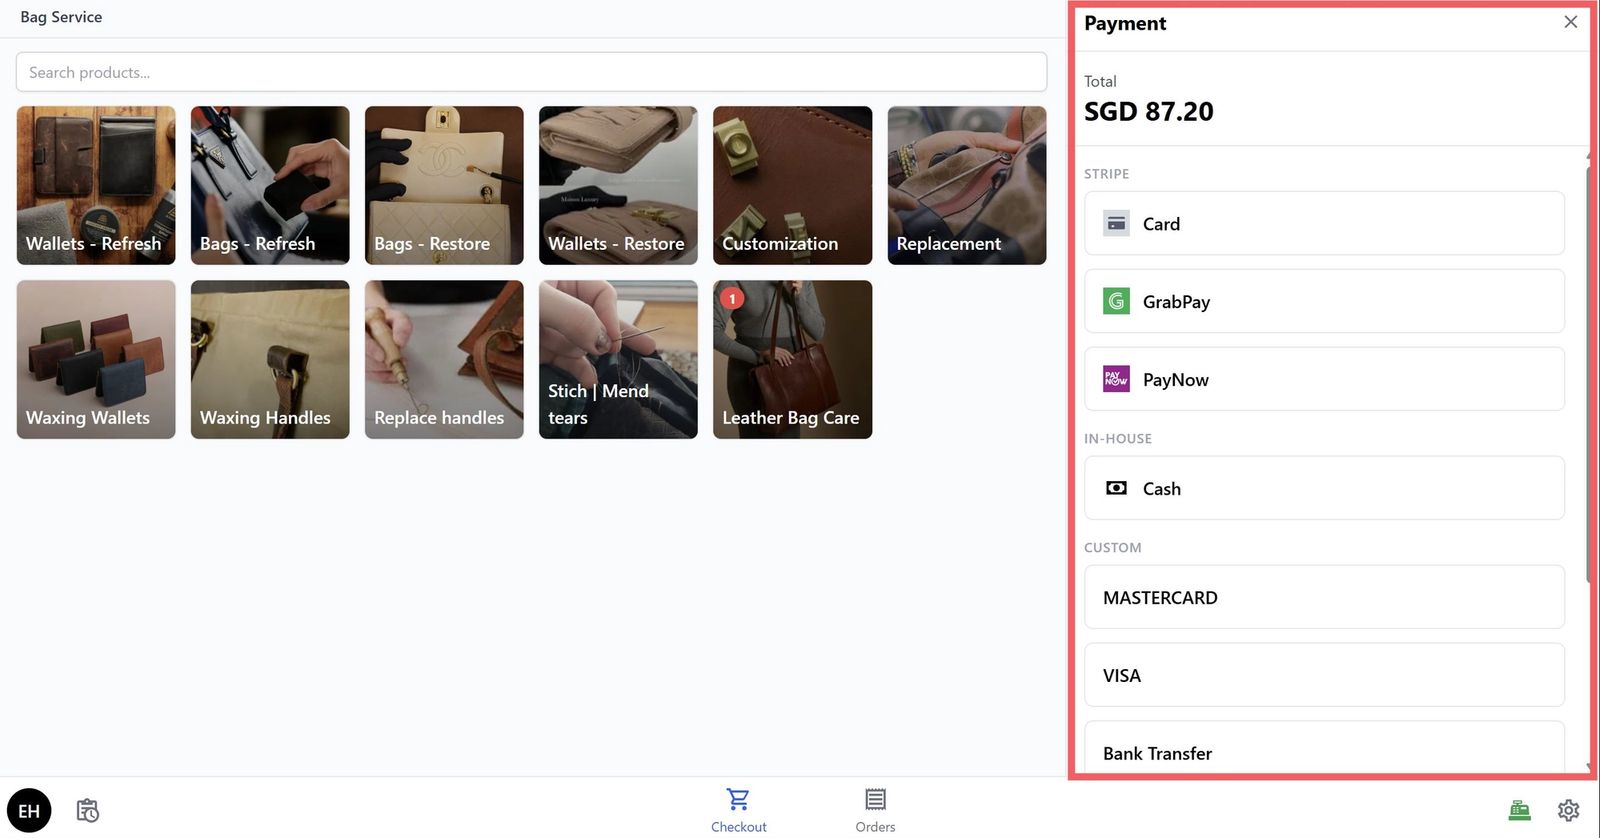
How it looks on POS
Set Up Your Cash Drawer
The Cash Drawer helps you track cash payments throughout the day. At the start of each shift, you set how much cash is in the drawer. As customers pay with cash, the system adds each payment automatically. At the end of the day, you can see exactly how much cash should be in your drawer.
If you want to set a default starting cash amount (so your staff do not have to type it in every time), you can do this in App Studio.
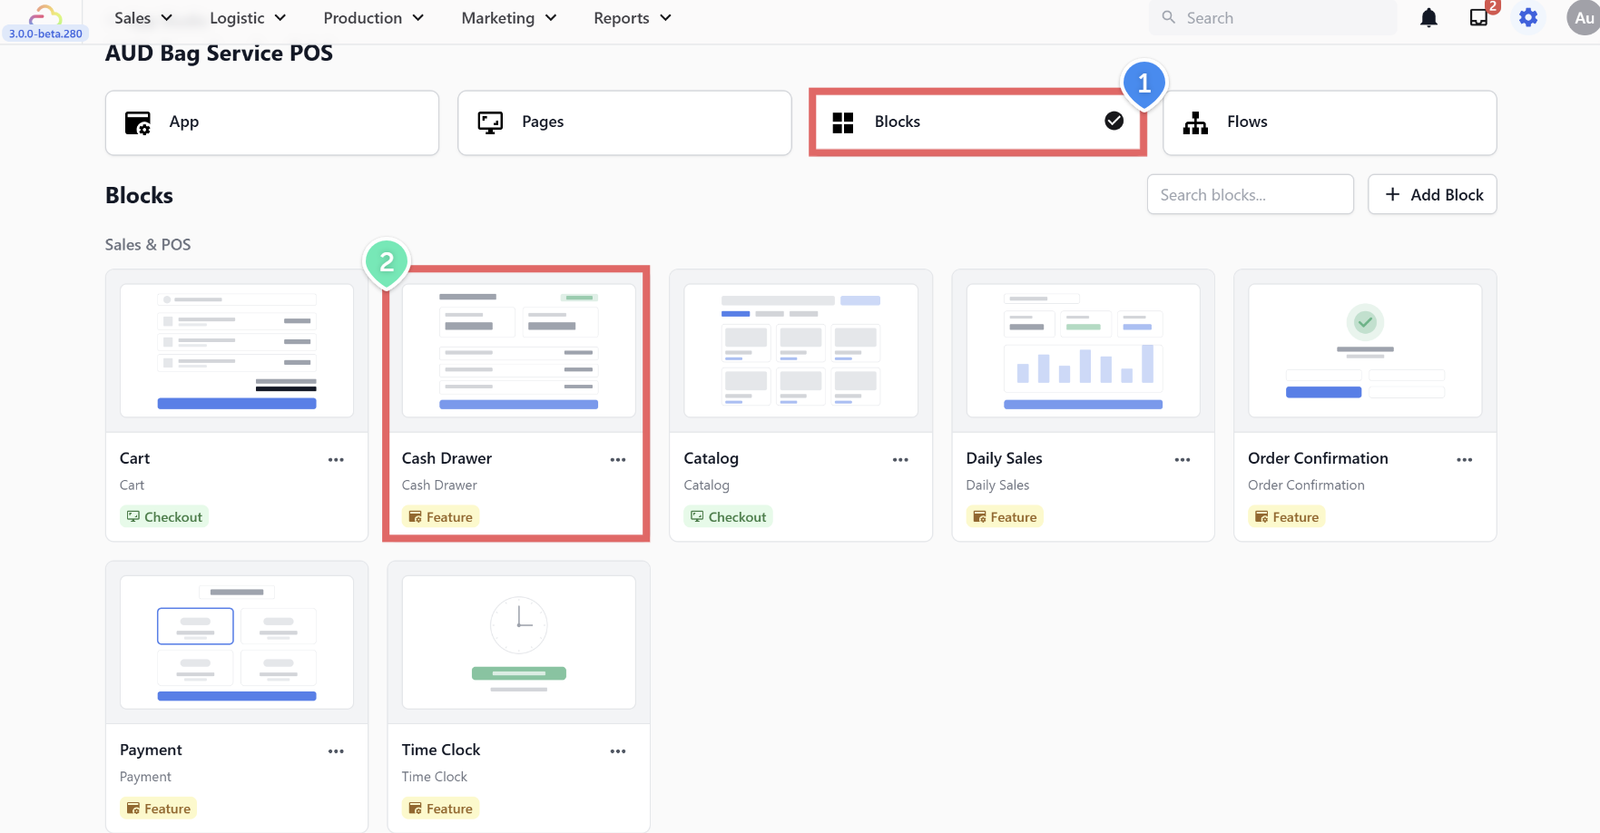
Go to the Blocks tab. Find the block called Cash Drawer and click on it.
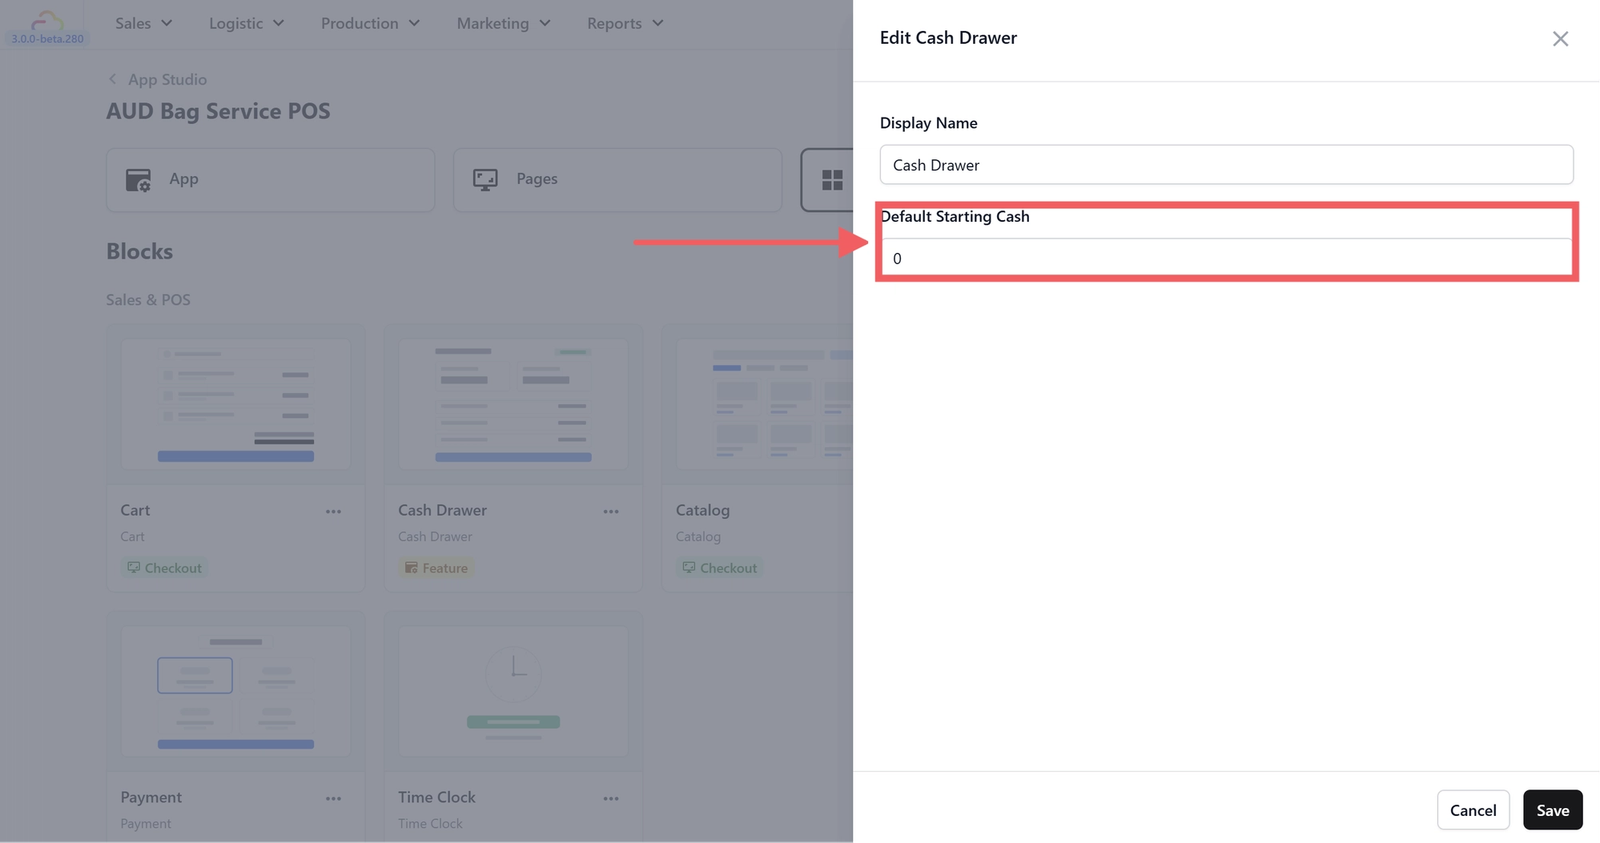
Set the Default Starting Cash to whatever amount you normally start with (for example, $100 or $500). It is currently set to 0.
Set Up Your Close of Day Report
At the end of each business day, you will want to close out your sales and see a summary of how much money came in.
How Close of Day looks on POS
The Close of Day report gives you a full breakdown — total orders, total sales, income by payment method (cash, card, GrabPay, PayNow, bank transfer), and any outstanding balances.
Setting this up takes a few steps, but you only need to do it once.
Step 1: Create a Close of Day Receipt Template
First, you need a receipt template so the system knows how to format your Close of Day report.
- In the EasyBiz Console, go to Settings (gear icon) → Templates → Receipt.
- Click the + Add button.
- Select Close of Day Report as the template type.
- You do not need to change anything in the template — the default layout works well for most businesses. It will show your daily summary with all the numbers you need.
- Click Publish to save the template.
Step 2: Create a Close of Day Procedure
Next, you need to create a procedure — think of this as a checklist that your staff will follow when closing the day. The system will guide them through each step automatically.
- In the EasyBiz Console, go to Settings (gear icon) → Business Process Management → Procedures. (Do not worry about the long name — this is just where EasyBiz keeps all your step-by-step processes.)
- Click the + Add procedure button.
- Select Close of Day as the procedure type.
- Give it a name (for example, "Close of Day").
Now you need to add the steps for this procedure. A typical Close of Day procedure has two steps:
Add Step 1 — Cash Drawer Summary:
- Click Add Step in the procedure editor.
- Set the step type to Block.
- Select Cash Drawer Summary as the block.
- This step shows your staff a summary of all cash payments received during the day, so they can verify the amount in the drawer.
Add Step 2 — Signature:
- Click Add Step again.
- Set the step type to Data Entry.
- Select Signature as the data entry type.
- This step lets your staff sign off on the day's report, confirming that the numbers are correct.
Save the procedure when you are done.
Step 3: Link Everything to the Daily Sales Block
Finally, you need to tell the Daily Sales block in your POS to use the procedure and receipt template you just created.
- Go back to App Studio and open your Bag Service POS app.
- Go to the Blocks tab and find the block called Daily Sales.
- Click on it to open its settings.
- Set the Close of Day Flow to the procedure you created (for example, "Close of Day").
- Set the Close of Day Receipt Template to the receipt template you published earlier (for example, "Close of Day Report").
Quick Reference
Now that everything is set up, here is a quick reminder of where to find things in your POS:
- Daily Sales — View your Close of Day report with a full breakdown of sales and income by payment method.
- Checkout tab — Your main screen. Catalog on the left, cart on the right. Tap a category, tap a service, build the order, collect payment.
- Orders tab — View all your orders. Tap any order to see its details, print receipts or labels, attach photos, or check payment history. Filter by Today, Unpaid, or All.
- Cash Drawer — Set your starting cash each day and track all cash payments. Use "End drawer" to close it out.
- Settings tab — Manage your account, connect your receipt and label printers, and access the Time Clock (optional — for tracking staff working hours).
Your POS also comes with these features already switched on: Payment , Order Confirmation, and Time Clock.
What's Next?
Your Bag Repair POS is set up and ready to go. Here are some things you might want to do next:
- Start taking orders — Open the Checkout screen, select a bag repair service, assign a customer, and collect payment.
- Print labels — The system can generate labels for each item in an order. You can connect a label printer in Settings and customise the label format to suit your needs.
- Take photos — Use the Photos section in Order Detail to document the condition of each bag before and after repair.
- Customise your POS — As your business grows, you can go back to App Studio in the Console to add or remove features, change the layout, or adjust your catalog categories.
Give feedback

Up next
Products & PricingLearn how to organize your items, manage service options, and apply dynamic pricing rules to streamline your sales process.
Read more