Set up your Bag Repair POS

In this article
This guide walks you through setting up your Bag Repair POS in the EasyBiz Console — from creating the app to getting it ready for your shop counter. By the end, your staff will be able to take in bags, log orders, collect payments, and close out the day, all from one screen. This guide takes about 30–45 minutes to complete. You do not need any technical experience, just follow each step in order.
Contents
Contents
What You Will Be Setting Up
Watch this short video to see what your finished Bag Repair POS will look like, so you know what you are working towards before you start.
Your POS will have four main screens:
- Checkout — The main counter screen where your staff takes in bags and creates orders.
- Orders — Where your staff views and manages all past and current orders.
- Cash Drawer — Tracks all cash payments throughout the day.
- Daily Sales — Closes out the day with a full sales summary across all payment methods.
Before You Start
Before you begin, make sure you have the following ready.
- An EasyBiz Cloud account. You need to be able to log in to your EasyBiz
- Your services and products added to EasyBiz. Your POS catalog is built from what you have already added to EasyBiz. For a bag repair business, you will have two types of items:
- Service items — Items your customers bring in, like bags, shoes, or wallets. These usually do not have a fixed price, because the cost depends on what the item needs. For example a light clean is priced differently from a full restoration. When your staff selects one, they will usually be asked to choose a service option (Deep Clean, Repair, Conditioning, etc.) and fill in a short intake form including brand, colour, condition, damage photos, and so on, before the final price is confirmed.
- Retail products — Items you sell at a fixed price, like cleaning kits or accessories. These go straight into the cart with no extra steps.
If you have not added your items yet, follow our guide on how to set up your product catalog before continuing.
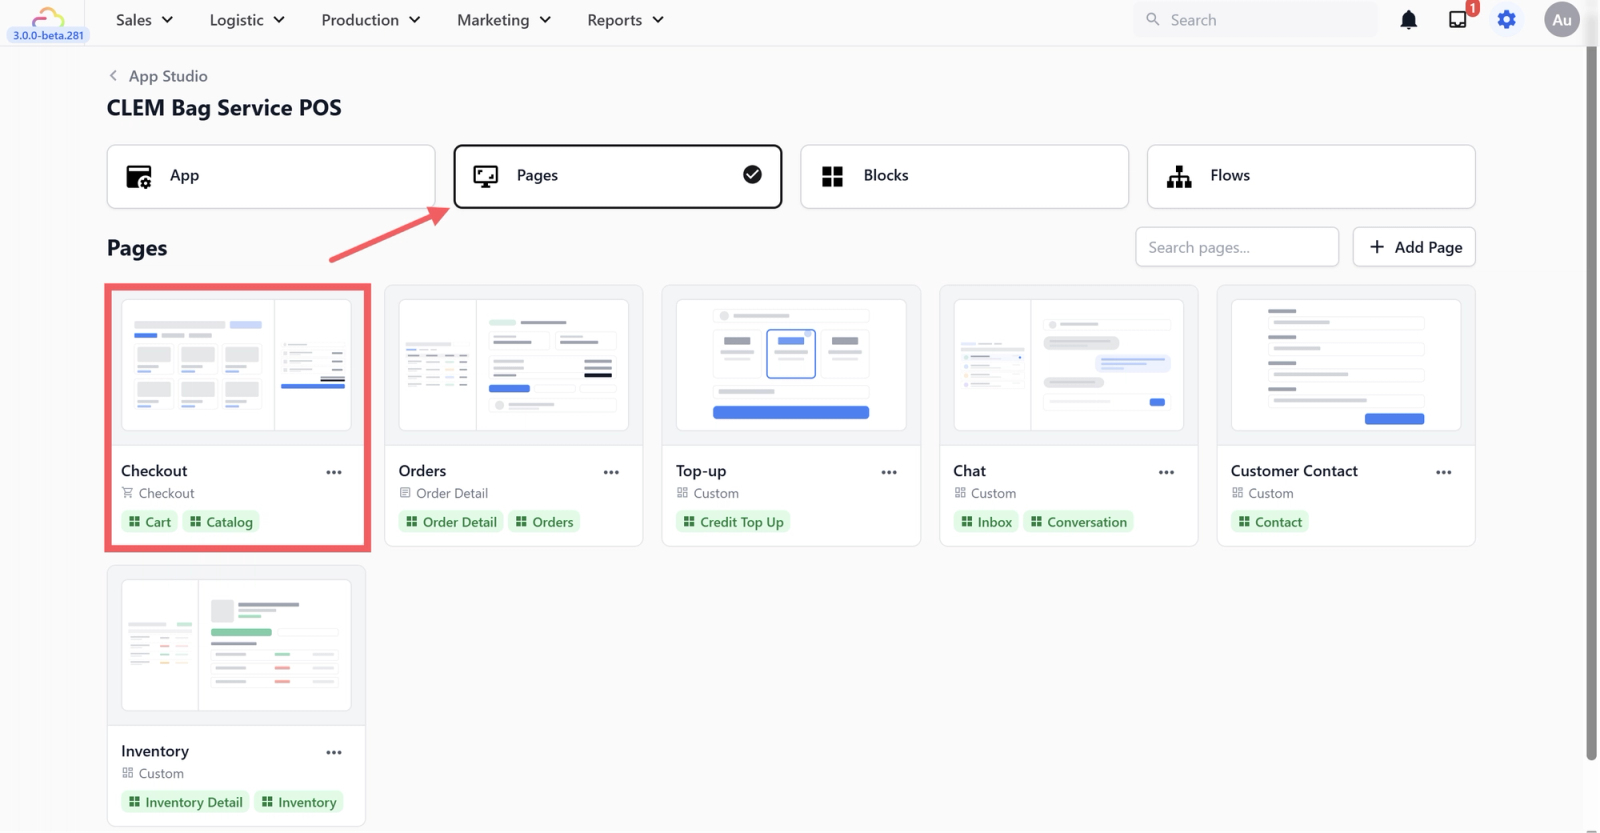
Create Your Bag Repair POS App
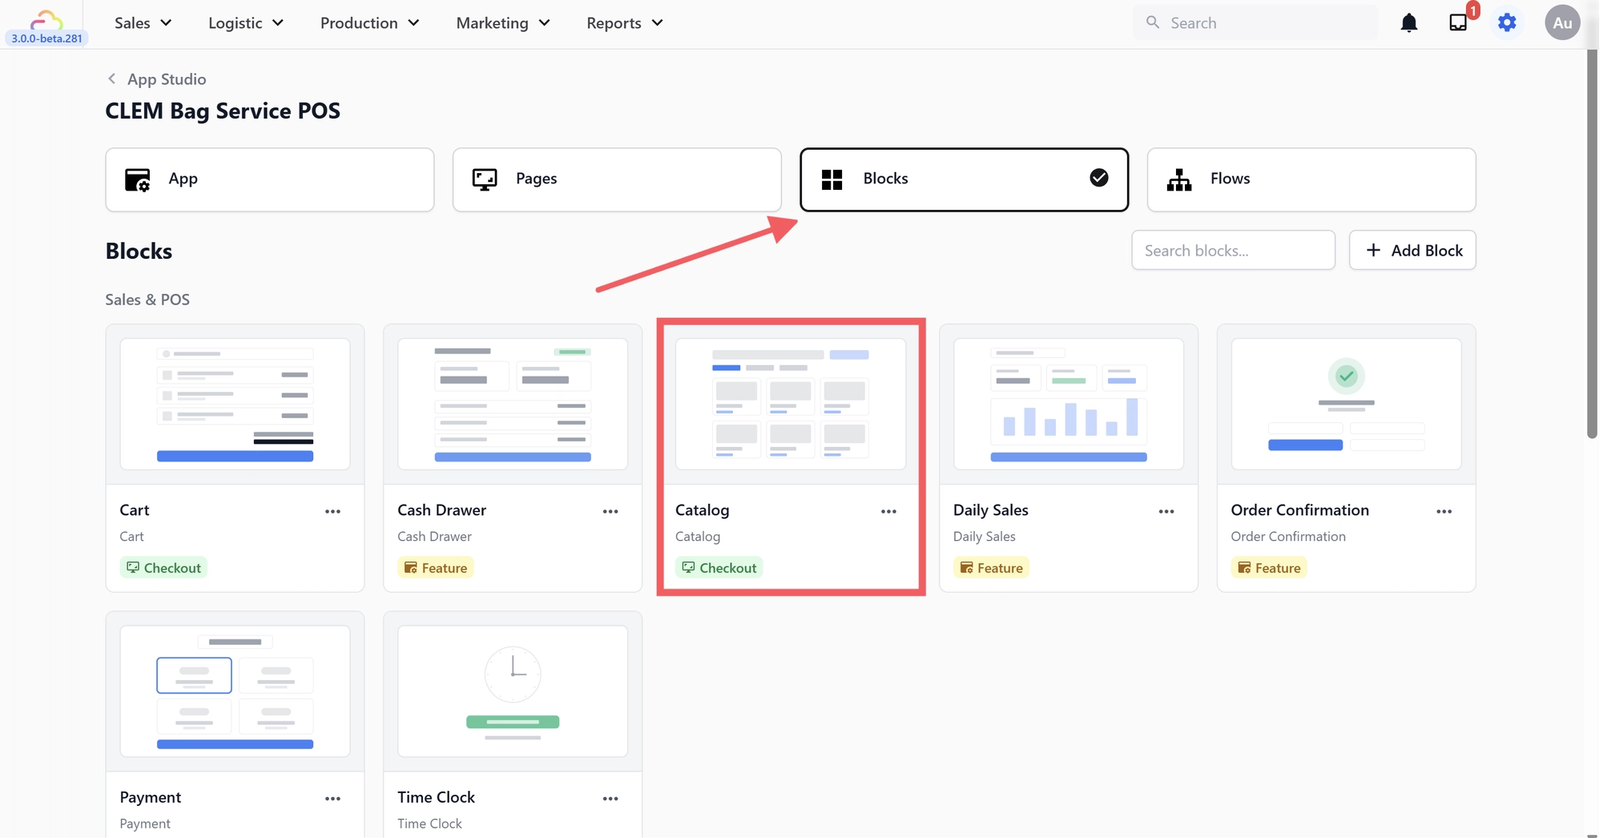
The first thing you need to do is create a new POS app in EasyBiz. There is a ready-made Bag Service POS template that does most of the work for you so you do not have to build anything from scratch. it comes with a checkout screen, order tracking, payment processing, and everything else already built in. You just need to connect it to your shop's services and products.
From the top navigation bar in your EasyBiz Console, click the Settings icon (the ⚙️ gear icon in the top right corner).

Under the Platform section, click App Studio.
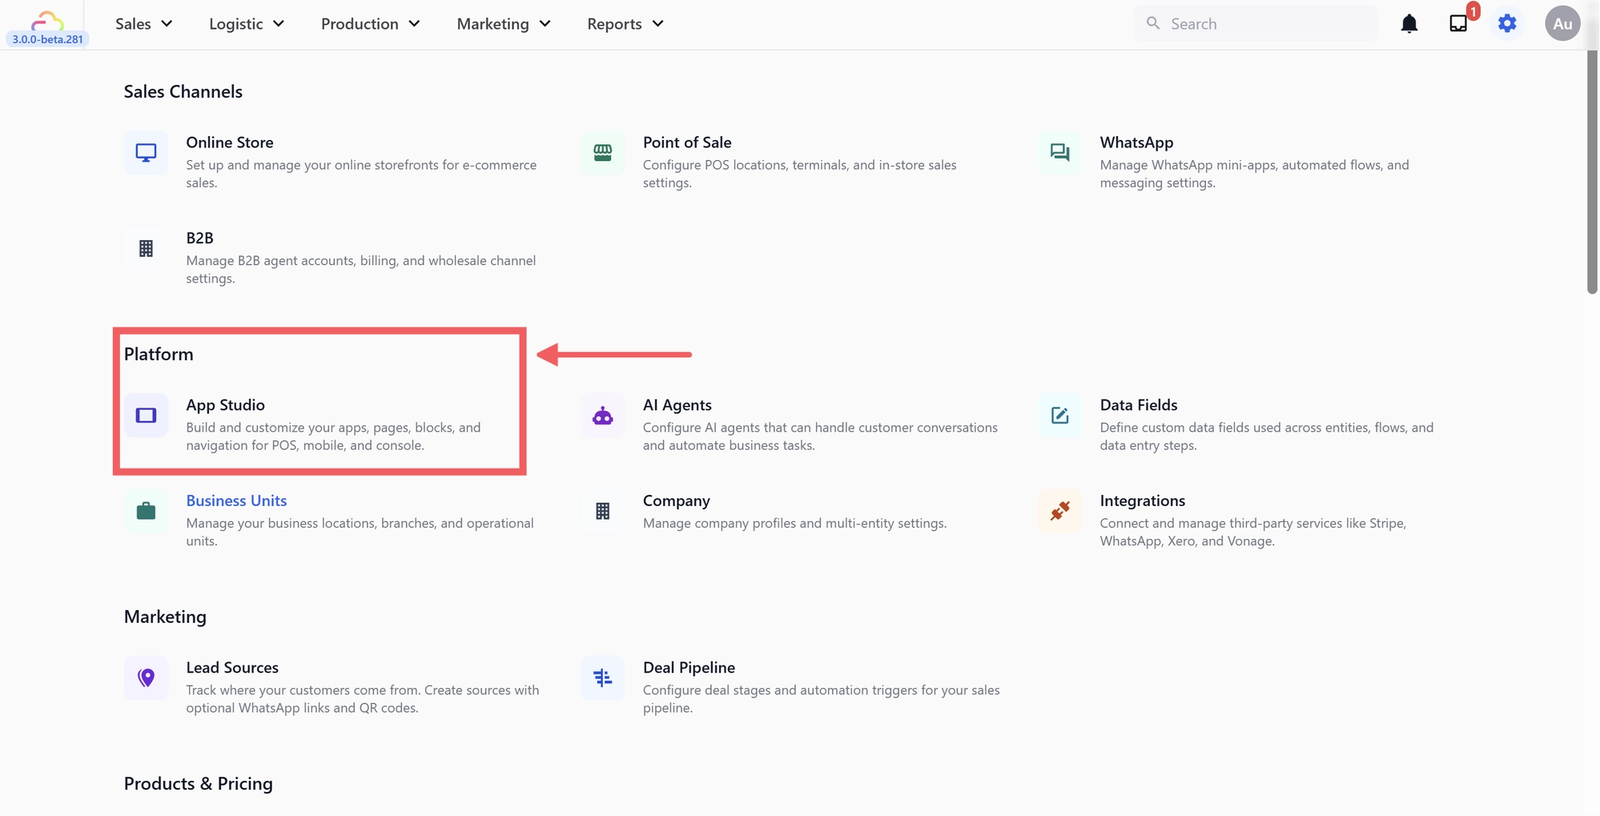
On the App Studio page, click the + Add New App button in the top right corner.

A window will appear asking you to choose a template. At the top, make sure Client Type is set to POS. You will see four options:
- Laundry POS — For laundry and dry cleaning businesses
- Bag Service POS — For bag repair and leather care businesses
- Retail POS — For retail shops
- Blank App — Start from scratch (not recommended for beginners)
Select Bag Service POS.

You will see an App Name field pre-filled with "Bag Service POS". You can keep this name or change it to something that fits your shop — for example, "Maison Luxury Care Counter" or "BagDoc POS".
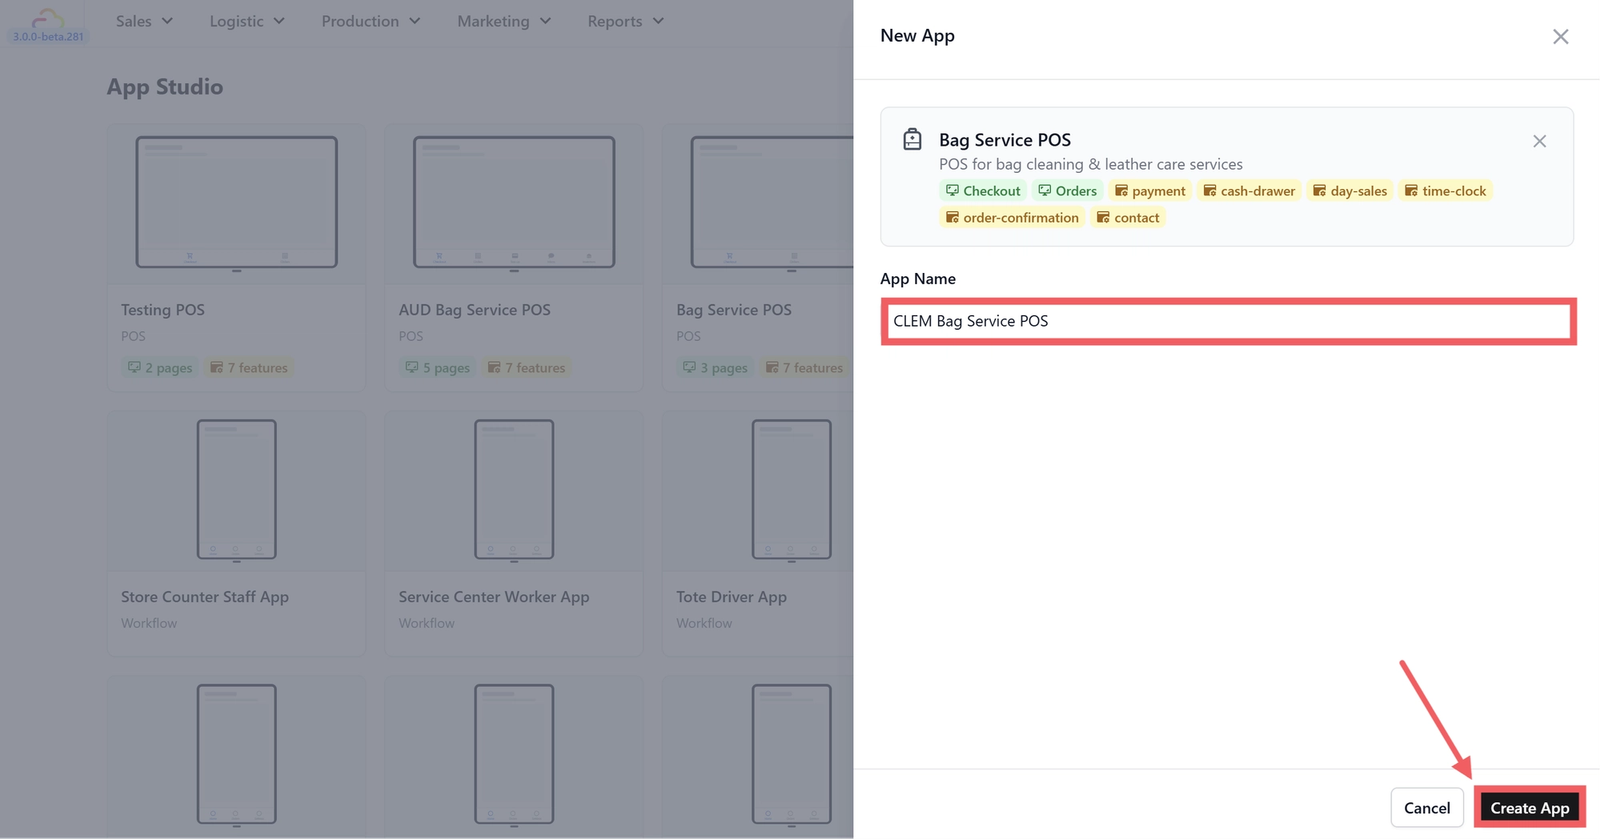
Click Create App.
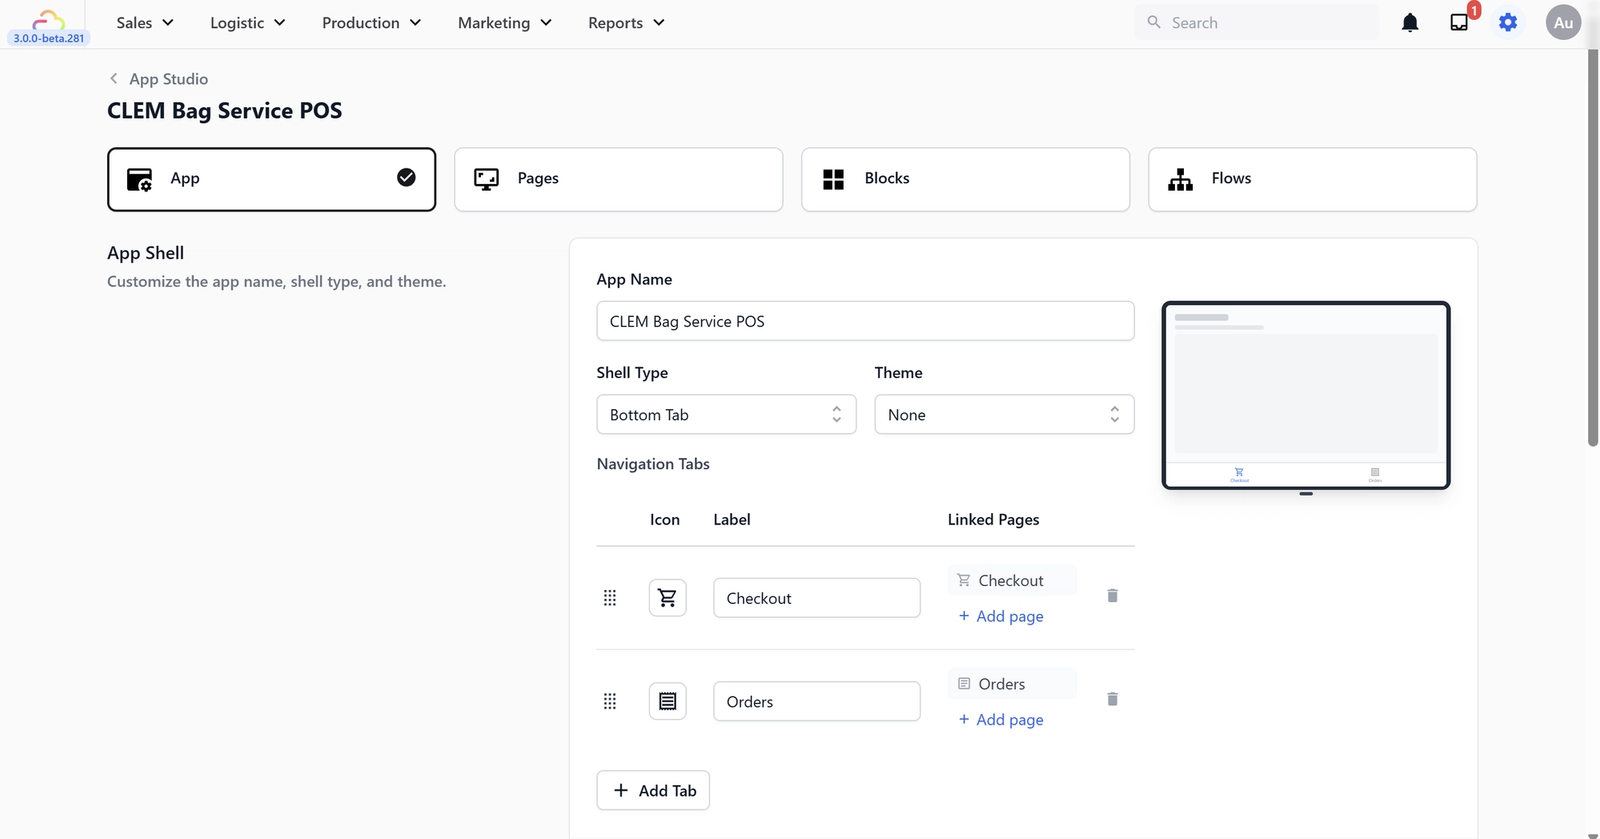
You will be taken to the setup page for your new app. This is where you will do all the configuration in the steps that follow.
Set Up Your Checkout Screen
The Checkout screen is the main screen your staff will use every day. It has two sides — the catalog on the left where your staff browses and selects items, and the cart on the right where selected items are added before payment.
In this step, you will configure four things:
- Catalog: Shows your bag repair service items and retail products.
- Cart: Where items are added and orders are completed.
- Payment: The payment methods your shop accepts.
- Order Confirmation: The screen shown right after an order is created.
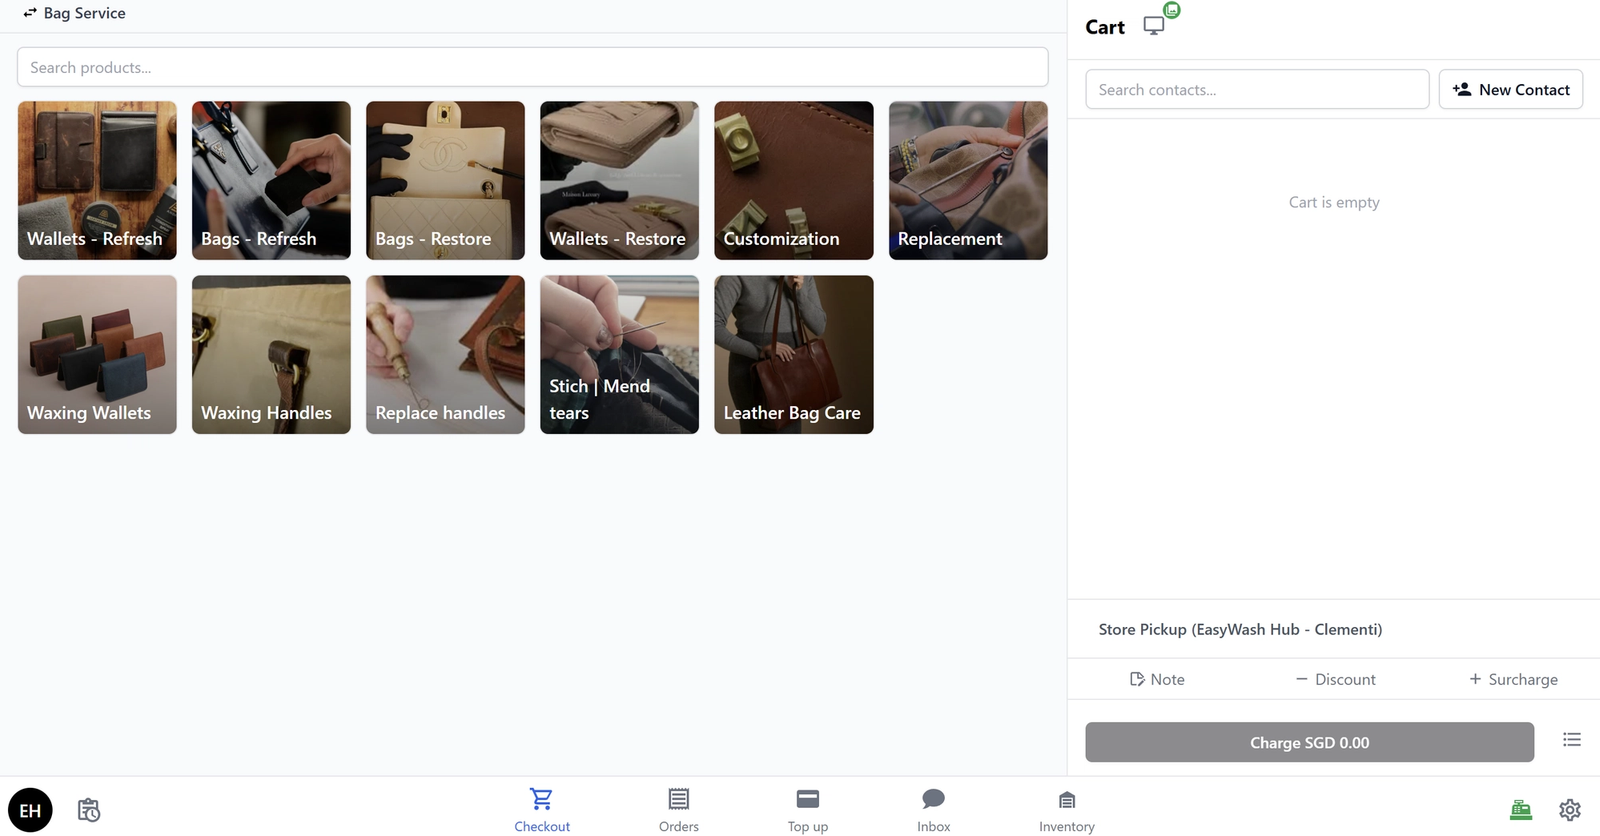
How the Checkout Page should look at the end of this section.
Configure Your Catalog
The Catalog is the left side of your Checkout screen. It shows all your bag repair service items and retail products, organised by category, so your staff can quickly find and select what a customer needs.
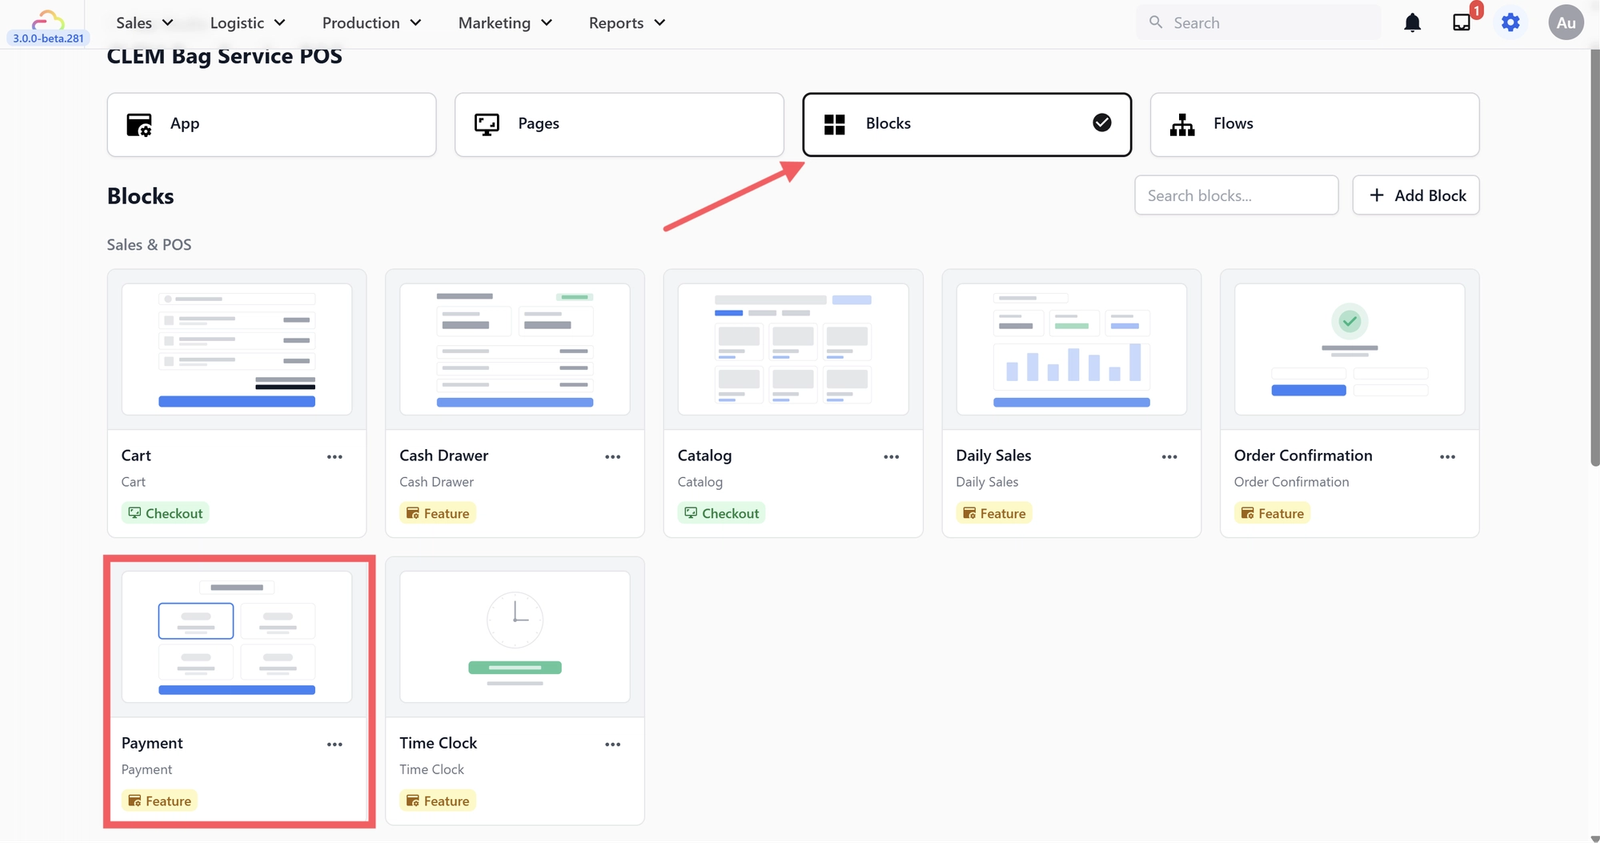
To set this up, from the Blocks tab, find the block called Catalog and click on it.
Set the following fields:
- Display Name: By default, the name follows the block. You can choose to rename it to how your business calls it or leave it as it is.
- Business Units: Select the business unit for your bag repair shop. This connects your POS to the right services and products in your EasyBiz account.
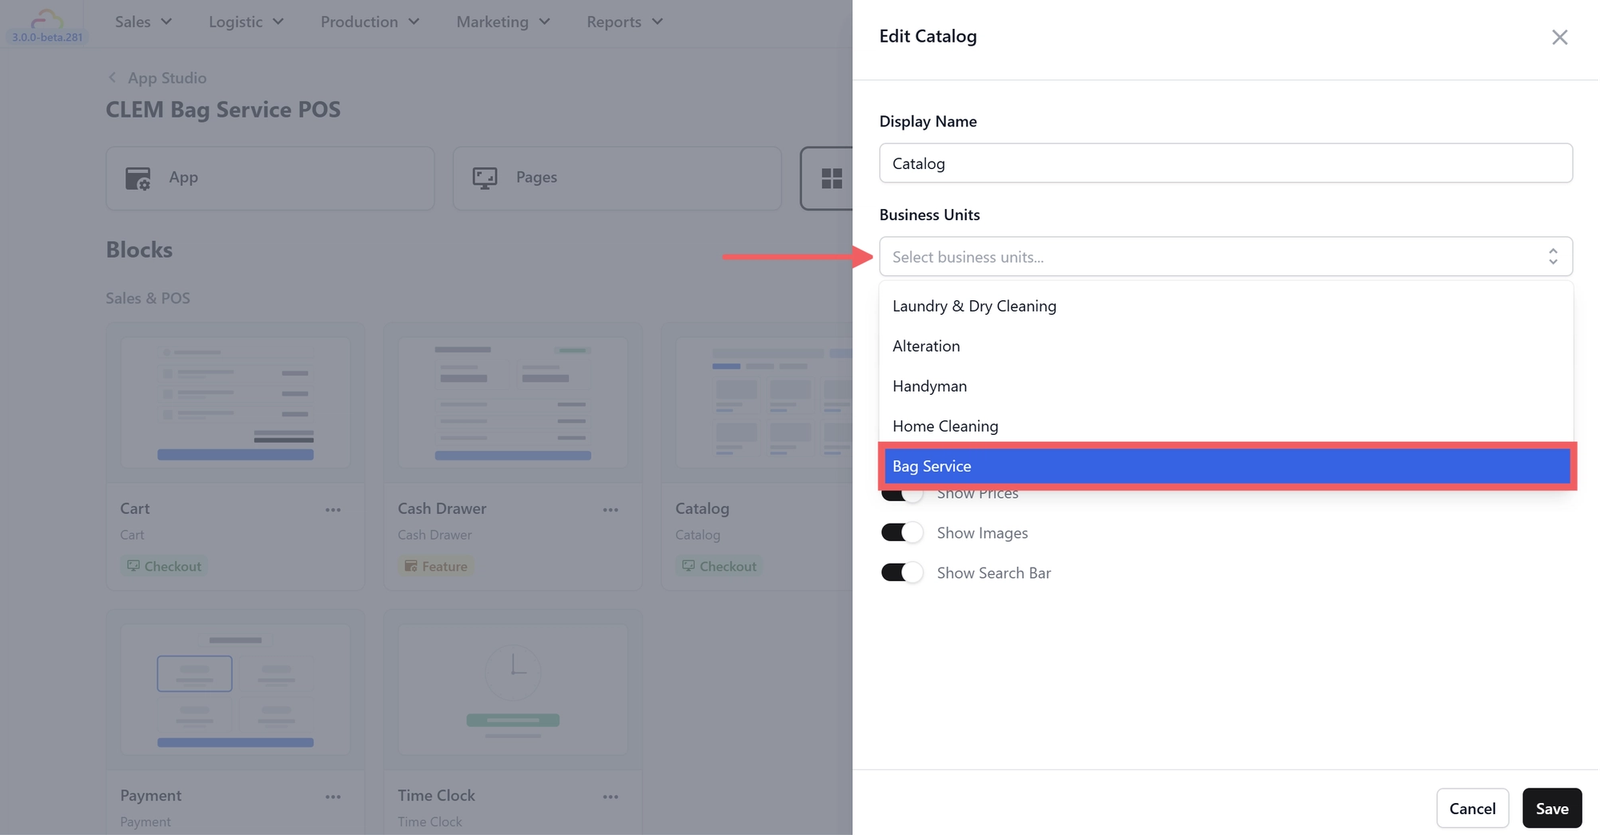
Once you select a business unit, more fields will appear underneath.
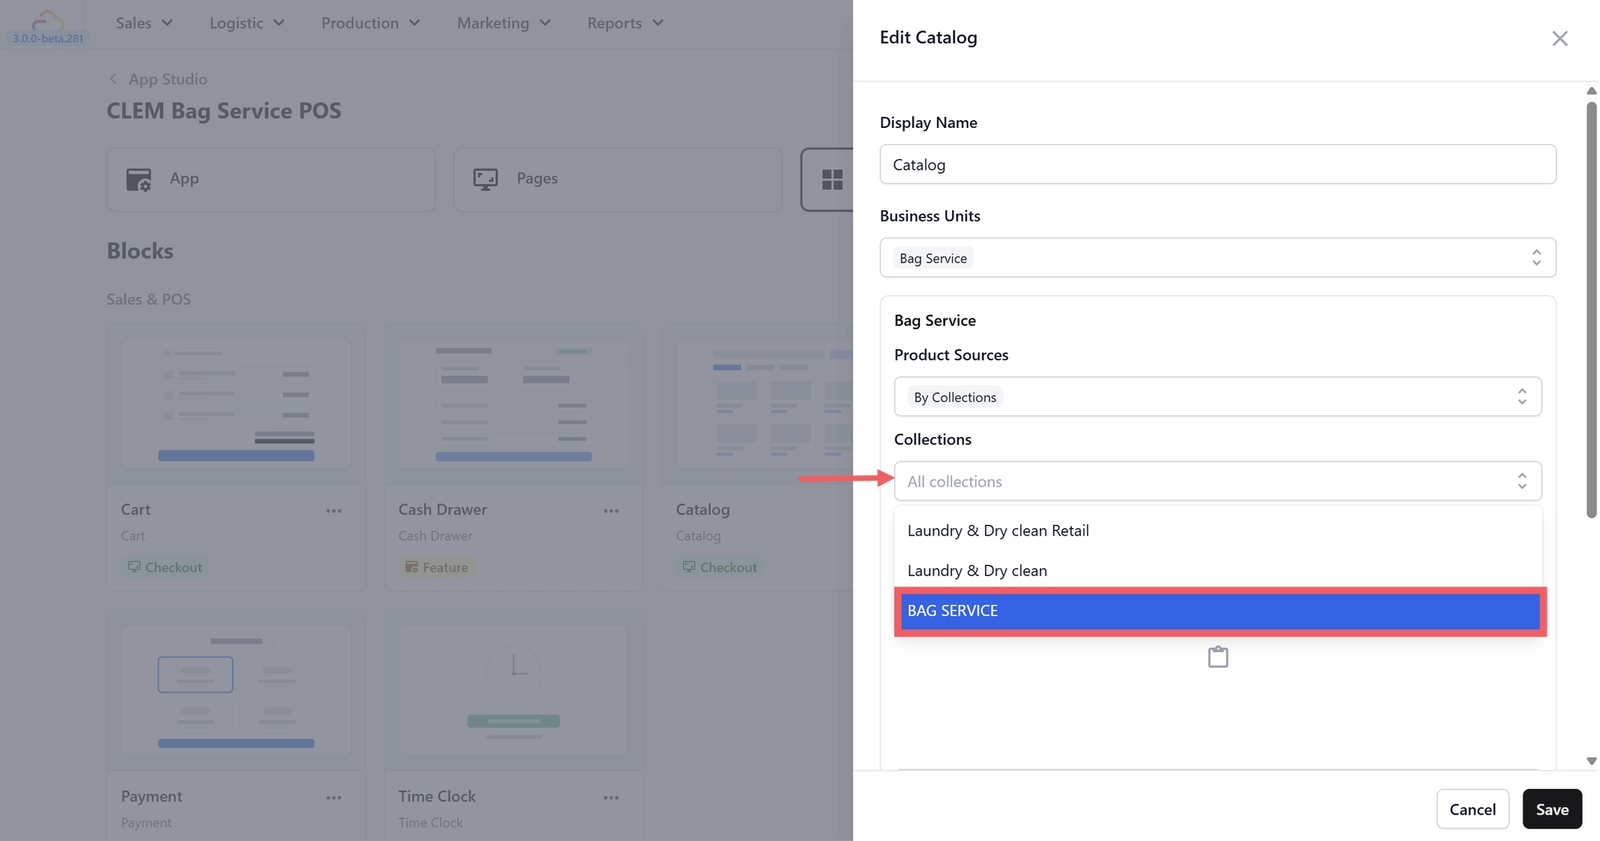
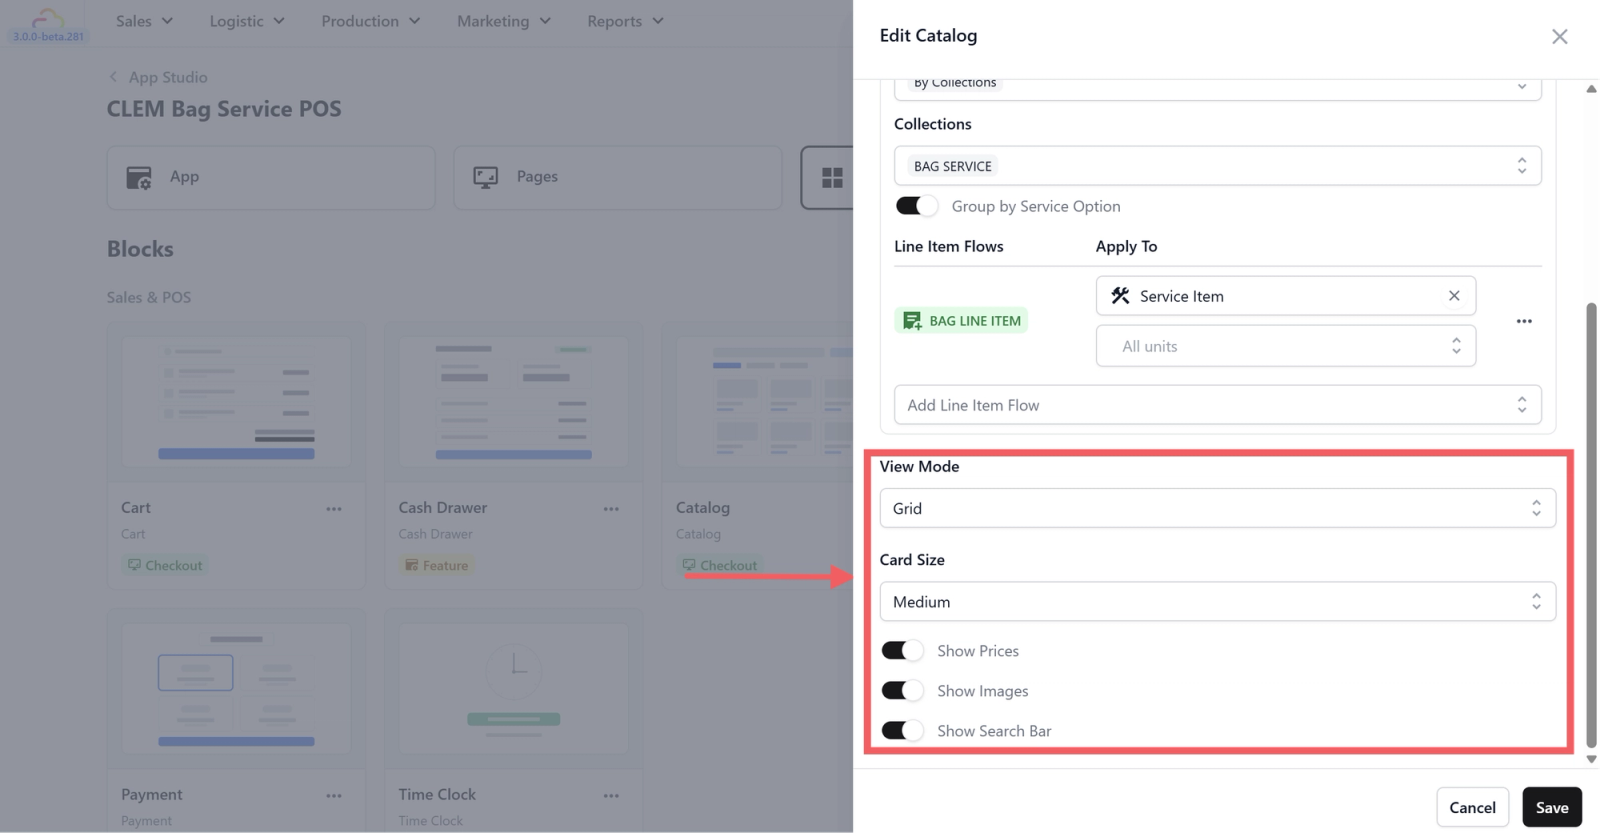
- Product Sources — This controls how your catalog is organised. For bag repair businesses, always select By Collections.
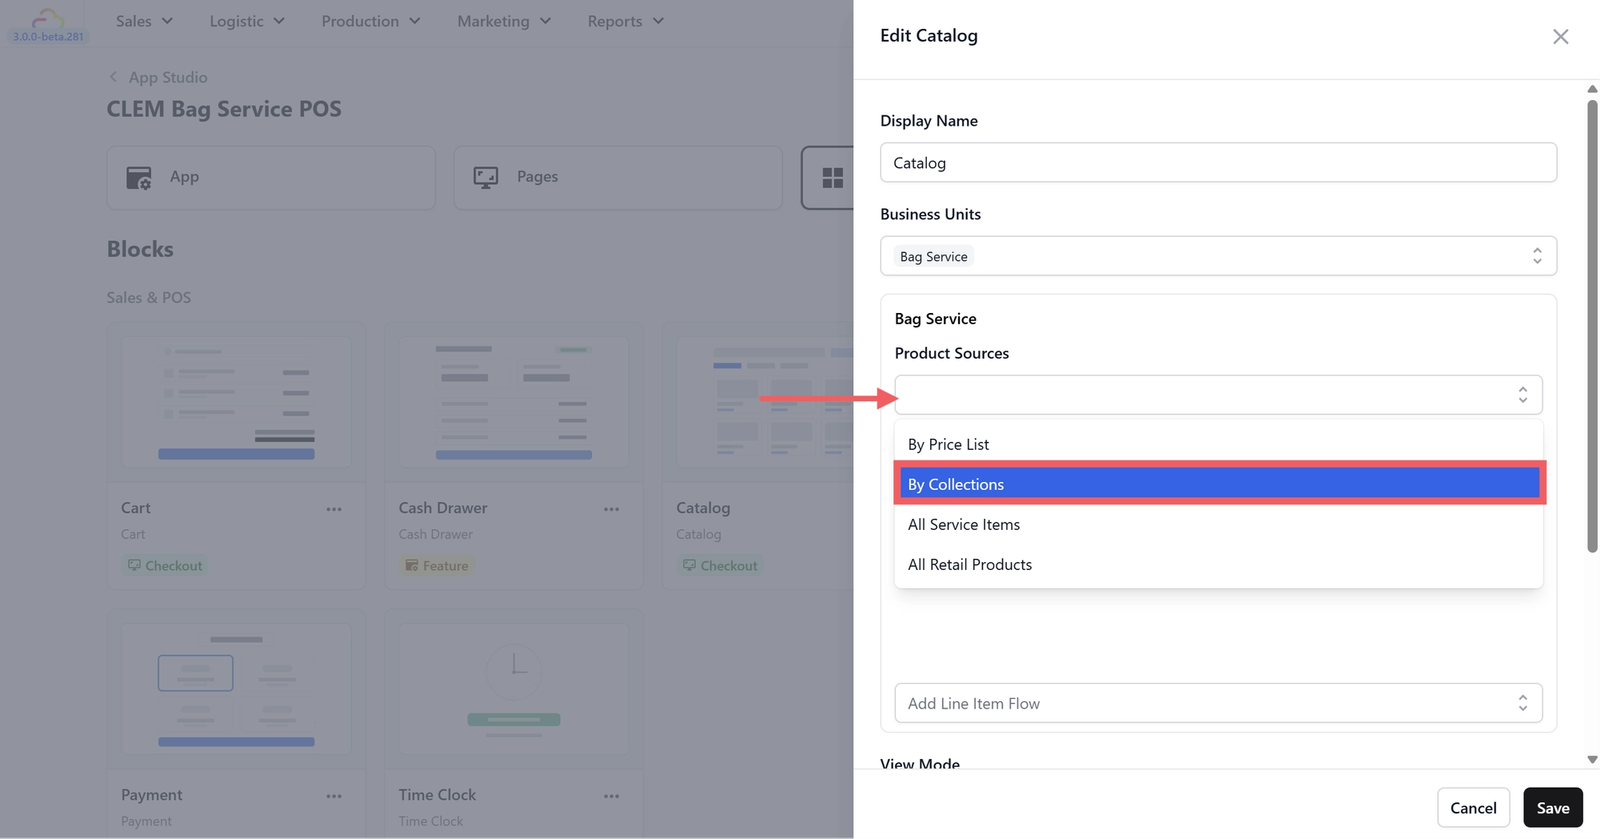
Collections — Select your bag service collection from the dropdown, for example, "BAG SERVICE".
You will also see these display settings:
- Group by Service Option: Turn this on. This organizes your catalog so items are grouped by service type.
- Line Item Flows: When your staff selects a service item (for example, Bag) and then picks a service option (for example, Deep Clean), a Line Item Flow is the short intake form that appears before the item is added to the order.
Each service option in your catalog can have its own flow. For example:
- Deep Clean → prompts for brand, color, condition, before photo
- Hardware Repair → prompts for brand, which hardware is damaged, before photo
- Leather Conditioning → prompts for leather type, colour, existing cracks
When adding a flow, you will see an Apply To field. Make sure this is set to Service Item. This way the intake form only appears when your staff adds a service item to the cart, and retail products still go straight into the cart with no extra steps since they have a fixed price.
- View Mode: Leave as Grid. This displays your items as cards which are easier to browse than a list.
- Card Size: Leave as Medium. If you have a large catalog, you can switch to Small to fit more items on screen.
- Show Prices: Turn this on for retail products. For service items where the price is confirmed after assessment, this is optional.
- Show Images: Turn this on if you have uploaded images for your products. It makes the catalog much easier to use at the counter.
- Show Search Bar: Turn this on so your staff can search for items by name instead of scrolling through the catalog.
Click Save when you are done.

Configure Your Cart
The Cart is the right side of your Checkout screen — where your staff builds the order and processes payment.
From the Blocks tab, find the block called Cart and click on it to open its settings.
Set the following:
- Display Name: You can rename this or leave it as the default.
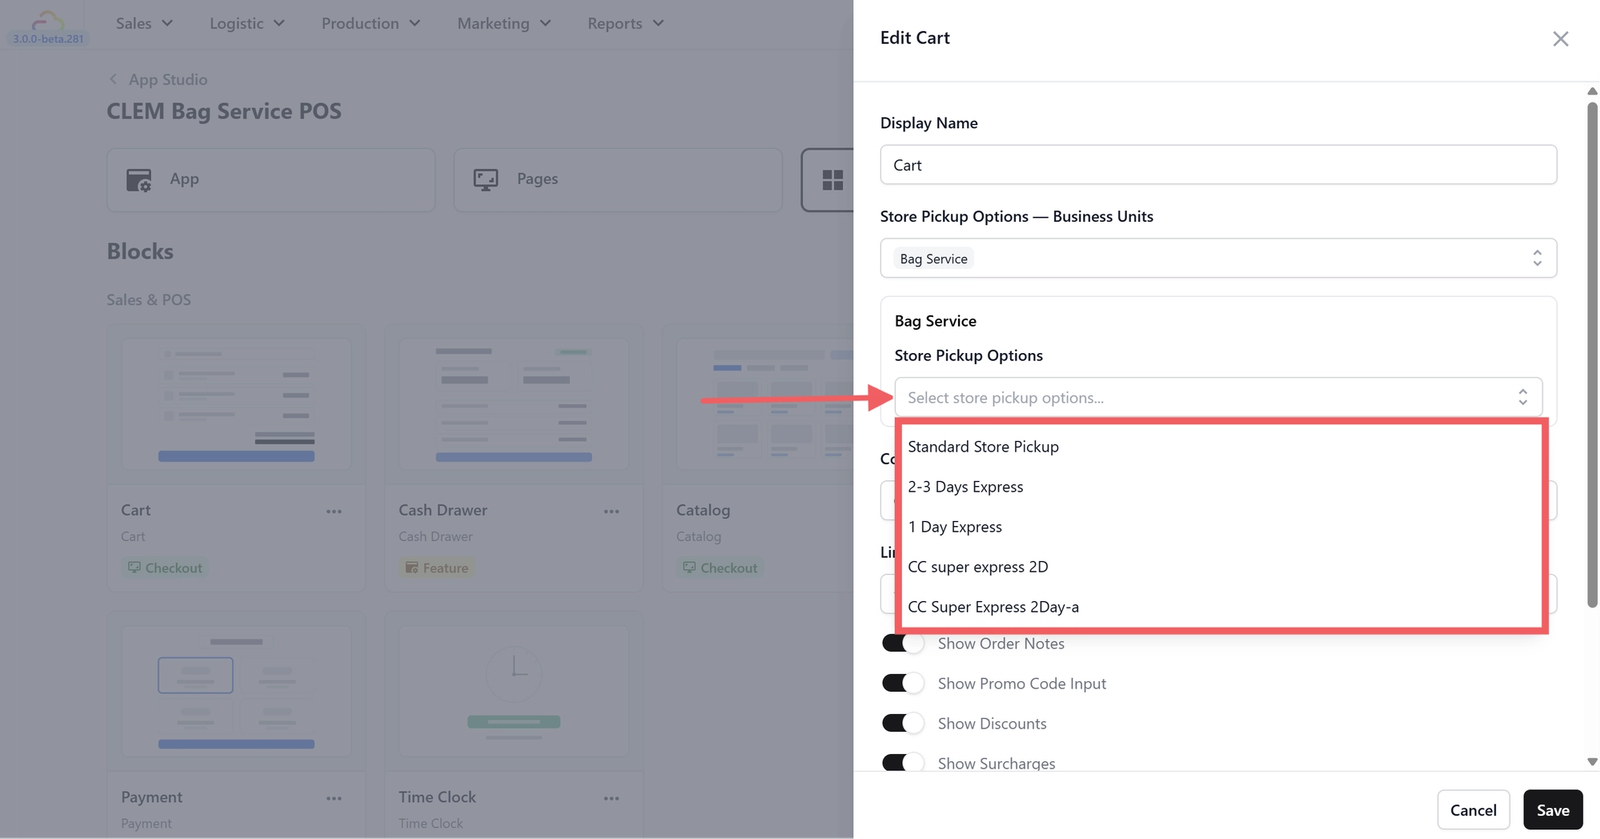
- Store Pickup Options — Business Units: Select the same business unit you chose for the Catalog.
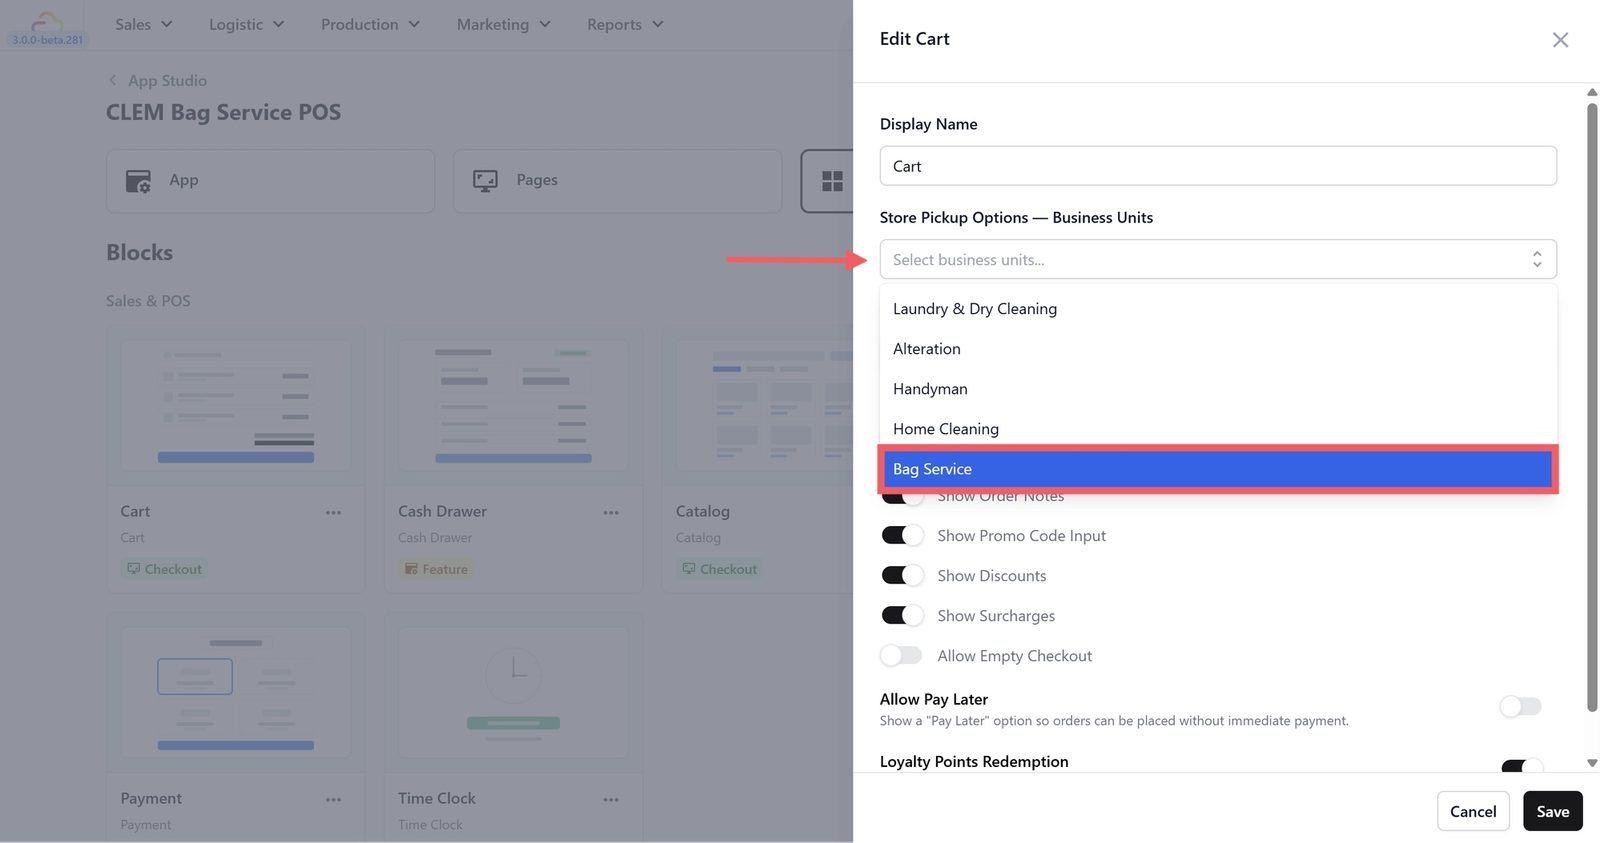
After selecting a business unit, your available turnaround times will appear. Select the ones that apply to your shop (for example, "Standard Store Pickup", "2-3 Days Express", "1 Day Express").
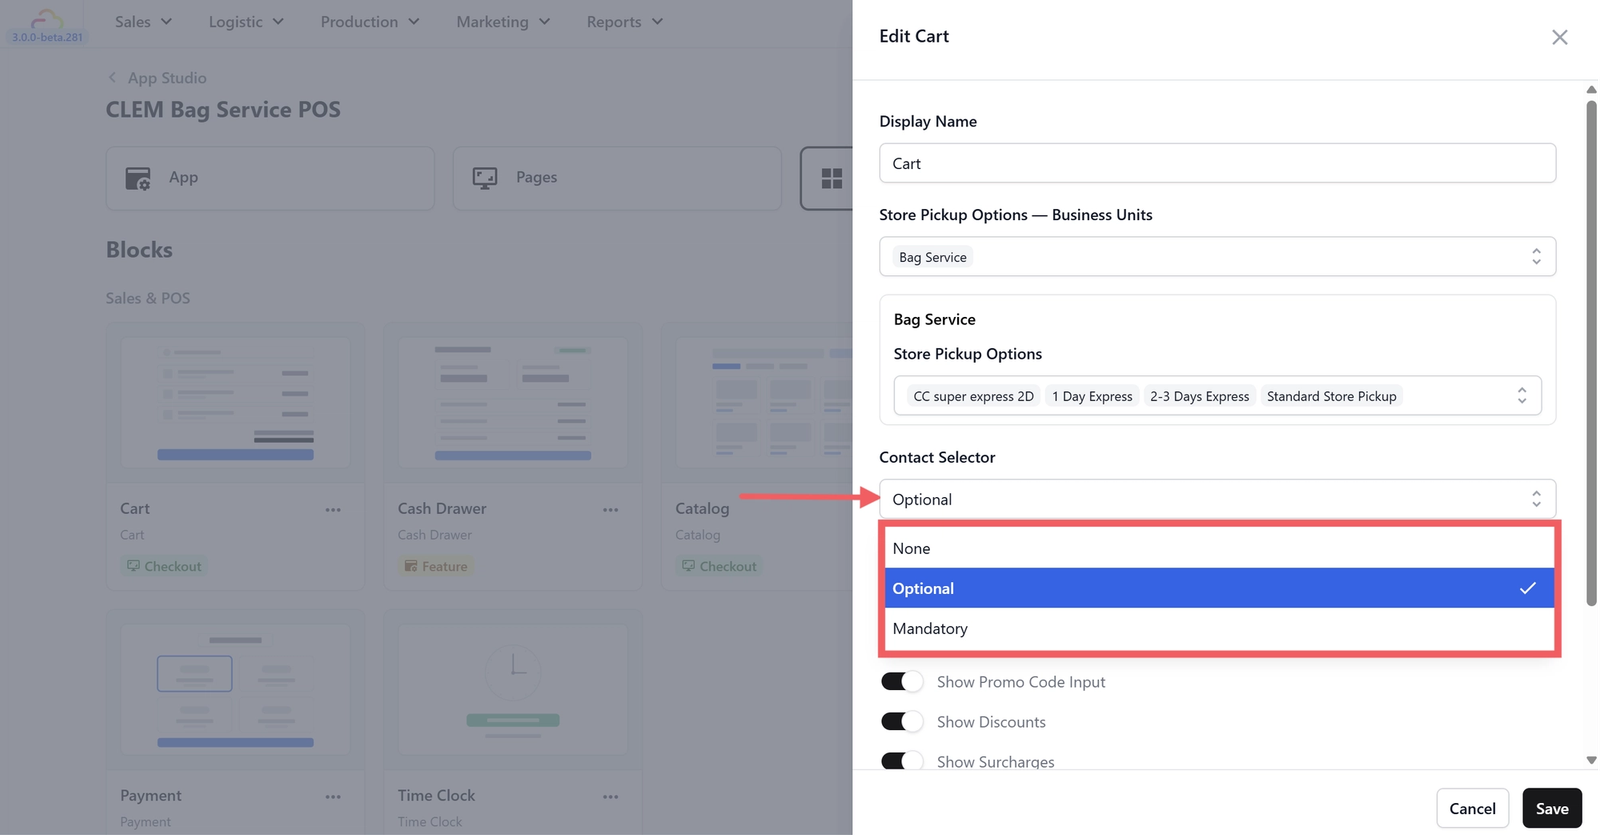
- Contact Selector: This controls whether your staff needs to assign a customer to each order. It defaults to Optional. For bag repair businesses, we recommend changing this to Mandatory since every bag in your shop needs to be traceable to a specific customer, especially when you have multiple bags from different customers in the shop at the same time.
- None — No customer needs to be assigned. Not recommended for bag repair businesses.
- Optional — Staff can assign a customer or skip it.
- Mandatory — Staff must assign or create a customer record before the order can be completed. Recommended for bag repair.
- Line Item Description: Leave this as is, or enter a label if you want a notes field on each line item. Type @ to see a list of placeholders you can insert.
You will also see several toggles. Here is what each one does:
- Show Order Notes: Turn this on. Useful for special instructions like "Customer wants colour matching" or "Call customer before collection."
- Show Promo Code Input: Turn on if you use promo codes for discounts.
- Show Discounts: Turn on if your staff can apply manual discounts at the counter.
- Show Surcharges: Turn on if you charge extra for things like express handling or specialty materials.
- Allow Empty Checkout: Leave this off.
- Allow Pay Later: Turn this on. Most bag repair businesses collect payment when the customer picks up their bag not when they drop it off. This setting lets your staff create an order without collecting payment upfront.
- Loyalty Points Redemption: Turn on if you have a loyalty programme set up.
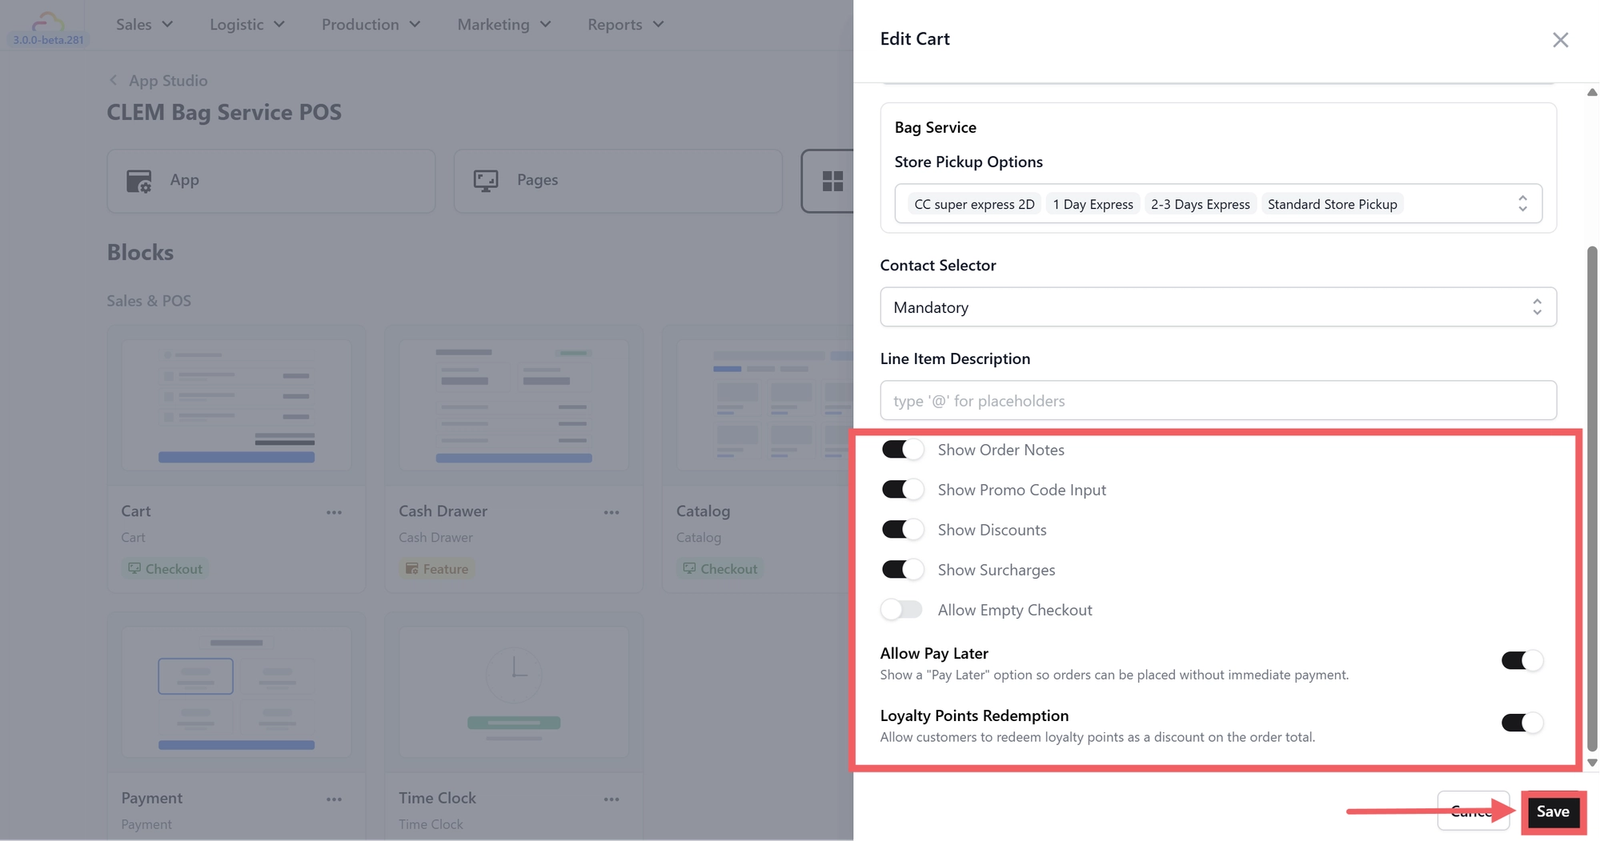
Click Save when you are done.
Configure Payment Methods
The Payment block controls which payment methods your staff can accept when checking out an order. You need to turn on the ones your shop uses so they appear as options during checkout.
Go to the Blocks tab, find the block called Payment and click on it.
You will see payment methods grouped into three sections:
- Stripe (Online & terminal payments)
- Card: for card payments via a Stripe terminal
- GrabPay
- PayNow
- In-House (Cash & store credit)
- Cash: For cash payments. This is what gets tracked in your Cash Drawer.
- Store Credit: if you offer top-ups or store credit
- Custom Method (Manual / record-only methods)
- Grab, Cheque, MASTERCARD, Credit Card, VISA, Bank Transfer: These are additional payment methods you can offer. Toggle on the ones your shop accepts.
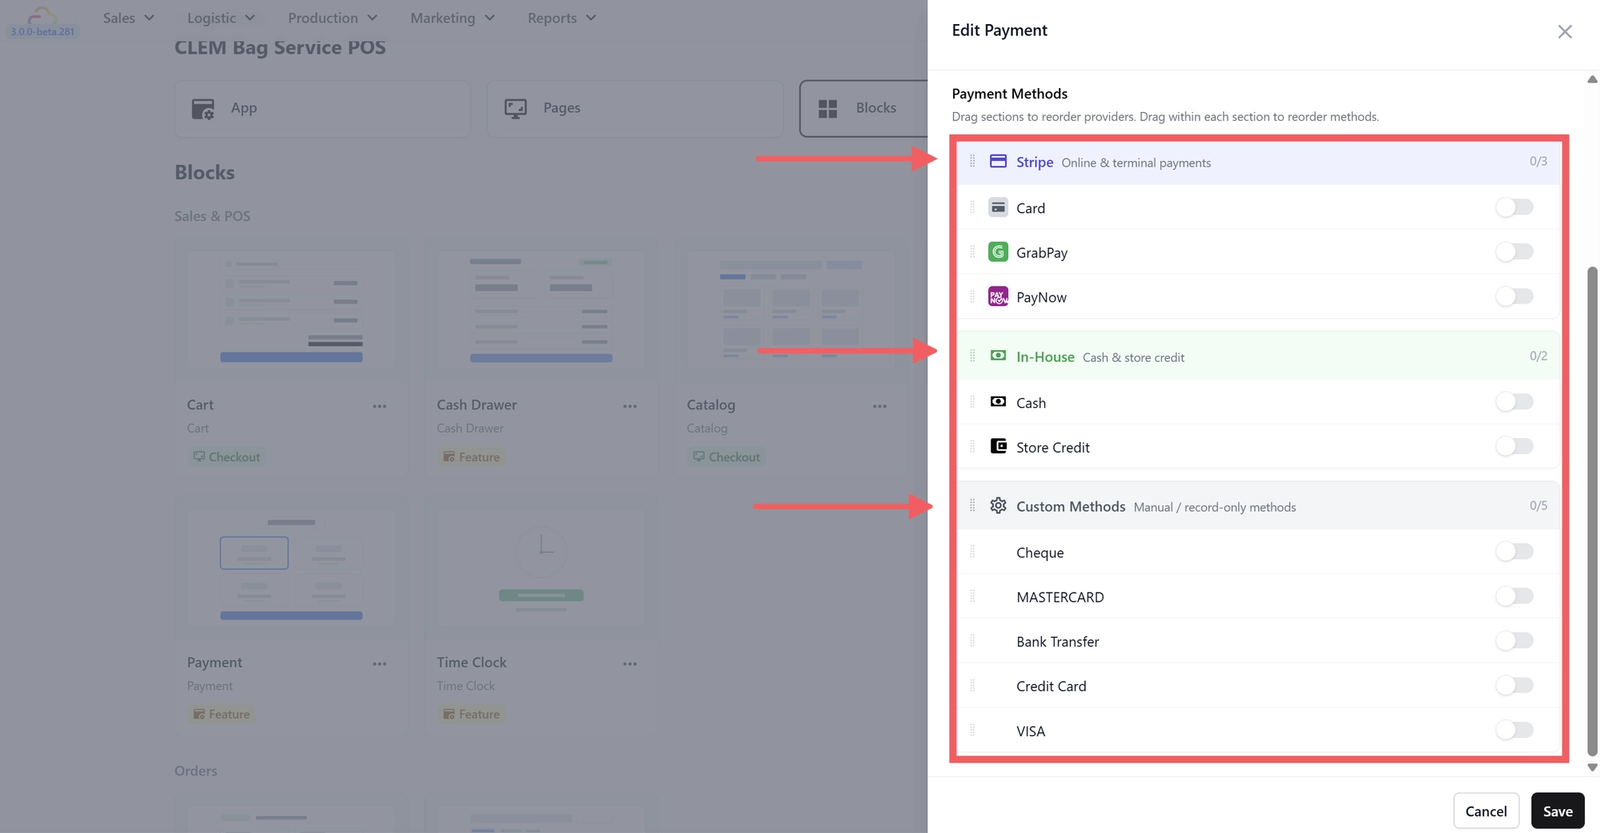
Toggle on the payment methods your shop accepts. For most bag repair shops, at least Cash and PayNow or Bank Transfer are a good starting point.
You can drag and reorder the methods the order you set here is the order your staff will see them during checkout.
Click Save when you are done.
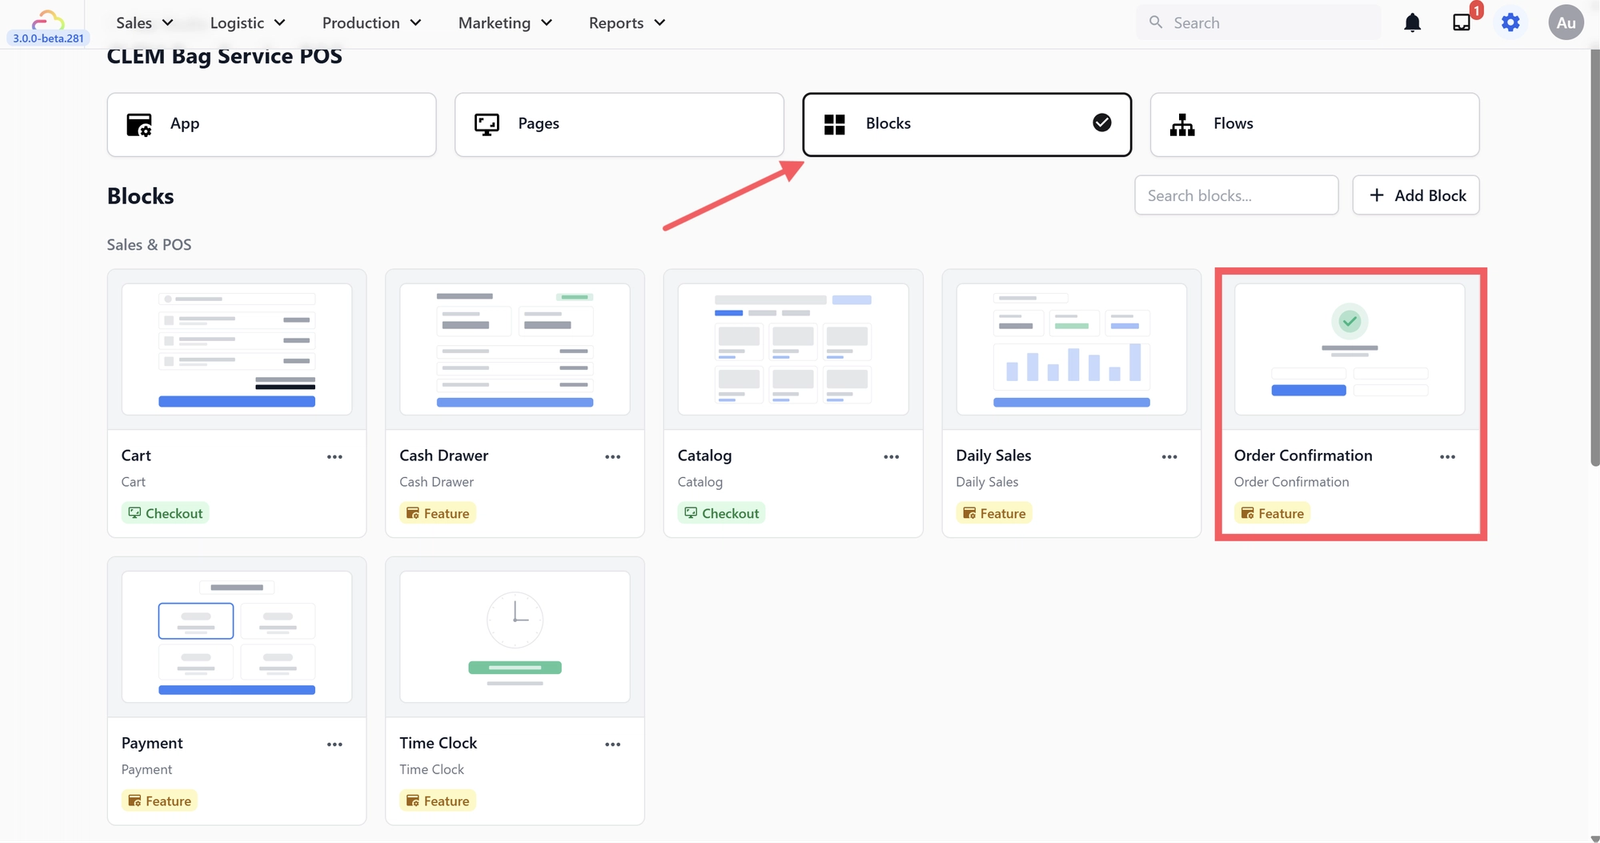
Configure Order Confirmation
The Order Confirmation is the screen your staff sees right after an order is successfully created. It lets them take quick actions — like printing a receipt, printing labels, or contacting the customer — without having to go to the Orders screen.
From the Blocks tab, find the block called Order Confirmation and click on it to open its settings.
You will see:
- Display Name: Defaults to block name. (you can leave this as is or give it a meaningful name)
- Action button columns: Defaults to 2. This controls how many action buttons appear per row on the confirmation screen.
- Confirmation Actions: Click the Add action dropdown to choose which actions your staff can take right after an order is created.
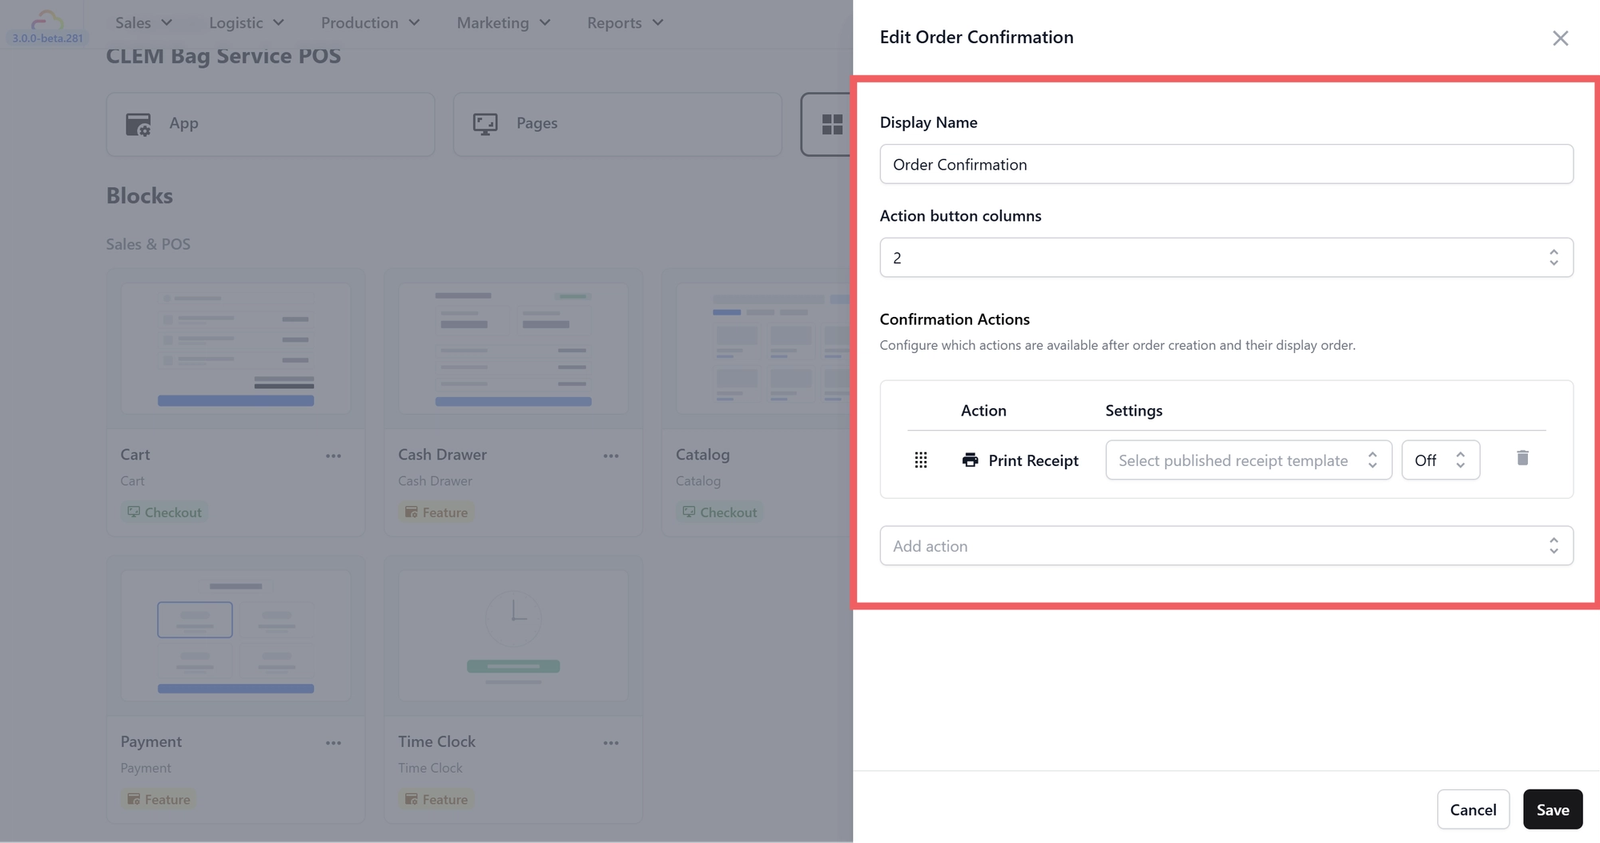
Actions that work straight away with no extra setup needed:
- Call: Call the customer directly.
- Direction: Open directions to the customer's address.
- WhatsApp: Send the customer a WhatsApp message.
- Payment: Collect payment if the customer has not paid yet.
Actions that need a template to be set up first:
- Print Receipt: Print a receipt for the customer. You will need to create and publish a receipt template first. See our guide on configuring receipt templates.
- Print Labels: Print labels for each laundry item. You will need to create and publish a label template first. See our guide on configuring label templates.
- Email: Email the customer an order summary. You will need to create and publish an email template first. See our guide on configuring email templates.
Verify Your Checkout Page
If you selected the Bag Service POS template at the start, your Catalog and Cart are already linked to the Checkout page. This step just confirms everything is connected correctly. You can verify this by going to the Pages tab and clicking on the Checkout page.
You should see:
- Page Name: Defaults to name of the Page. (You can rename this if your business calls checkout differently)
- Layout: Split by default. Change this if you want a top-down view compared to the side-by-side view.
- Split Ratio: 2:1 ratio by default. Change this if you want to view the Catalog and cart differently.
- Left side: Your Catalog.
- Right side: Your Cart.
- Order Confirmation Block (under Links): Set this to the Order Confirmation block you just configured. This tells the Checkout page which confirmation screen to show after a successful order.
Click Save when you are done.
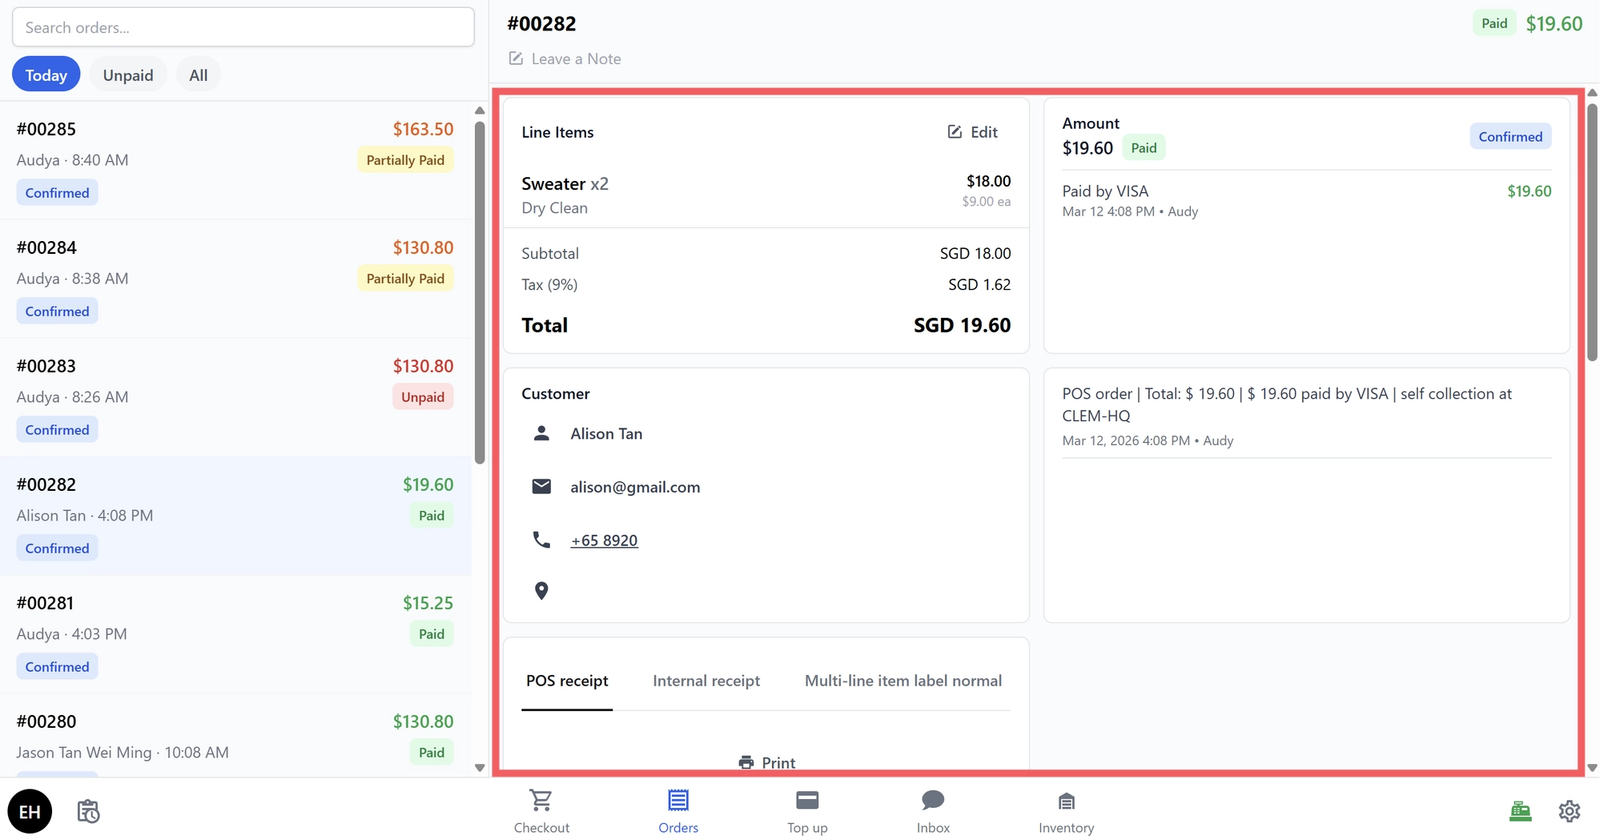
Set Up Your Orders Screen
The Orders screen lets you view and manage all the orders placed through your POS. The template has already set this up for you, so it works right away.
From the POS side, you will see a list of orders on the left, and the full details of each order on the right.
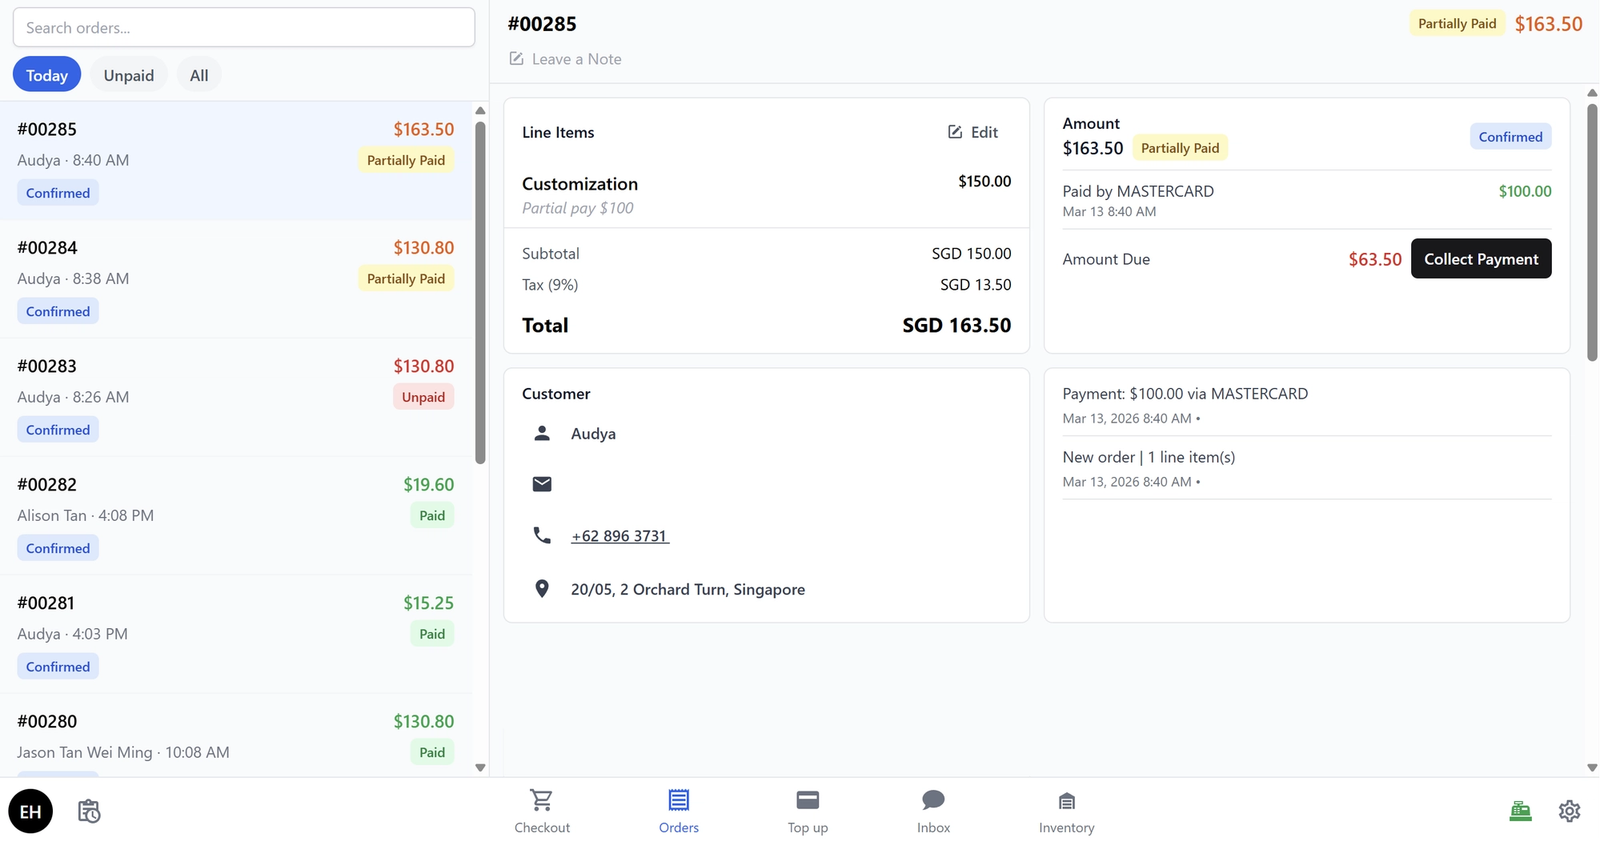
For the order details, you can add extra sections to the screen to help your staff manage orders better.
- From App Studio, go to the Blocks tab. Find the block called Order Detail and click on it.
You will see a list of sections that are already included:
- Line Items: What the customer ordered.
- Payment: Payment status and history.
- Customer: Customer details.
- History: Order timeline.
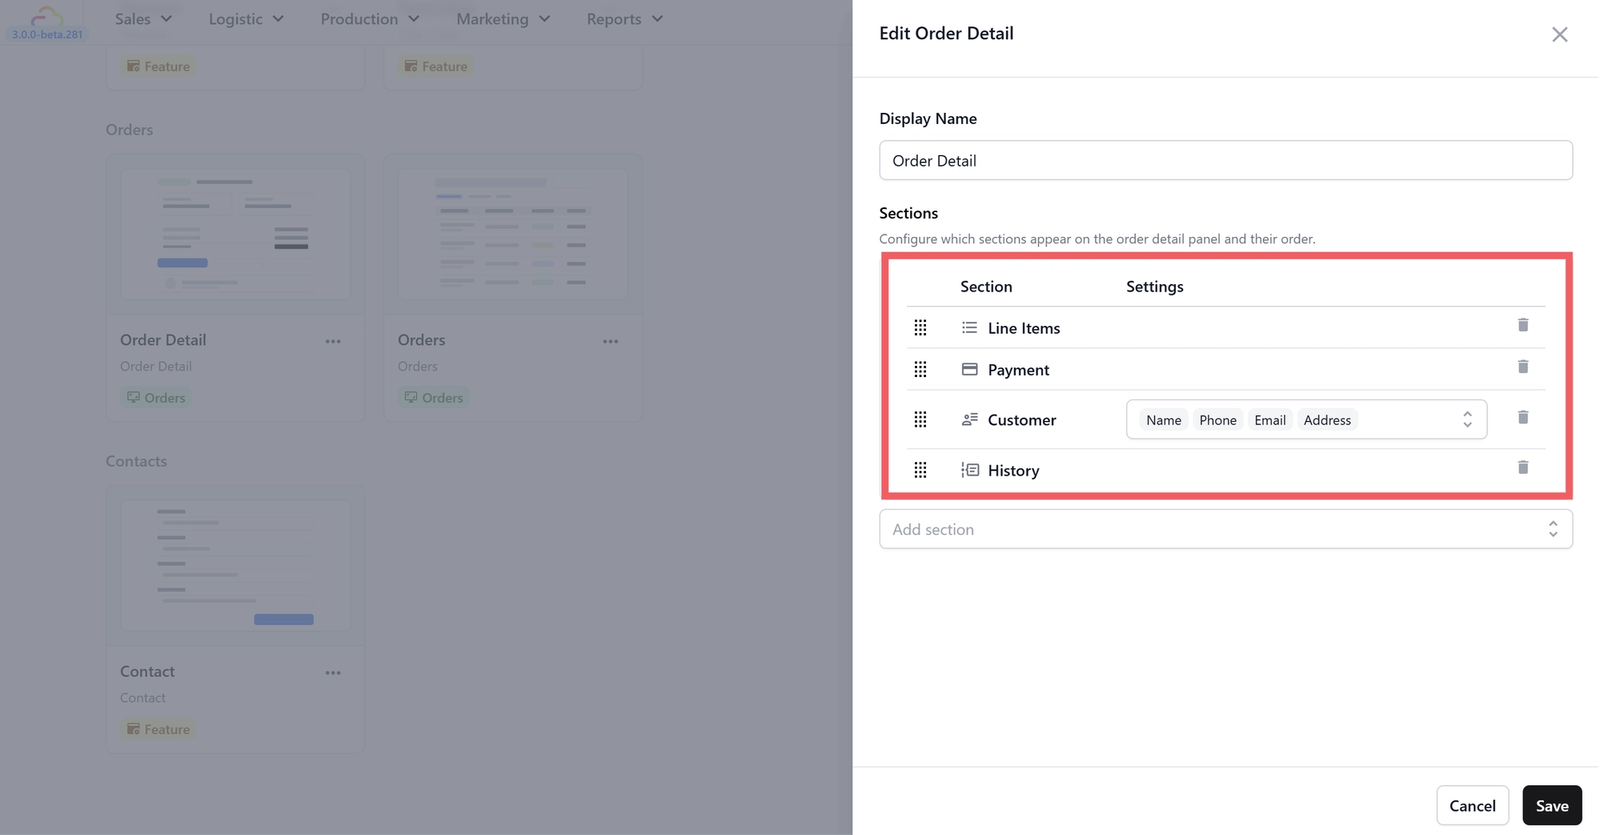
Click the Add section dropdown to see what else you can add. For a Bag service shop, we recommend adding:
- Print: Lets your staff print receipts and labels directly from any order. Very useful for tagging items so nothing gets mixed up.
- When you add this section, you will need to select which templates to use from the dropdown (for example, "POS receipt" for receipts or "Package label" for item labels). Your console should already come with default templates to choose from.
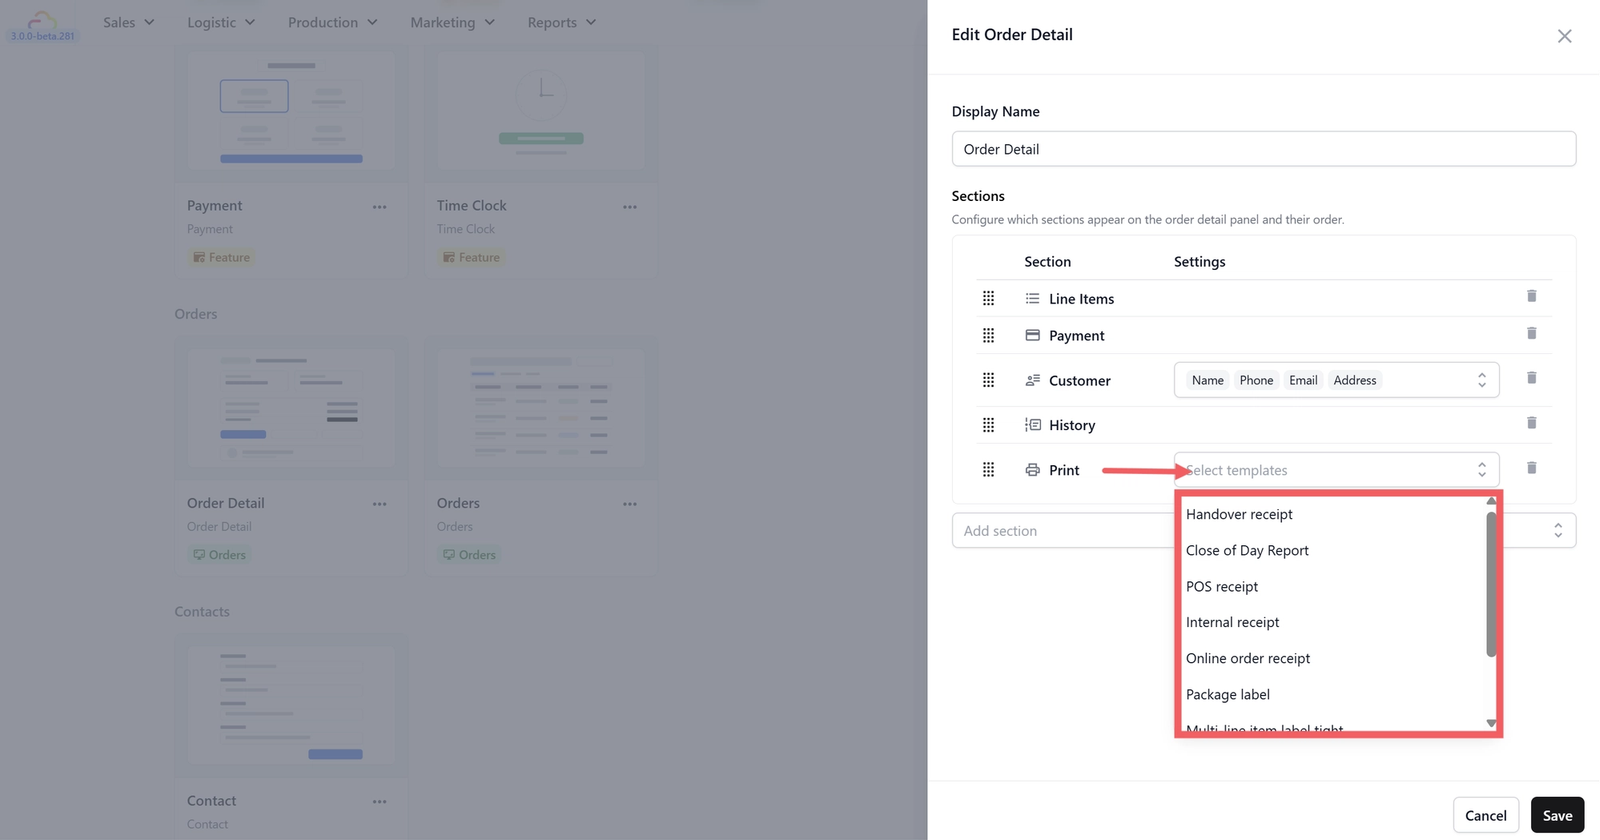
Click Save when you are done, then head back to your POS to see the updated order detail screen.
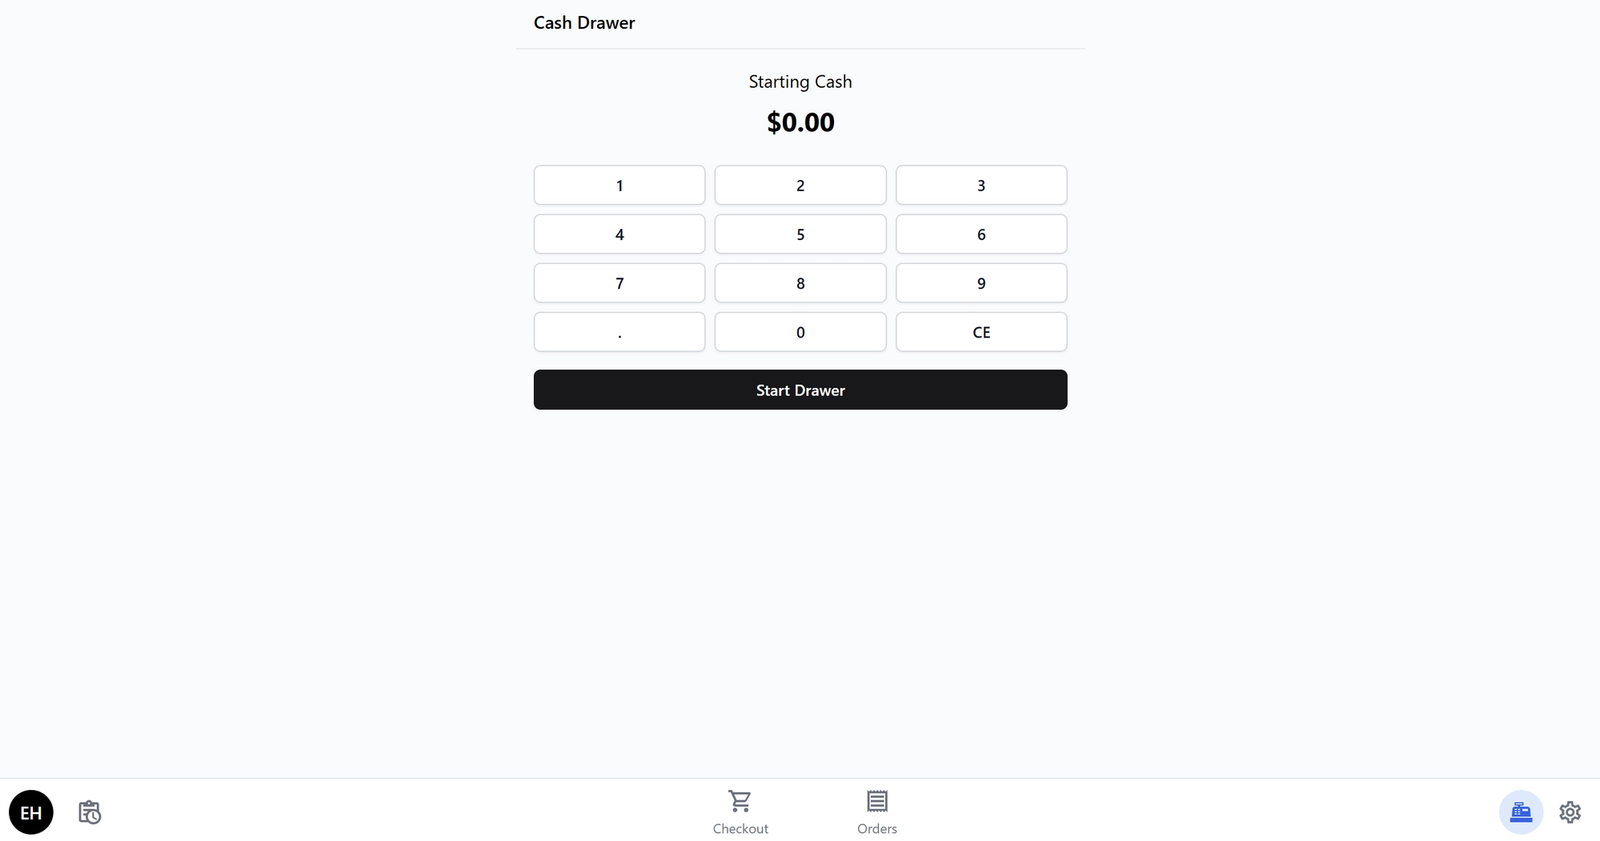
Set Up Your Cash Drawer
The Cash Drawer is already included in your POS by default. It tracks all cash payments throughout the day. At the start of each shift, your staff enters how much cash is in the drawer. As cash payments come in, the system adds them automatically. At the end of the day, you can see exactly how much cash should be in the drawer and check it against what is actually there.
By default, the starting cash is set to $0.
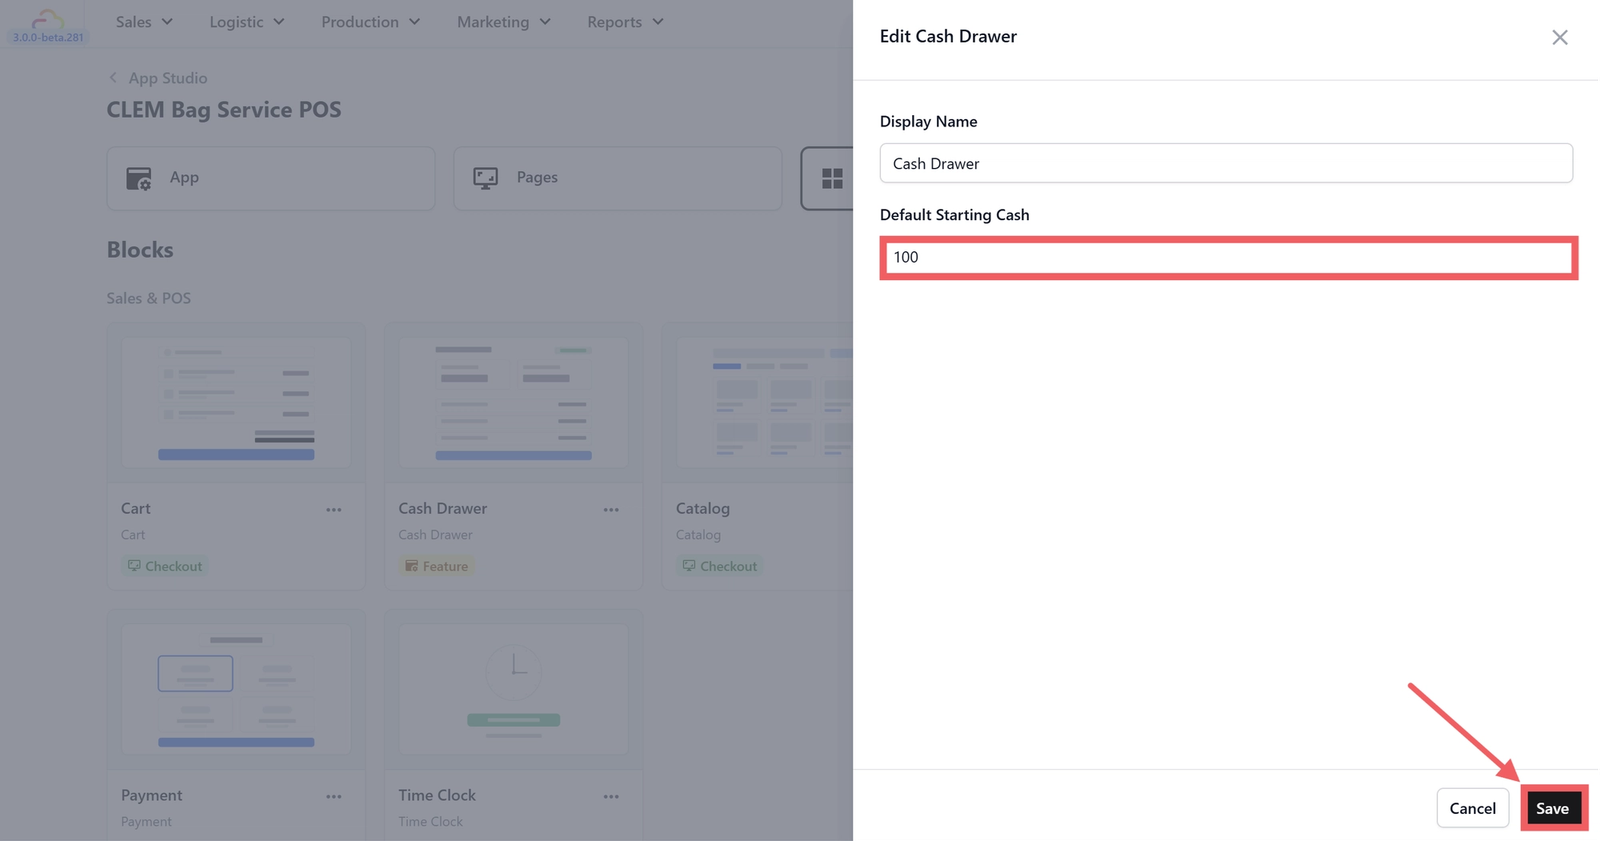
If you want to set a default starting cash amount so your staff does not have to type it in every day, go to the Blocks tab in App Studio and click on the Cash Drawer block.

Set the Default Starting Cash to the amount your shop normally starts with — for example, $50 or $100 then click Save to save your changes.

Set Up Your Close of Day Report
At the end of each business day, you will want to close out your sales and see a summary of how much money came in. The Close of Day report gives you a full breakdown — total orders, total sales, income by payment method (cash, VISA, NETS, bank transfer), and any outstanding balances.
By setting up a Close of Day procedure, you can do two things at once — reconcile your cash drawer and generate your daily sales report in a single flow. This way, your staff do not have to close the drawer and run the report separately.
Setting this up takes a few steps, but you only need to do it once.
Step 1: Create a Close of Day Receipt Template
First, you need a receipt template so the system knows how to format your Close of Day report.
- In the EasyBiz Console, go to Settings (gear icon) → Templates → Receipt.
- Click the + Add button.
- Select Close of Day Report as the template type.
- You do not need to change anything in the template — the default layout works well for most businesses. It will show your daily summary with all the numbers you need.
- Click Publish to save the template.
Step 2: Create a Close of Day Procedure
Next, you need to create a procedure — think of this as a checklist that your staff will follow when closing the day. The system will guide them through each step automatically.
- In the EasyBiz Console, go to Settings (gear icon) → Business Process Management → Procedures. (Do not worry about the long name — this is just where EasyBiz keeps all your step-by-step processes.)
- Click the + Add procedure button.
- Scroll down and select Close of Day as the procedure type.
- Give it a name (for example, "Close of Day").
Now you need to add the steps for this procedure. A typical Close of Day procedure has two steps:
Add Step 1 — Cash Drawer Summary:
- Click Add Step in the procedure editor.
- Set the step type to Block.
- Select Cash Drawer Summary as the block.
- This step shows your staff a summary of all cash payments received during the day, so they can verify the amount in the drawer.
Add Step 2 — Signature:
- Click Add Step again.
- Set the step type to Data Entry.
- Select Signature as the data entry type.
- This step lets your staff sign off on the day's report, confirming that the numbers are correct.
Save the procedure when you are done.
Step 3: Link Everything to the Daily Sales Block
Finally, you need to tell the Daily Sales block in your POS to use the procedure and receipt template you just created.
- Go back to App Studio and open your POS app.
- Go to the Blocks tab and find the block called Daily Sales.
- Click on it to open its settings.
- Set the Close of Day Flow to the procedure you created (for example, "Close of Day").
- Set the Close of Day Receipt Template to the receipt template you published earlier (for example, "Close of Day Report").
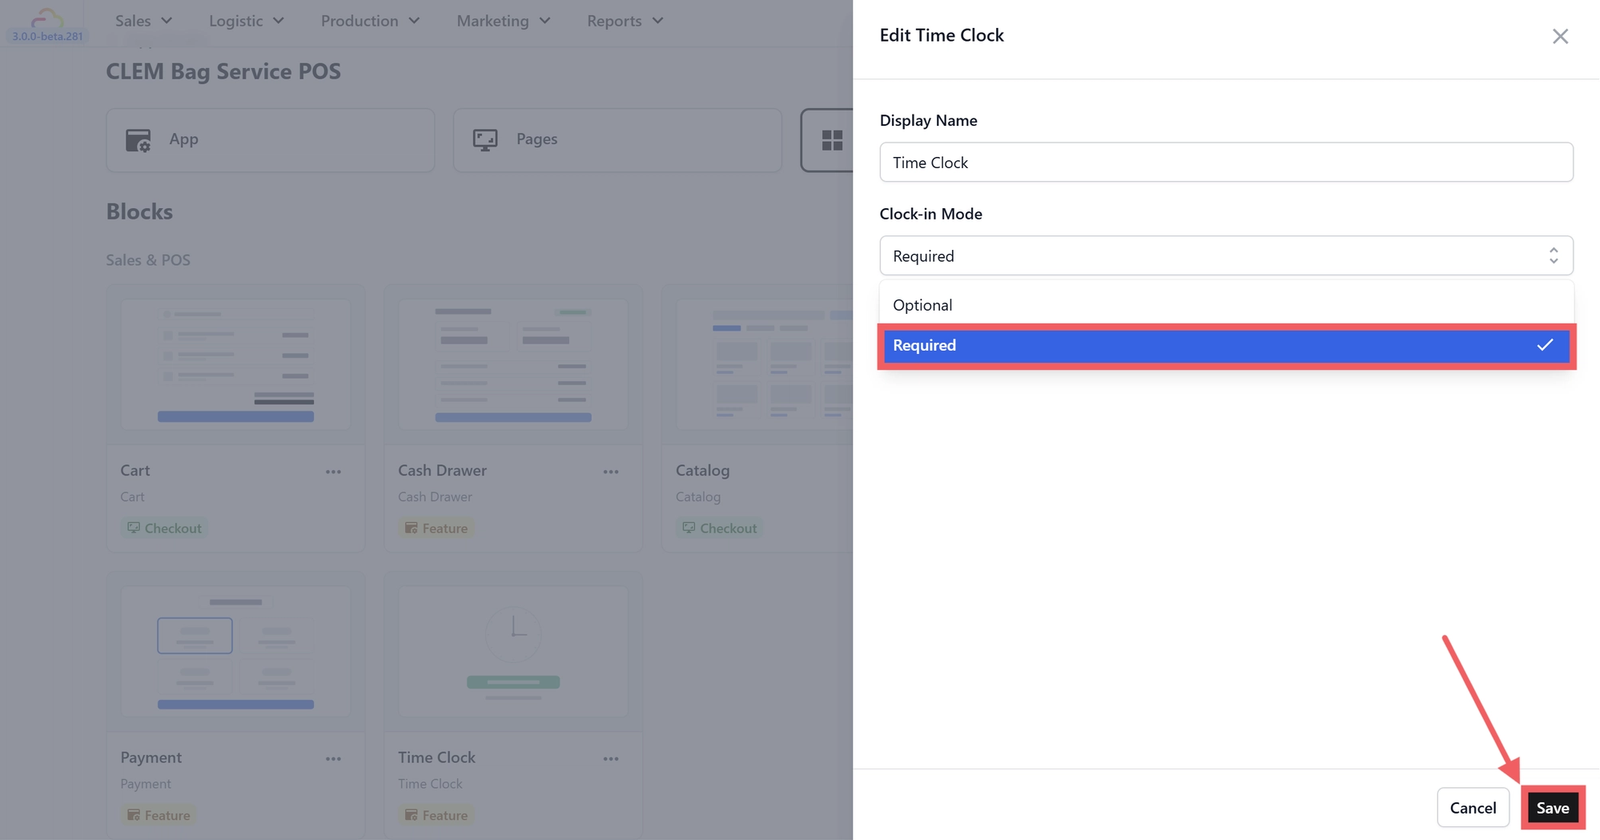
Set Up Your Time Clock (Optional)
Your Bag Repair POS includes a built-in Time Clock so your staff can clock in and out for their shifts. By default, it is set to optional — your staff can clock in if they want, but they are not required to.
If you want to make clocking in mandatory before staff can start taking orders, go to the Blocks tab in App Studio and click on the Time Clock block.

Update the clock-in mode to Required
Quick Reference
Once everything is set up, here is a quick reminder of what each screen does:
- Checkout: Your main counter screen. Browse the catalog on the left, select a service item and service option, fill in the intake form, add items to the cart on the right, assign the customer, and process payment.
- Orders: View all orders. Tap any order to see its details, attach photos of the bag, print labels or receipts, and check payment status. Filter by Today, Unpaid, or All.
- Cash Drawer: Set your starting cash at the beginning of each shift and track all cash payments throughout the day.
- Daily Sales: Run your Close of Day report to see a full breakdown of sales by payment method and close out the day.
- Time Clock: Staff clock in and out for their shifts. Optional by default.
Give feedback
Up next
Sign In to Your POSConnect your POS device to EasyBiz Cloud so your staff can start taking orders at the counter.
Read more