Getting Started with BPM
In this article
This guide explains the three main parts of BPM and how they connect. Whether you're running a tailoring shop, a shoe repair service, or any other service business, this will help you understand how to build your own workflow from scratch.
Contents
Contents
Business Process Management has three main parts: Data Fields, Procedures, and Work Orders. This guide explains what each one does and how they work together, so you can set up a process that fits the way your business runs.
Already know what you need? If your business does laundry or bag repair, you can skip ahead to a ready-made setup: Laundry & Dry Cleaning or Bag Repair & Restoration.
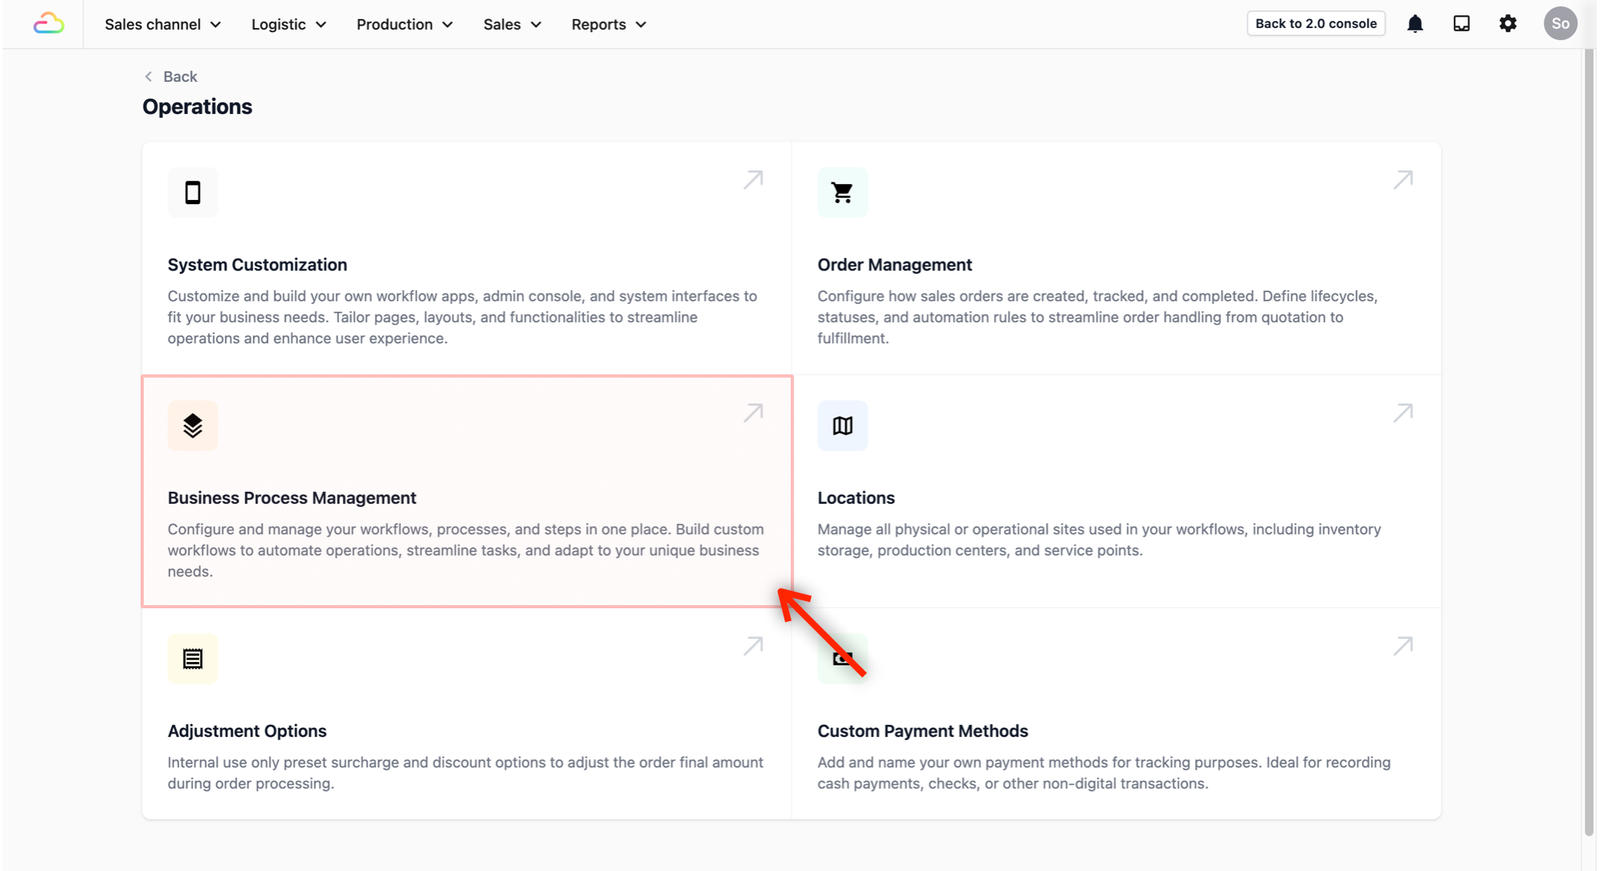
How to access BPM
- In your EasyBiz console, go to Settings → Operations.
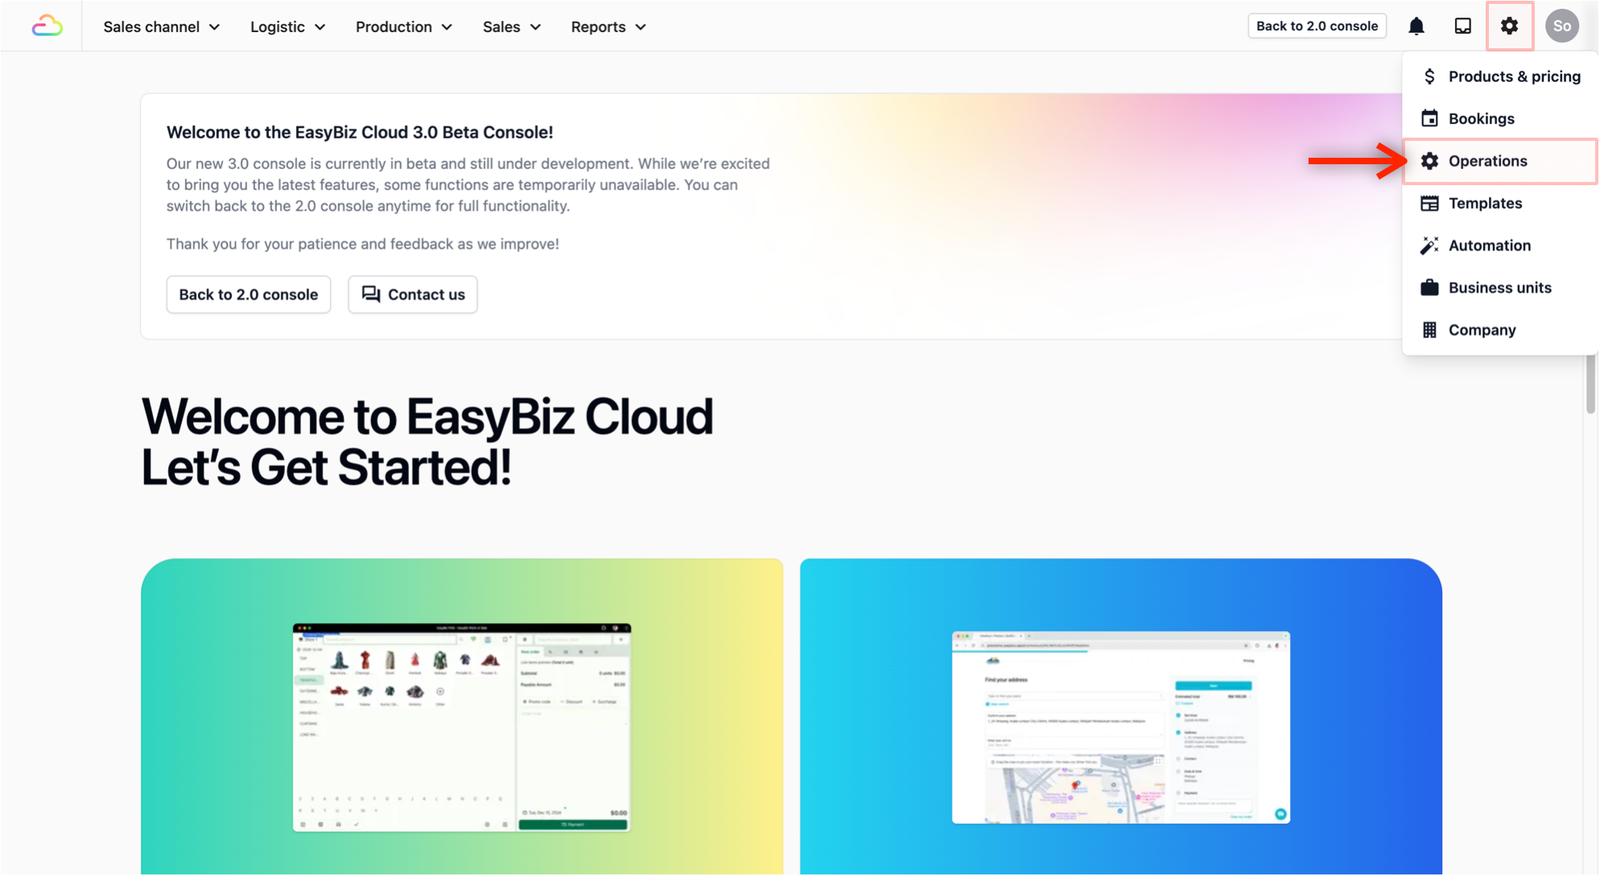
- Click on Business Process Management.
What you'll be setting up
Think of it this way. You're going to tell EasyBiz how your business works so it can help your team follow the same steps every time a new work order is created.
Here's what that looks like:
- Data Fields: First, if you need to capture extra information (like item condition or photos), you'll create custom fields for that.
- Procedures: Next, you'll create the individual steps your team follows (e.g., "Receive items," "Washing," "Quality Check") and link your data fields to them.
- Work Orders: Finally, you'll put it all together into a template. When a customer's order is confirmed, EasyBiz uses this template to automatically guide your team through each step.
We'll go through each one below.
Set up your Data Fields
If the information that the system captures by default doesn't cover everything you need, you can create your own custom fields. These are called Data Fields.
For example, you might want to record the brand of a bag, or note special washing instructions — things that are specific to your business. Setting these up first means they'll be ready to use when you create your procedures in the next step.
How to add a data field
- Click the Data Fields tab.
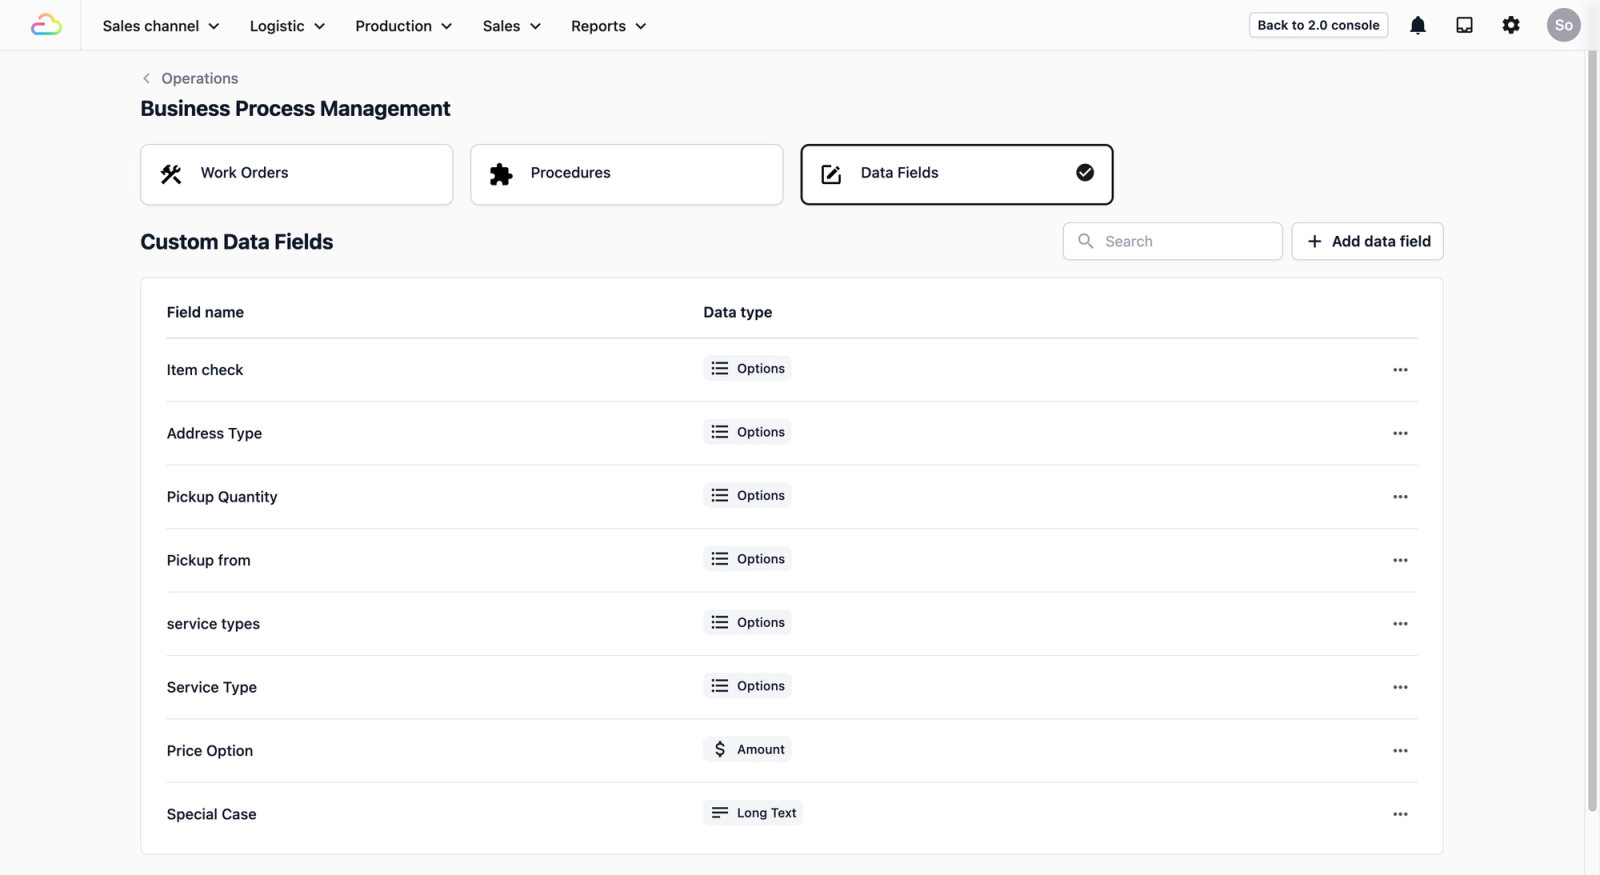
- Click + Add data field.

- You'll see the New Data Field form like the one below:

- Fill in:
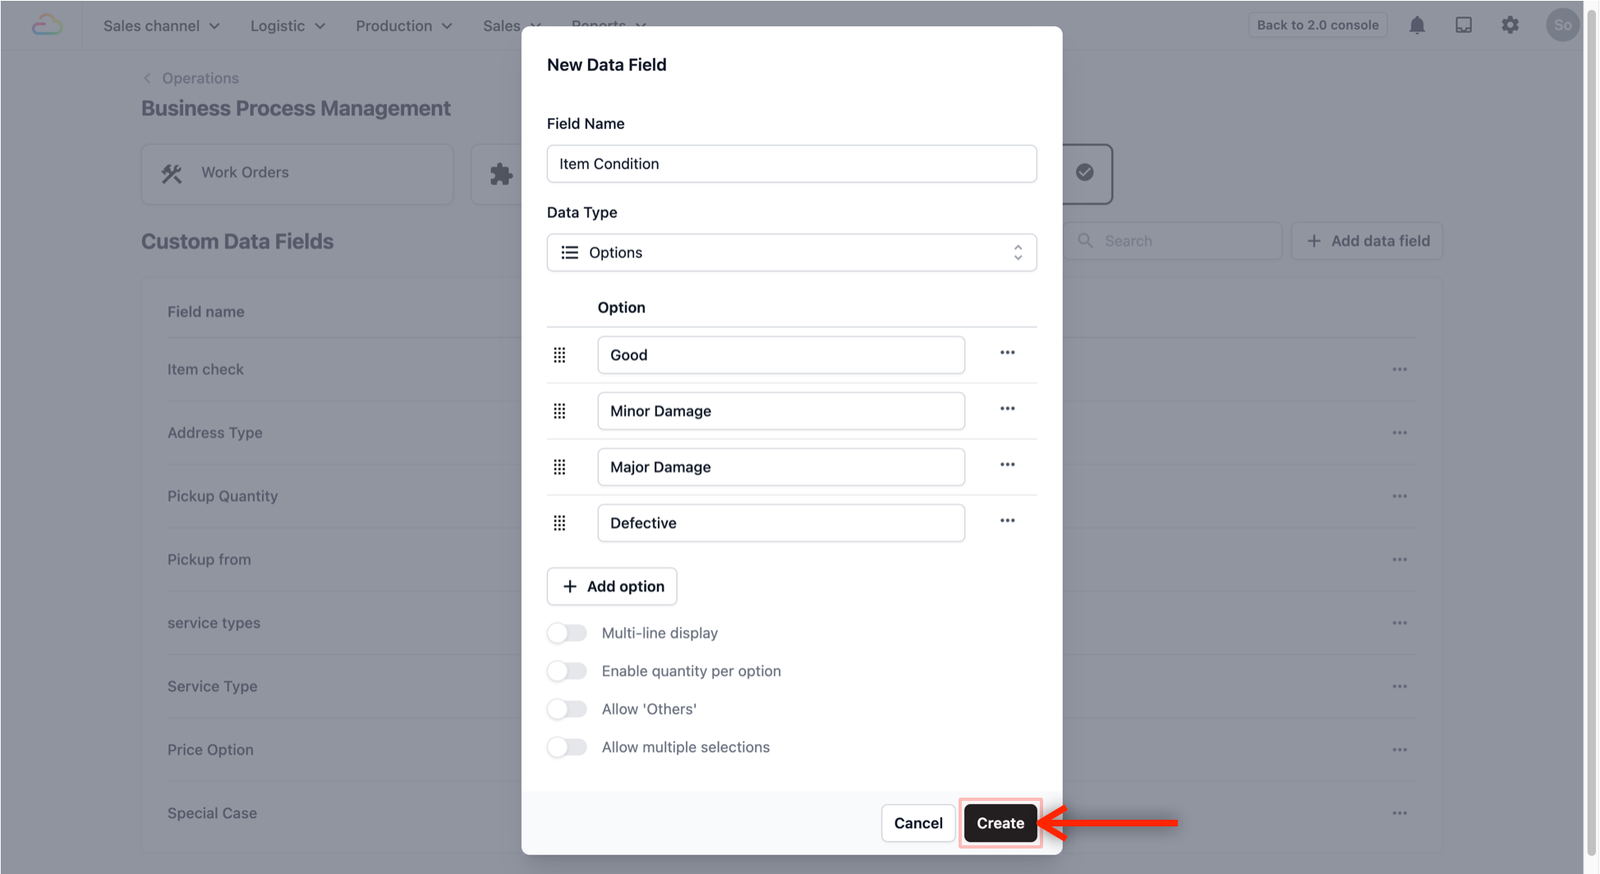
- Field Name: Give it a clear name (e.g., "Item Condition," not just "Condition")
- Data Type: Pick the format that fits your information:
| Data Type | What it's for | Example |
|---|---|---|
| Text | Short answers | Tracking number, customer name |
| Long Text | Longer notes | Damage description, special instructions |
| Number | Numbers | Serial number, quantity |
| Amount | Money | Quoted price, repair cost |
| Image | Photos | Before/After photos |
| Phone Number | Phone numbers | Customer mobile number |
| Email Address | Emails | Customer's email |
| Date | Dates | Service date, follow-up date |
| Options | A list of choices to pick from | Garment type, service type |
- In this example, we'll add an Options data field to show how the process works. Let's say you want your team to record the condition of every item that comes in. You would enter "Item Condition" as the Field Name, select Options as the Data Type, and add your choices using the + Add option button — such as Good, Minor Damage, Major Damage, and Defective.

- Click Create.
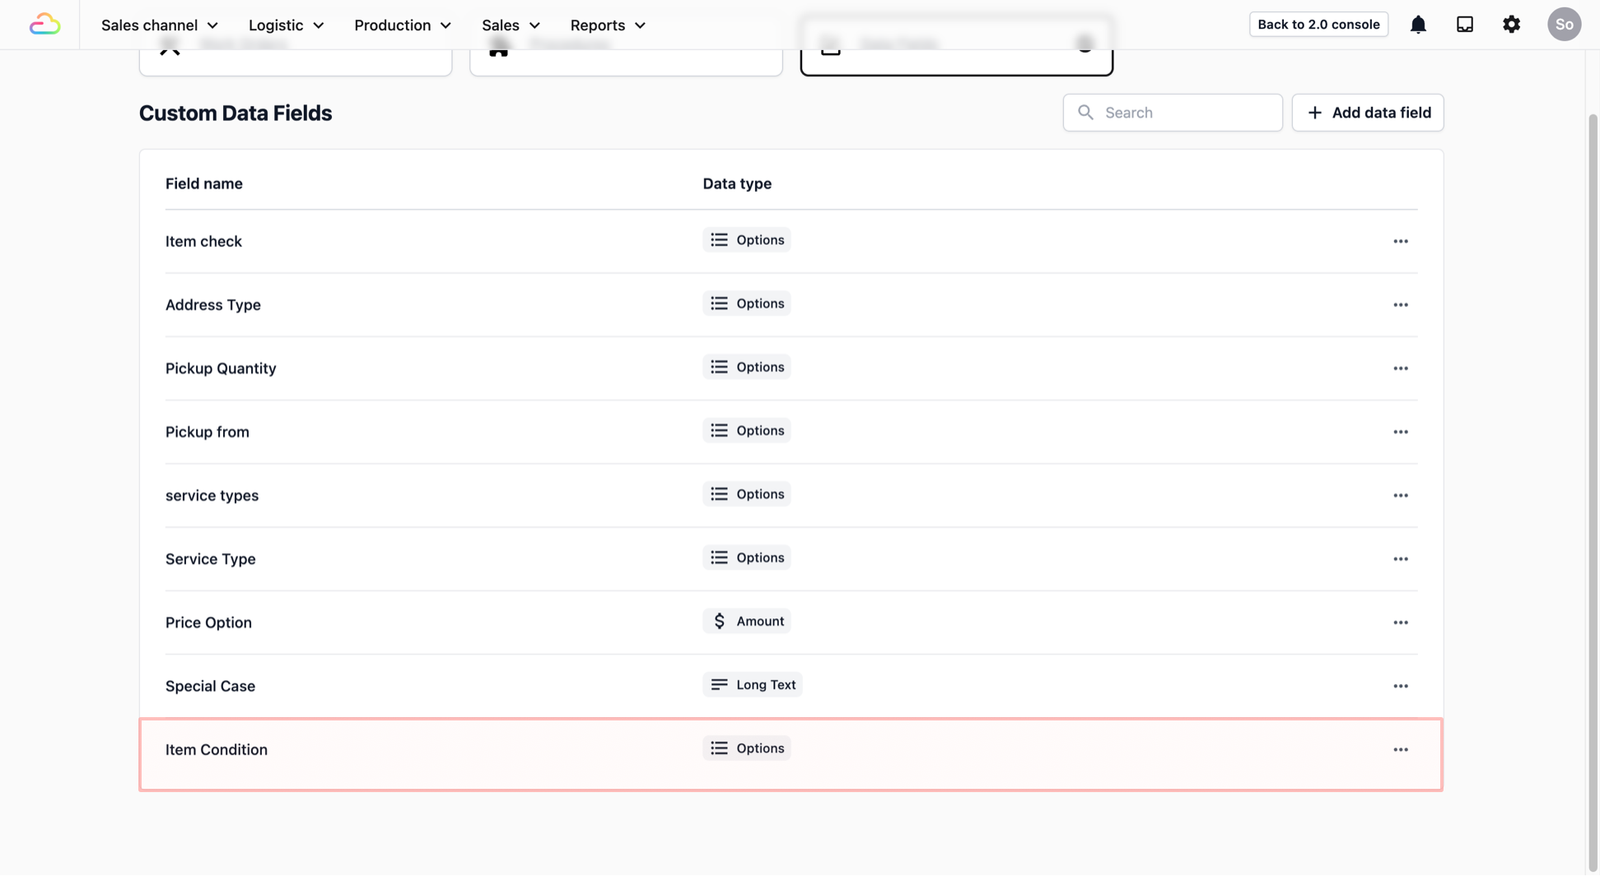
- Once created, this should now appear as a new data field in your Data Field Tab.
- Need a visual reference? Watch the video below to see how we add an "Item Condition" data field from start to finish!
Create your Procedures
Procedures are the steps your team follows, such as "Washing" or "Quality Check." Each procedure comes with built-in steps that are ready to use (for example, taking photos, collecting payments, or capturing signatures). If you also created custom data fields previously, you can link those too.
How to add a procedure
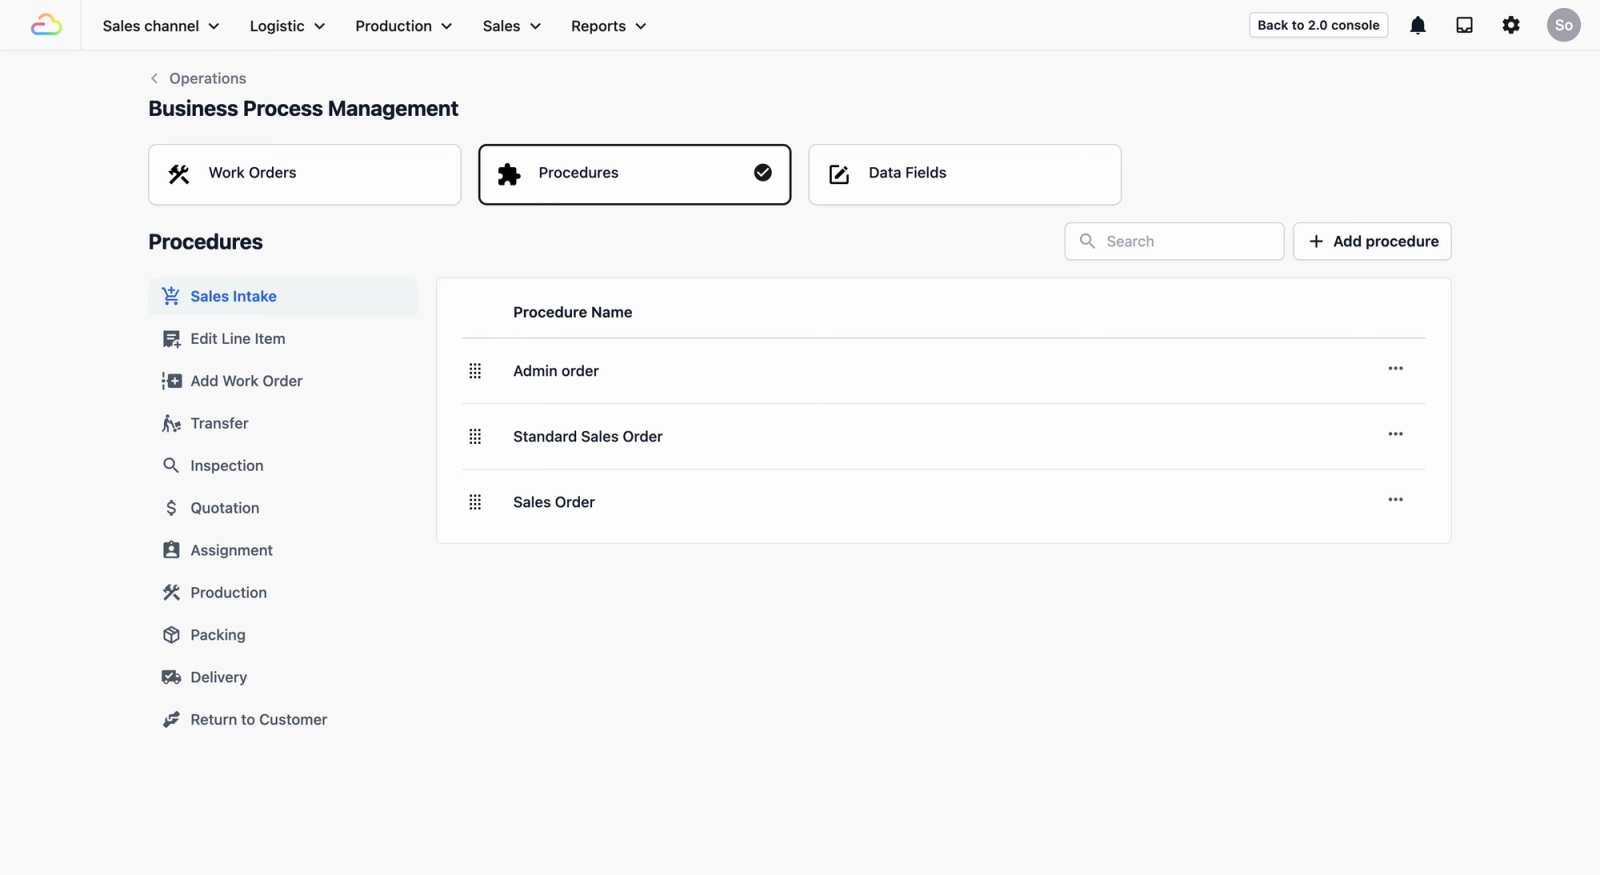
- Click the Procedures tab.
- Click + Add procedure.

- Choose a Procedure Type and fill in the details. This tells EasyBiz what kind of step this is in your workflow.

- Here are the types available:
| Procedure Type | What's it for? |
|---|---|
| Sales Intake | Taking in items from the customer |
| Edit Line Item | Updating or changing items in an order |
| Add Work Order | Adding a new work order to track production or service tasks |
| Pickup | Collecting items from a customer's location |
| Transfer | Moving items between locations or checking them in/out |
| Inspection | Checking item condition |
| Quotation | Creating a price estimate |
| Approval | Getting confirmation from a customer or internal staff before moving forward |
| Assignment | Assigning work to a team member, department or production location |
| On-Site Service | Doing the work at the customer's location |
| Production | The actual service work (washing, repairing, etc.) |
| Packing | Preparing items for return |
| Delivery | Delivering items to the customer |
| Return to Customer | Customer pickup |
- Once you select a Procedure Type, a pop-up window will appear. Fill in the details to complete your adding of a new procedure:
- Procedure Name: What your team sees (e.g., "Inspect & pre-treat").
- Completed Label: The status shown when this step is done (e.g., "Inspected").
- Completion Dependency: Choose when this step starts from, either from a previous step or from a specific step that is finished. This is by default not affected by any steps.
- Enable tasks: Turn this on if you want to break this procedure into smaller tasks that staff can complete and track individually. This is useful for procedures with multiple steps, like production or inspection. (This option only appears for certain procedure types such as Production.)
- Procedure Note: Any internal instructions for your team (optional).
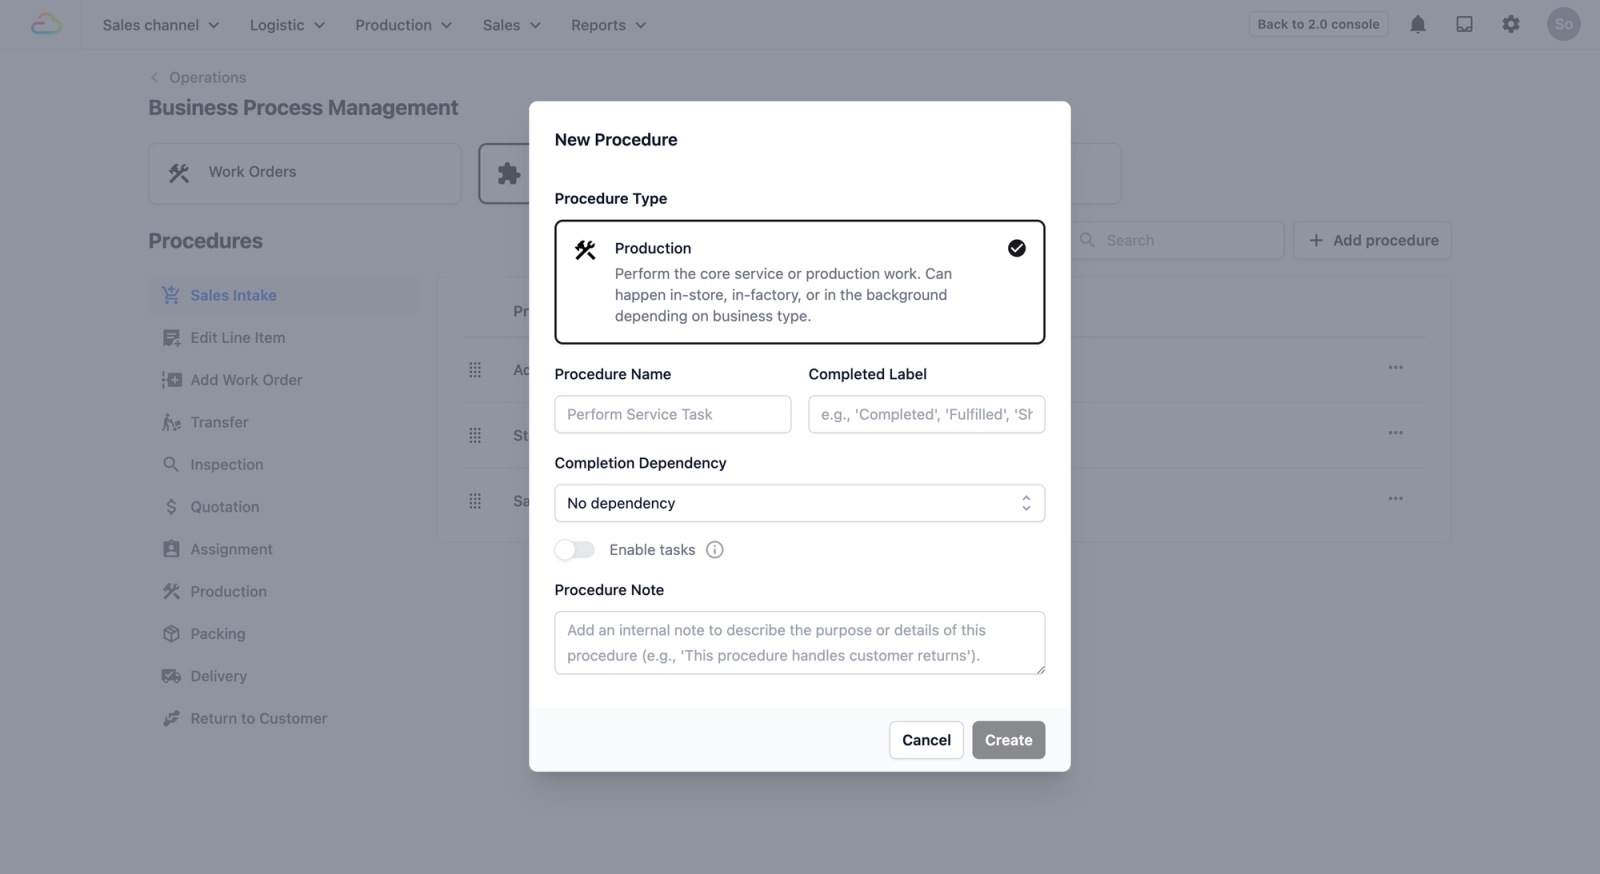
- Click Create.
Once created, the procedure will appear on the left sidebar under its procedure type. You can add more procedures under the same type. For example, Production can have multiple procedures like "Washing," "Drying," and "Finishing.".

Adding steps to your procedure
Steps are the small tasks your team completes within each procedure. To add one, lets head over to the new procedure we just added.
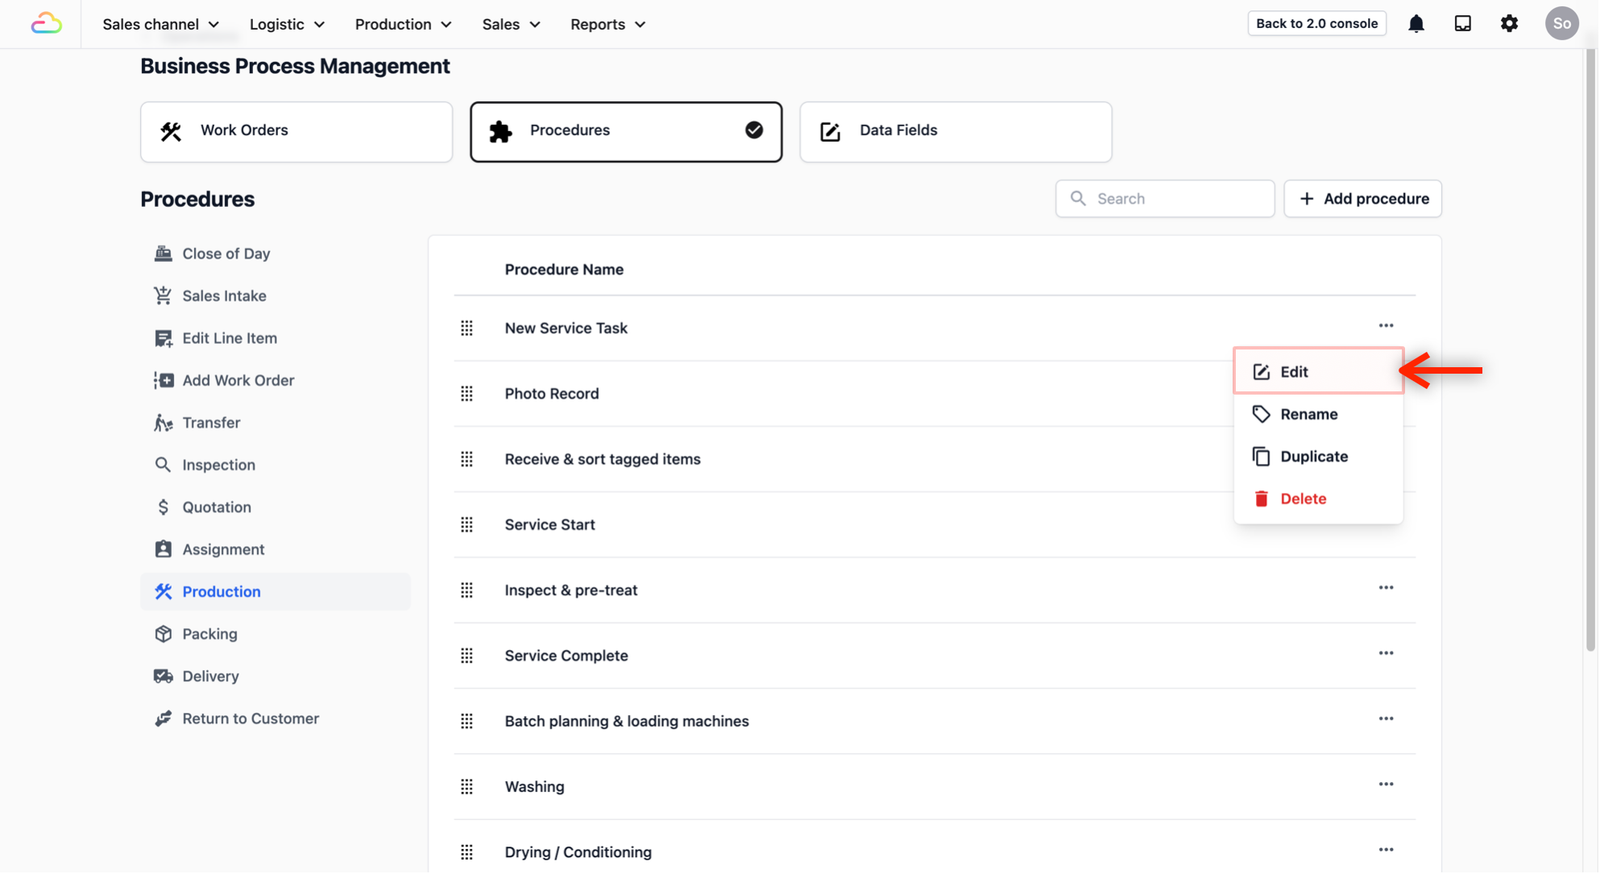
- From the sidebar on the left, click on the procedure type that you just added.

- A table should appear with all the procedures from that procedure type. Find the procedure that you have added from the table, and click on the ⋯, select Edit to start adding your steps to the procedure.
- Scroll down to Complete Procedure Actions and click + New Step to add a new step to this procedure.
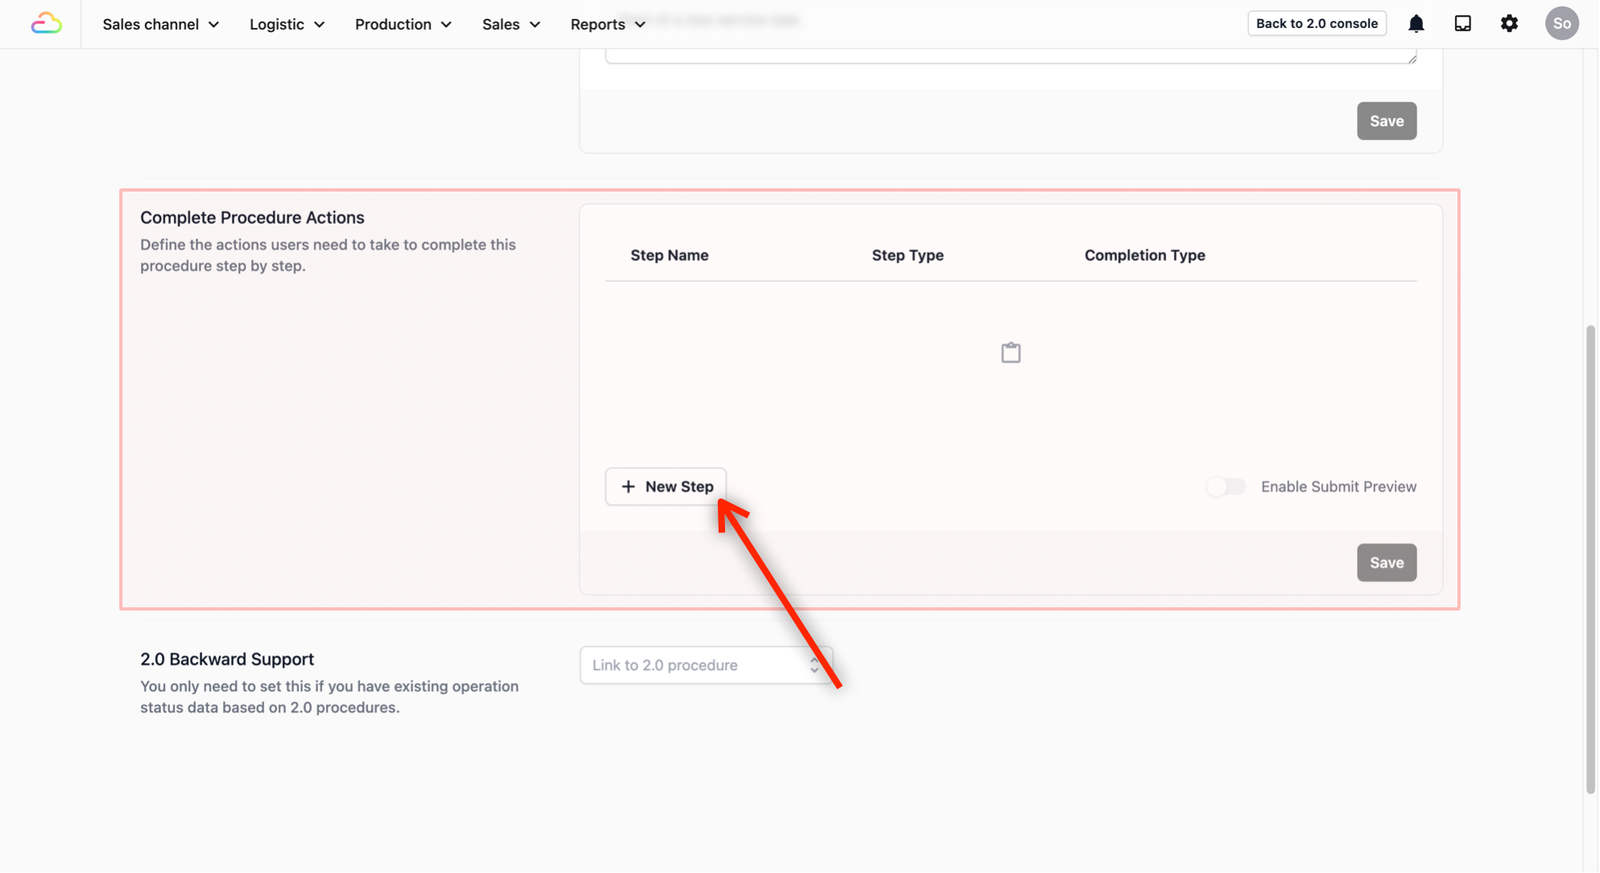
- You'll see two Step Type options:
- Block: These are the built-in actions the system already provides, like taking a photo, collecting a payment, or capturing a signature. Just pick the one you need from the Select Block dropdown when Block is selected as the Step Type.
- Data Entry: Use this when you want your team to fill in information — either using system fields or the custom data fields you created in Step 1.

Since most of the time you'll be choosing Block, here are some common ones:
| Block name | What your team does |
|---|---|
| Text Input | Type in notes or remarks |
| Photo Capture | Take photos before or after service |
To add a Block:
To add a Data Entry:
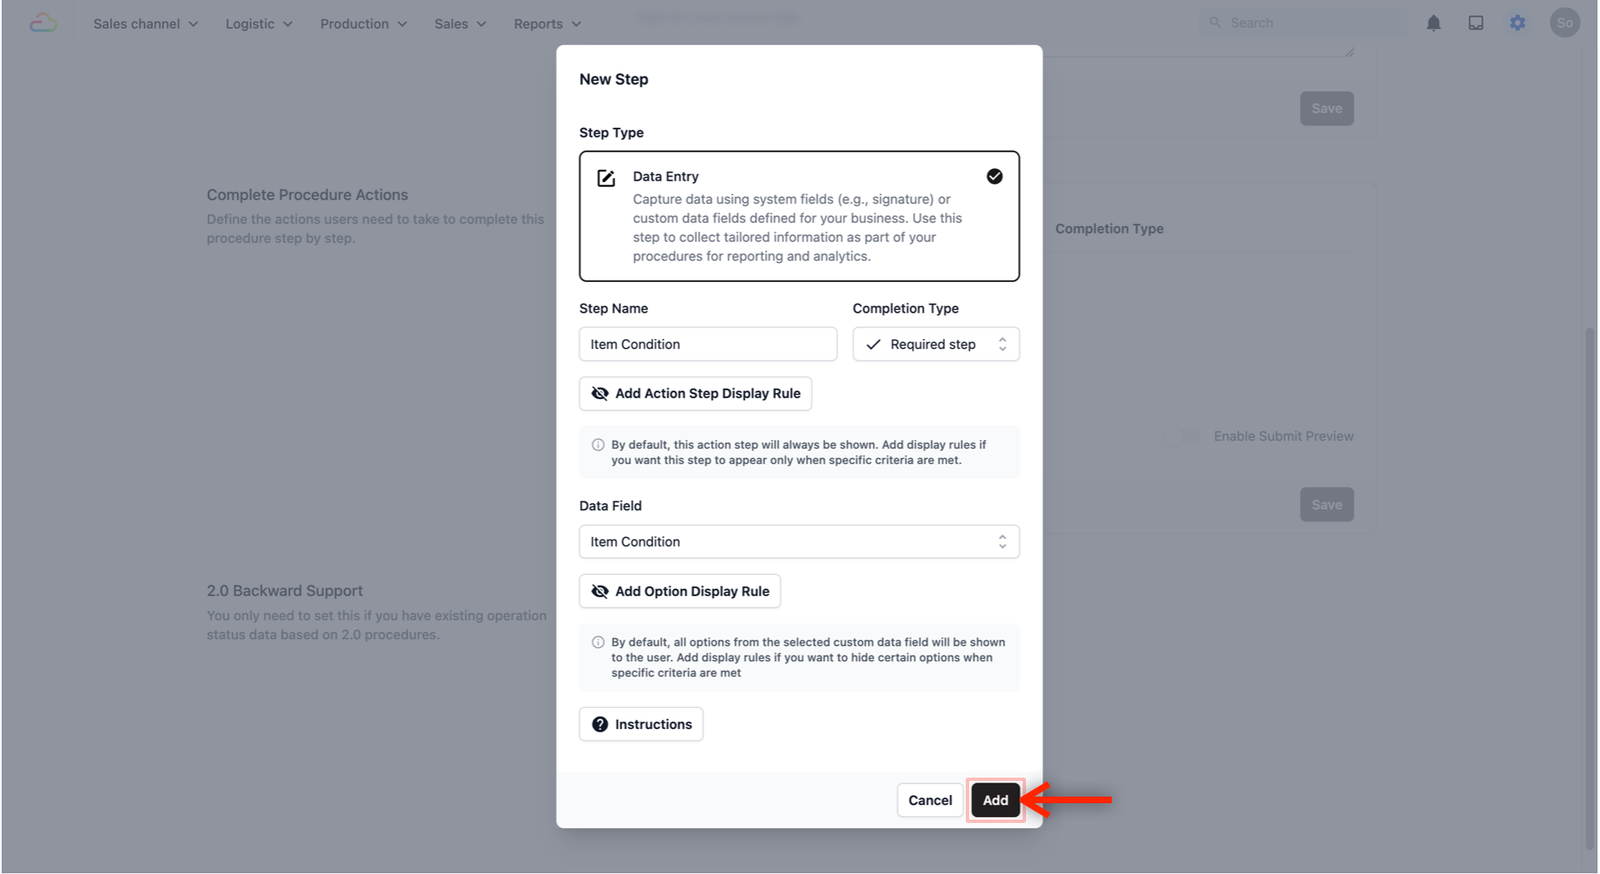
- If none of the built-in steps cover what you need — for example, recording a bag's brand name or selecting a garment type — that's where your custom data fields come in.
- When adding a new step, choose Data Entry as the step type. This lets your team fill in the custom fields you set up previously.

- A form will appear when Data Entry is selected. Fill in:
- Step Name: The name of the step that your team sees. Defaults to step type if left blank
- Completion Type: This is a required step by default. Click on the dropdown to change it to an optional or on-demand step.
- Data Field: Pick a field from the dropdown, this is where the custom data fields you created earlier will appear.

- Click Add.
- You should now see a new Data Entry step in your procedure.

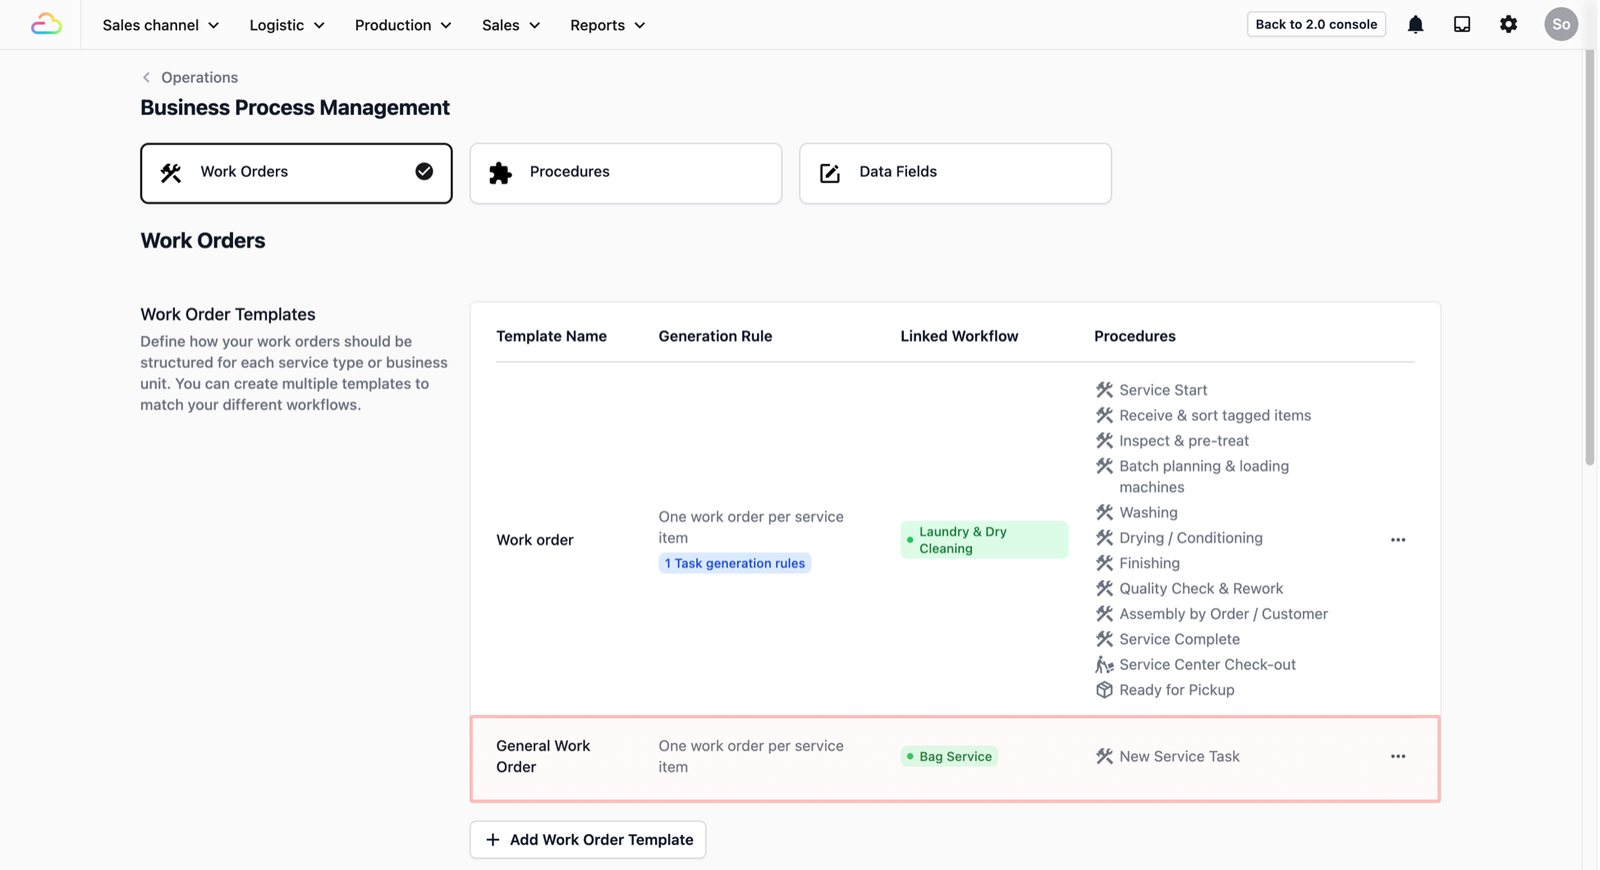
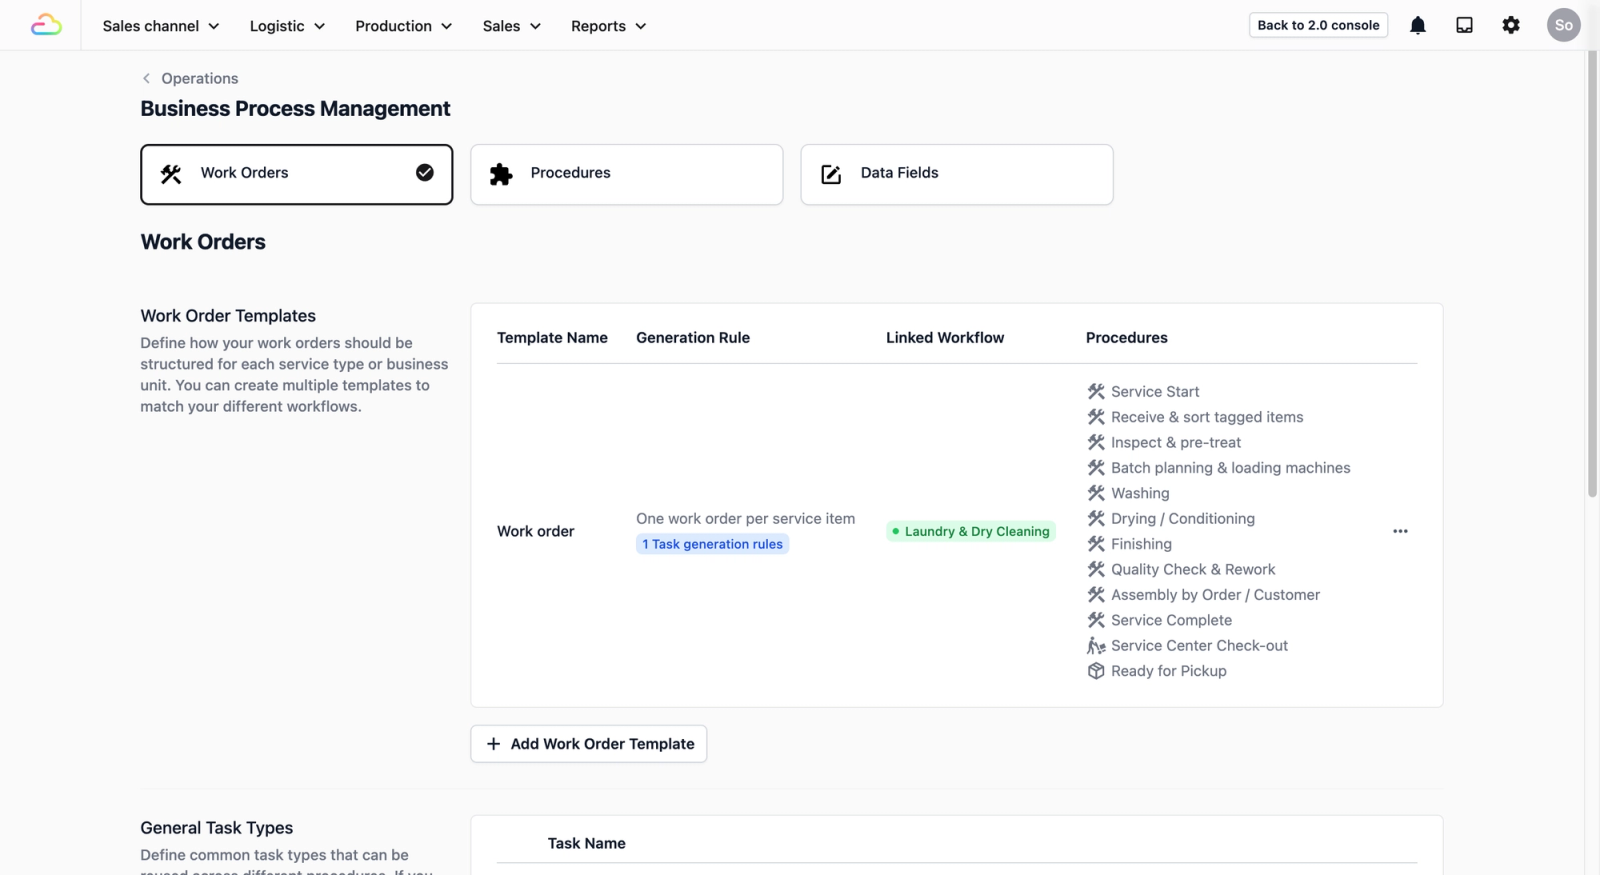
Create your Work Order Template
A Work Order Template ties everything together. It tells EasyBiz which procedures to follow, and in what order, whenever a sales order is confirmed.
How to create a work order template
- Click the Work Orders tab.
- Click + Add Work Order Template.
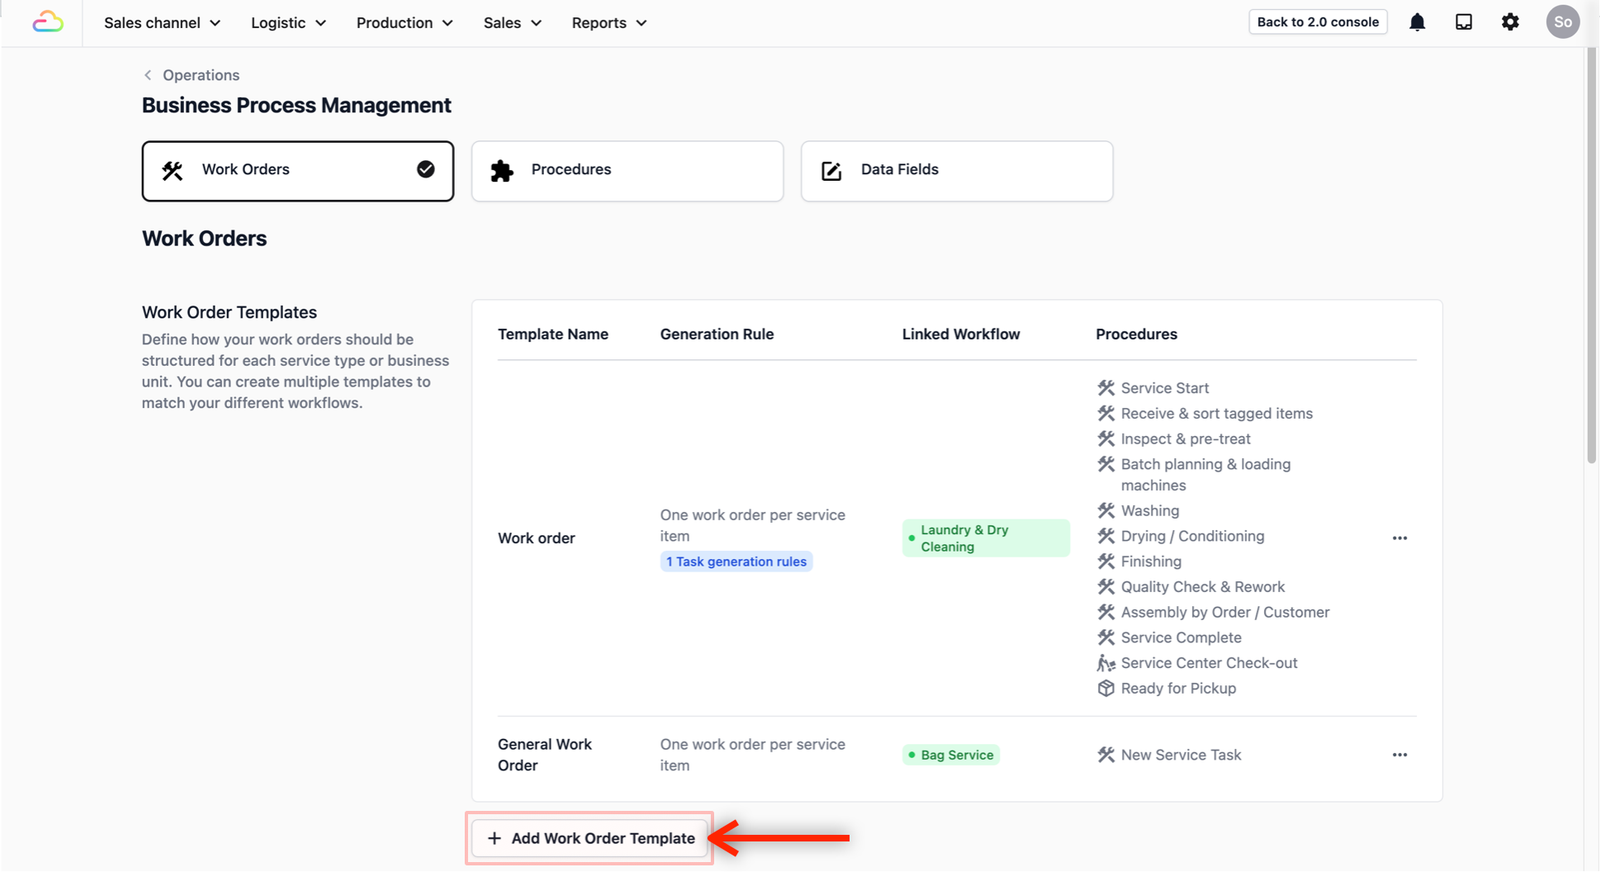
- Fill in:
- Template Name: A clear name (e.g., "Laundry & Dry Cleaning" or "Bag Repair")
- Work order Generation Rule: How work orders are created. Select One work order per service item for creating a work order per item in a Sales Order. This means each item gets tracked separately.
- Receipt Template: Pick the receipt layout your customers will see.
- Work Order Procedures: Select the procedures you created from earlier in this guide.

- Click Add. You should now see a new work order template.
Link your Work Order Template to a Business Unit
Now that your template is ready, you need to tell EasyBiz which part of your business should use it. In EasyBiz, a Business Unit is more often than not a service line — for example, "Laundry," or "Bag Repair." Linking your template to a business unit means that whenever a sales order comes in for that service, EasyBiz will automatically use this template to create the work order.
- Click the ⋯ menu on your template and from the options, select Link Workflow.

- Click the toggle to on for the business unit you want this work order template to be created when a sales order is confirmed.

- Click Save.
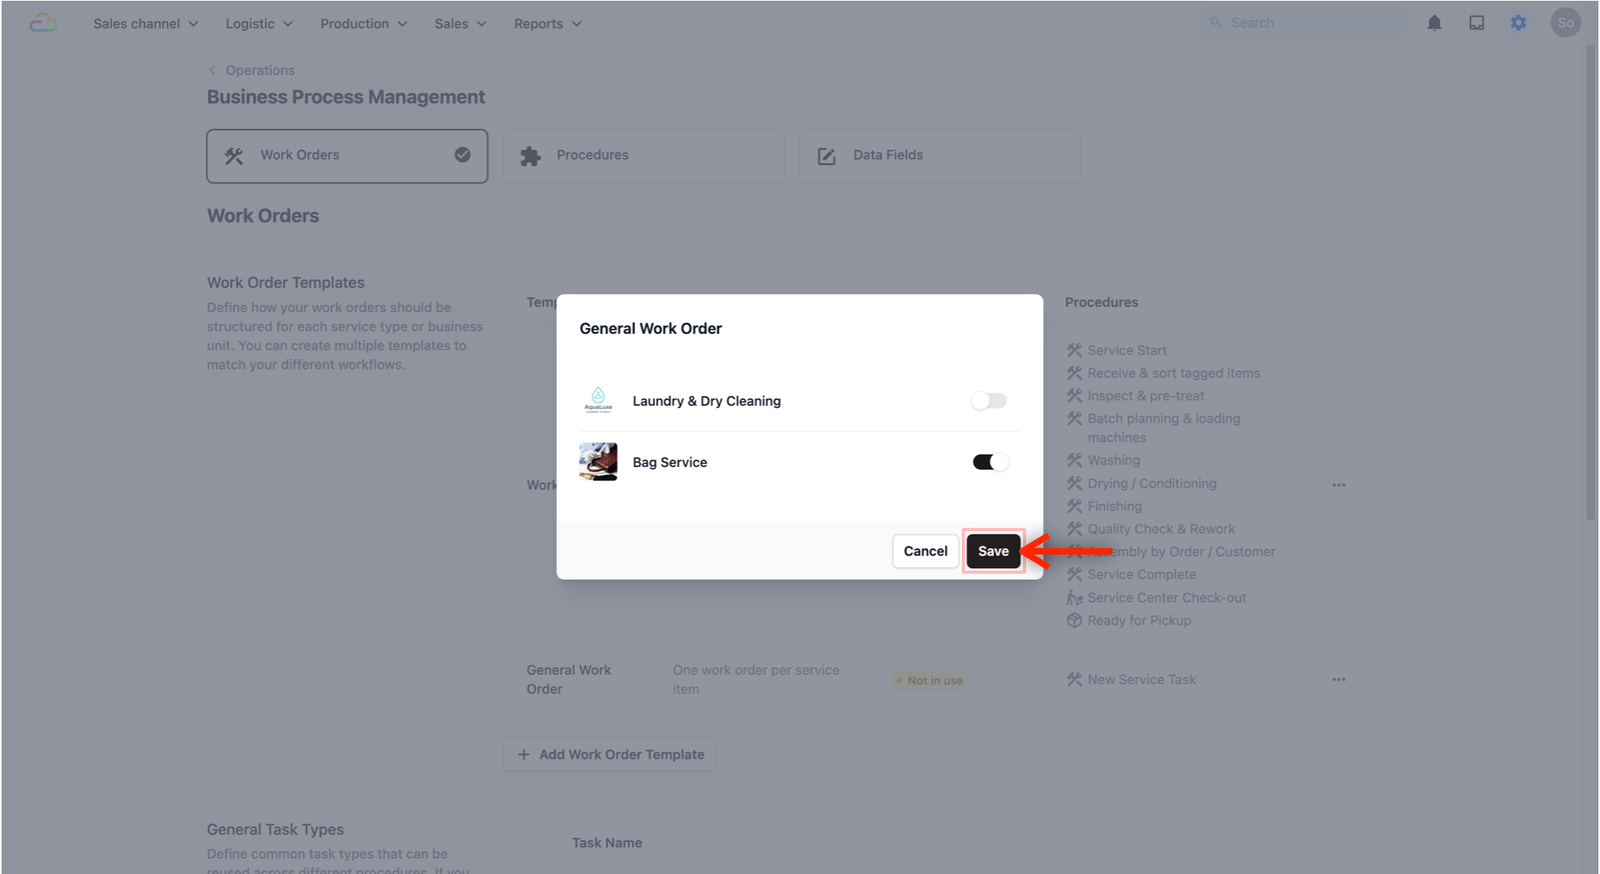
- You should now see the business unit linked to your specific work order template.

What's next?
Now that you understand how Data Fields, Procedures, and Work Orders fit together, you're ready to build a process for your business. When a sales order is confirmed, EasyBiz will automatically create work orders and guide your team through each step.
Want to see a complete example first? Check out our use cases: