Site Tab
In this article
The Site Tab is your global command center. Everything you set here—from your logos to your loyalty programs—is applied across your entire booking app to ensure a consistent experience for your customers.
Contents
Contents
In this section, we will define the settings found within the Site Tab. These fields allow you to establish your brand identity, contact methods, and customer loyalty rules in one central location.
Metadata
This section defines your business identity and how your branding appears in different lighting modes.
- Business Name: The official name of your business as it will appear on the site.
- Logo on Light Background: The version of your logo that appears when the website is in Light Mode. This is displayed in your navigation bar or sidebar.
- Logo on Dark Background: The version of your logo optimized for Dark Mode, ensuring your branding is always visible regardless of the user's screen settings.
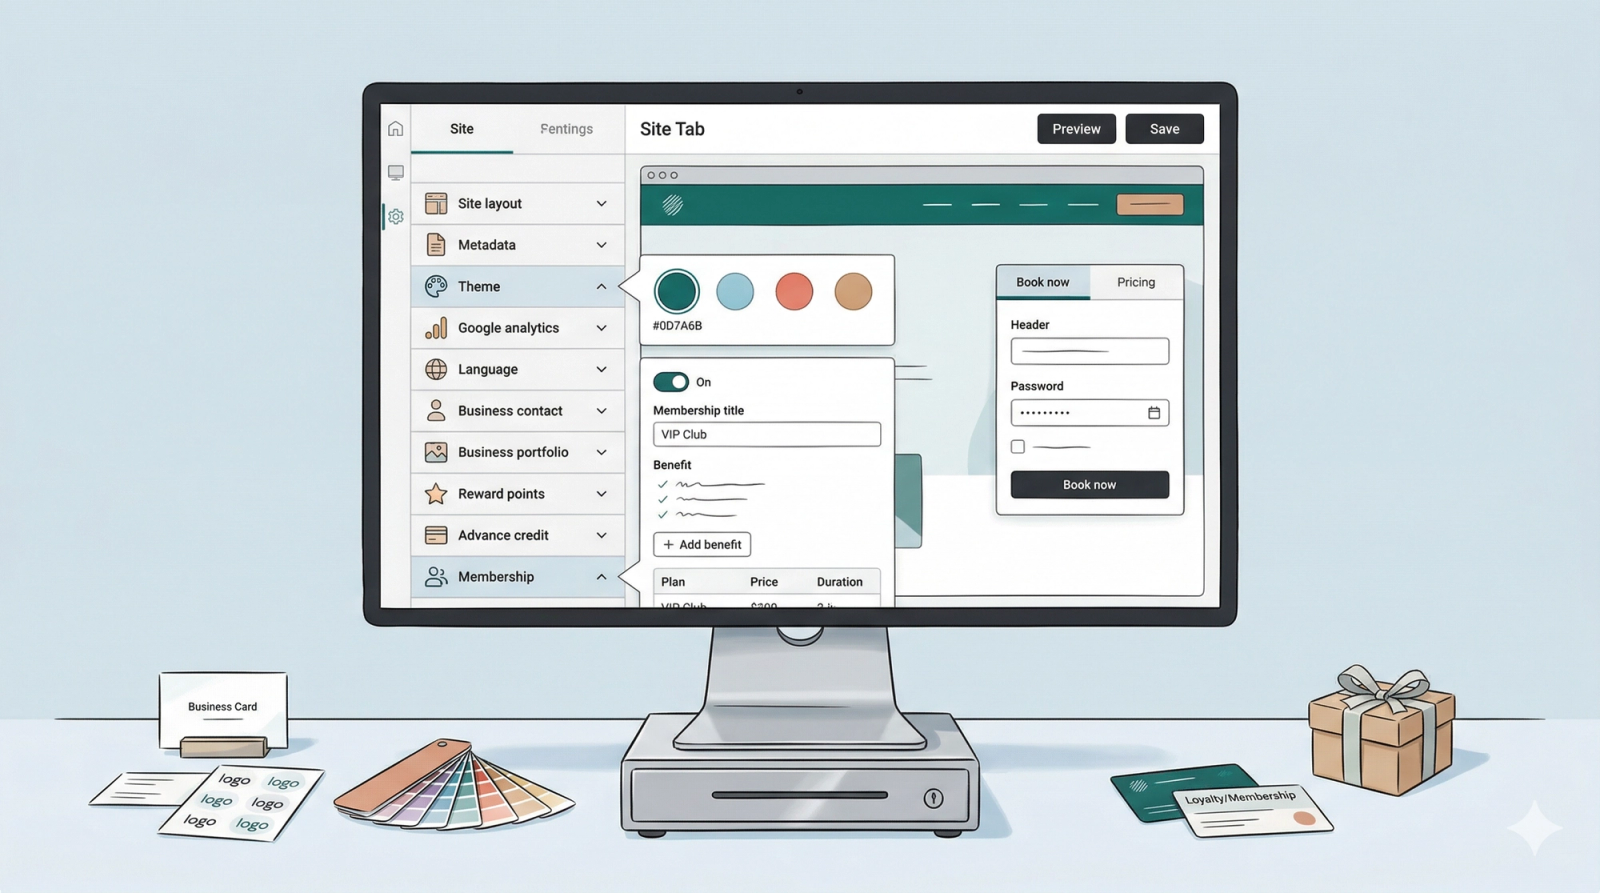
Theme
These settings establish your brand’s visual identity.
- Primary Color: Controls the color of your buttons, links, and selected text.
- Accent Color: A secondary color used for highlights and smaller design elements.
- Third Color: An additional color used to complement your primary and accent choices.
Google Analytics
Connect your site to Google’s tracking tools to see how many people are visiting your store.
- GA4 ID: Your unique Google Analytics 4 identification code.
- Google Tag Manager: Your container ID for managing various tracking tags.
Business Contact
These options determine how customers can reach you. Fill in the necessary fields. This will appear in your chat widget that you would set up later on in this guide.
- Phone Number: The primary contact line for your business.
- Whatsapp: Your business WhatsApp link or number, allowing customers to message you directly.
- Email: The address where you wish to receive customer inquiries and notifications.
- Facebook: The web link to your business Facebook page.
- Instagram: The web link to your Instagram profile to showcase your work.
- Youtube: The link to your video content or business channel.
- X (Twitter): The link to your business profile on X.
Business Portfolio
This links your store to your financial settings.
- Business Portfolio: This field ensures that the correct tax rates and billing information appear on customer bank statements, invoices, and receipts.
Reward Points
Automate how you reward your repeat customers for their spending.
- Reward Points Toggle: A switch to enable or disable the points program.
- Customer Automatic Earn: Defines how many points a customer receives for every dollar spent.
- Redeem Points for Payment: Defines how many points are required to exchange for one dollar of credit.
Advance Credit
Allow customers to top up their account balance in exchange for bonuses.
- Advance Credit Toggle: A switch to enable or disable the account top-up program.
- + Add top up option: Click this button to open a pop-up window where you can define your top-up tiers.
- Top Up Amount: The specific amount a customer chooses to add to their account.
- Additional free gift amount: The "bonus" credit you give to a customer for topping up that specific amount.
- Add Button: Once you have entered the amounts, click this to save the entry. The information will then appear as a new row in your top-up table.
- Top Up Table: Once saved, your tiers are displayed in a summary table. This allows you to view and manage your existing options at a glance.
- Columns: Top Up Amount and Gift Amount.
- Note: The Additional free gift amount from the pop-up is shortened to gift amount in this view.
- How to Edit/Delete: Simply click on any row in the table to re-open the pop-up window. From there, you can modify the amounts or delete the tier entirely.
Membership
Create a formal membership program with specific perks and pricing.
Membership Toggle: A switch to make your membership program live or disabled.
Membership Title: The name of your membership (e.g., Gold Member).
+ Add benefit: Click this to open a pop-up window and define a new perk for this membership.
- Benefit Type: From the dropdown field, choose between a direct Discount, Cash back, or Custom perk.
- Rate: The percentage of discount or cash back applied.
- Benefit Description: A text field used to describe your Custom benefits.
- Limit to Business: An optional setting to tie the Discount or Cash back benefits to a specific business unit.
- Add Button: Click this to save the benefit.
Benefits List: Once saved, your benefits appear as rows in a simplified list rather than a titled table.
- Summary Row: Each row displays a single description of the perk.
- For Discount/Cash back: The row displays a system-generated sentence (e.g., "5% direct discount").
- For Custom: The row displays the text you entered in the Benefit Description field.
- How to Edit/Delete: Click directly on the benefit row to open the settings window. You can then update the benefit details or remove it from the membership.
+ Add price option: Click this to define the cost and length of the membership.
- Price: The cost to purchase the membership.
- Duration: How long the membership lasts.
- Forever Checkbox: When selected, the membership is valid indefinitely and the duration field is disabled.
- Add Button: Click this to save the price option.
Price Table: This table summarizes your membership costs and durations.
- Columns: Price and Duration
- How to Edit/Delete: Click on the price row to open the price and duration settings. Use the window to make changes or delete the price option.