Set up your Online Booking System
In this article
The booking system is the heart of your website. It allows visitors to browse your "menu" of services and officially book your time and expertise.
Contents
Contents
Why set up your Online Booking System?
For a service business, this is the most important part of your website. It acts as the digital front desk that lets customers see your services and book you without needing to call or message you first.
Why use this?
- Work less on admin: The system handles the price checking and detail-gathering so you don’t have to do it manually over the phone.
- Open 24/7: Customers can book their own services even when you are busy or asleep.
- Professional & Organized: A clear booking process builds trust with new customers and automatically saves their contact info and special requests in one place, so you never have to worry about losing a scrap of paper with their details on it.
Prerequisite: Link your Price List
Before you can build your booking system, you need a "Menu" of services for the website to display. You must set up your Price List first so that the correct data (your services and rates) appears on your Pricing and Checkout pages.
- Check your Price List: If you haven't set up your services yet, follow our Products & Pricing Guide → first.
- Link the Price List to your Online Store: For your data to flow into the website, you must tell the Price List which store it belongs to. This is done during the Price List setup by using your Online Store Code:
- Find your code: Head to the main Online Store page. Click the 3 horizontal dots (•••) next to your store name and select Online store settings. You will see your Online Store Code there.
- Select the code: When publishing your price list, find your Online Store Code from the dropdown options and select it.
Once this link is made, your website will be able to "pull" your prices and services into the Pricing and Checkout pages.
Enable the Booking Pages
Now that the connection is ready, you can enable the booking features inside the Visual Builder.
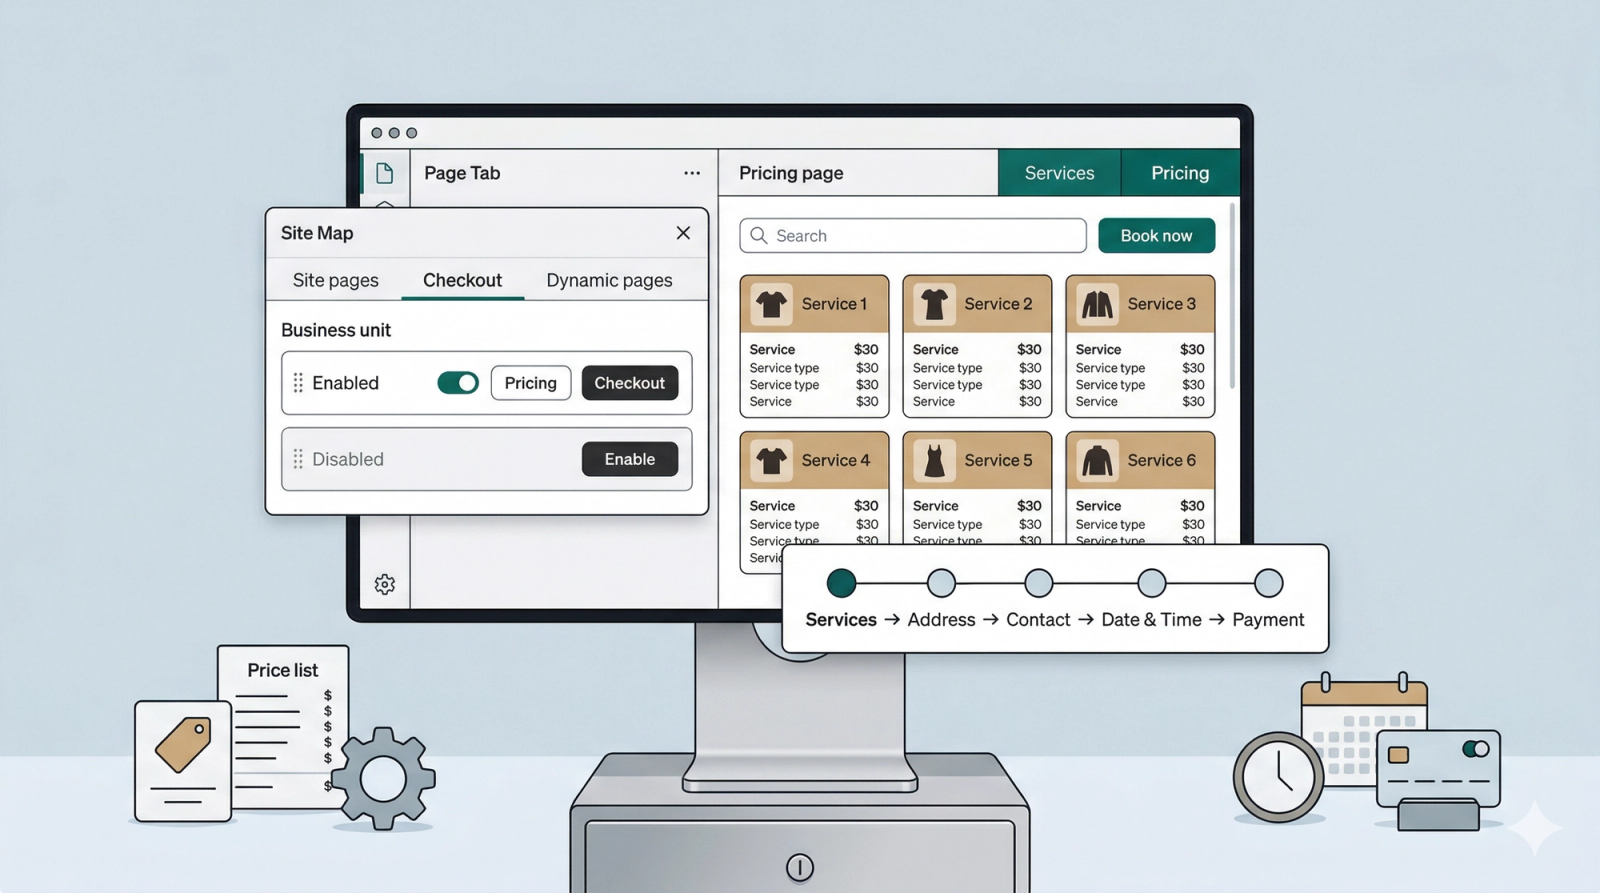
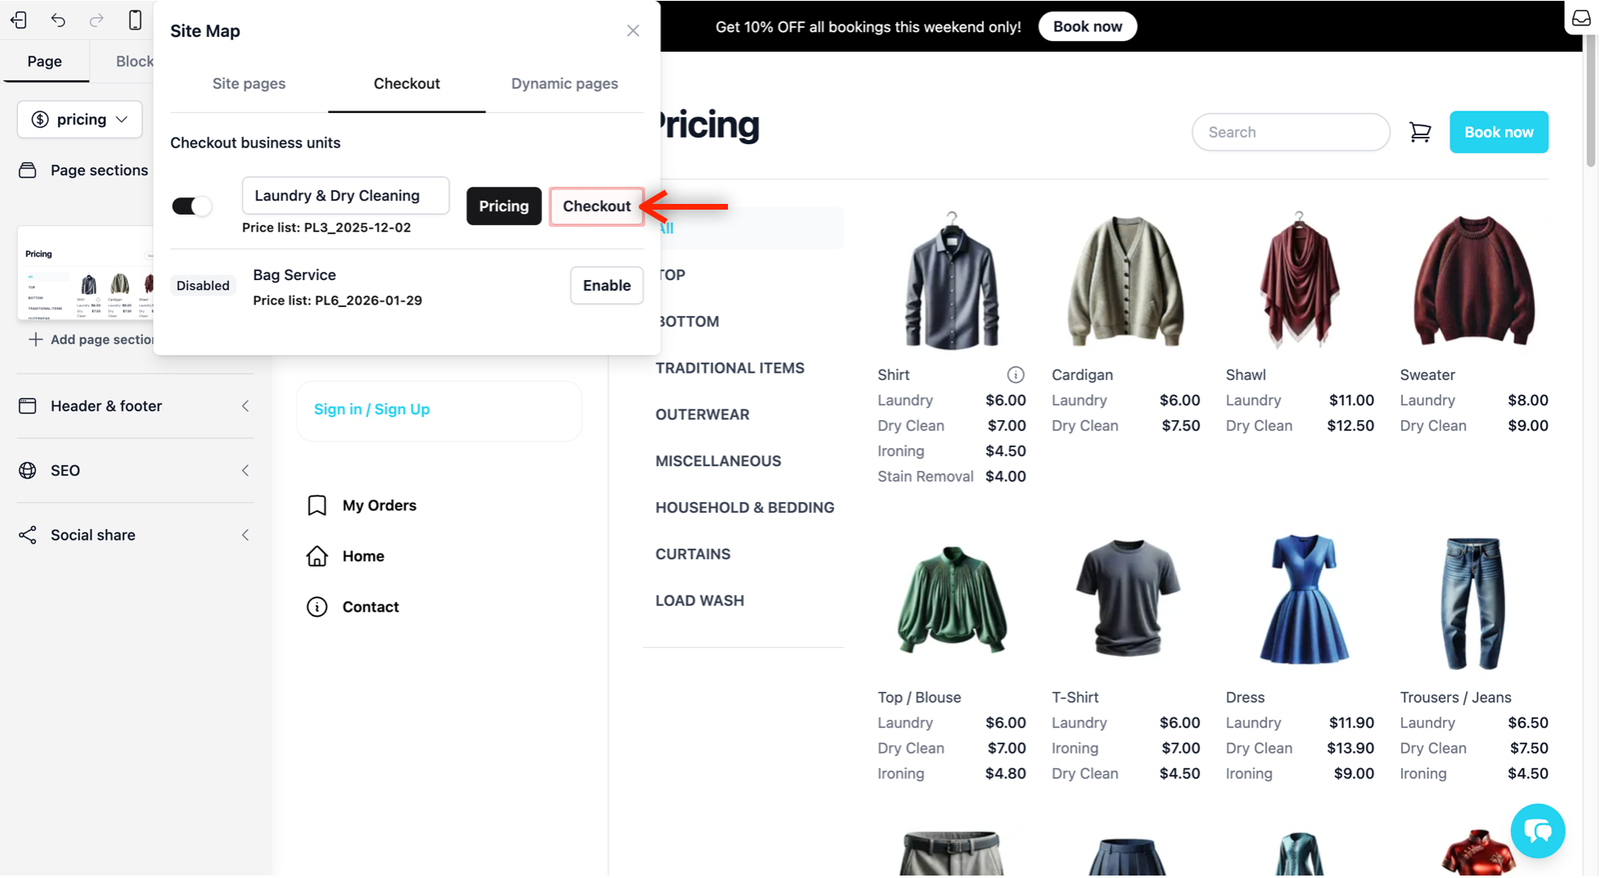
- In the Visual Builder, go to the Page Tab. Click on the first button (which shows your current page name) to open the Site Map.

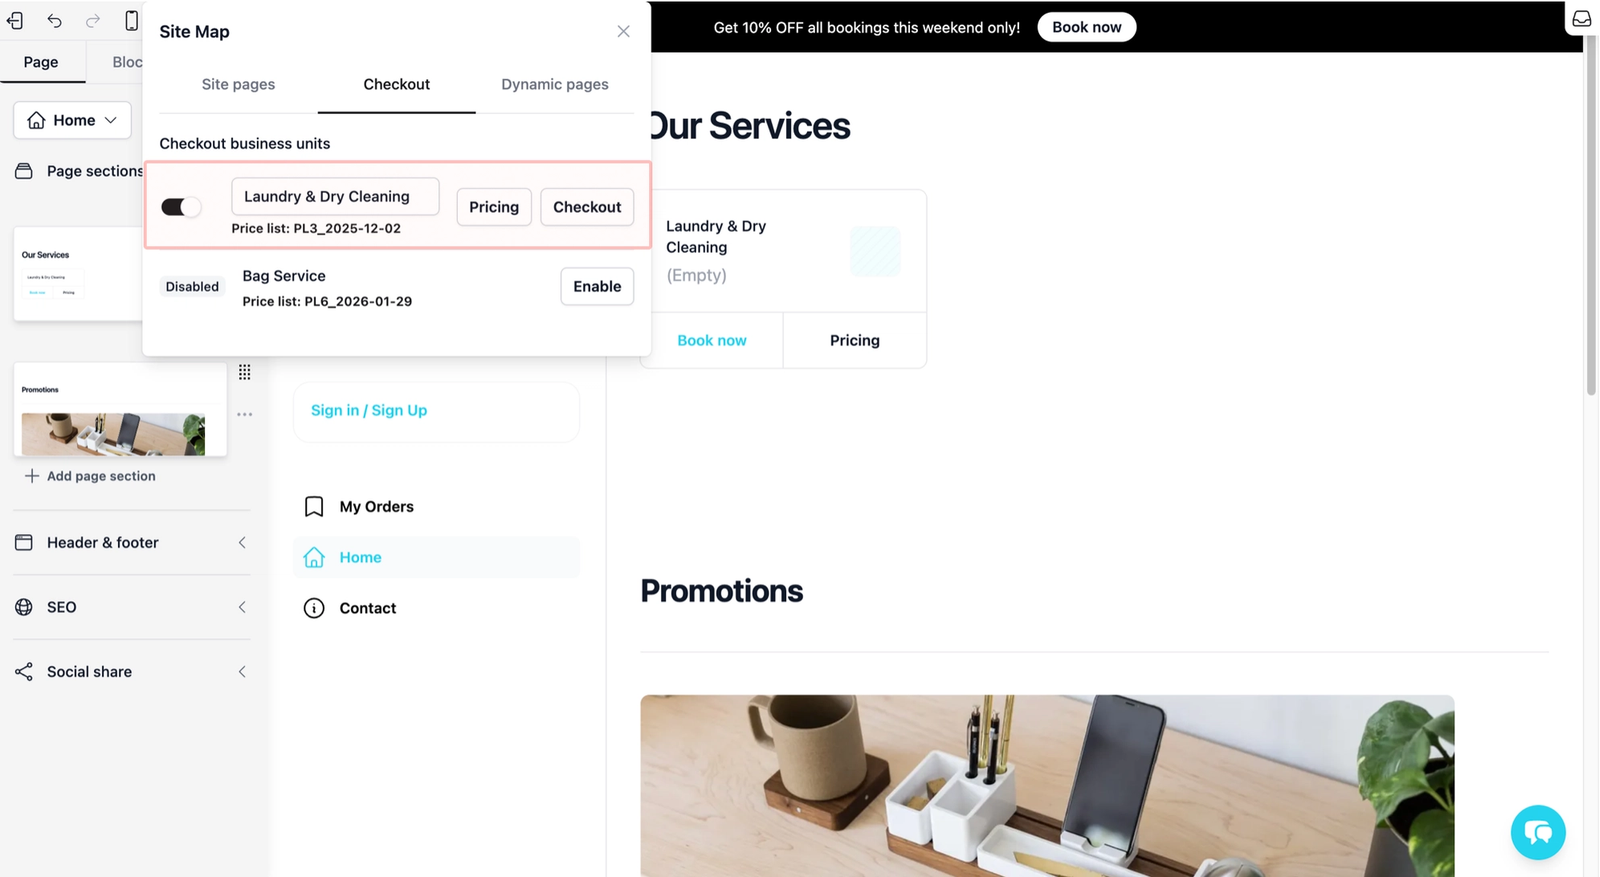
- Select the Checkout tab. You should see your linked Price List here. By default, it is disabled. Click Enable.
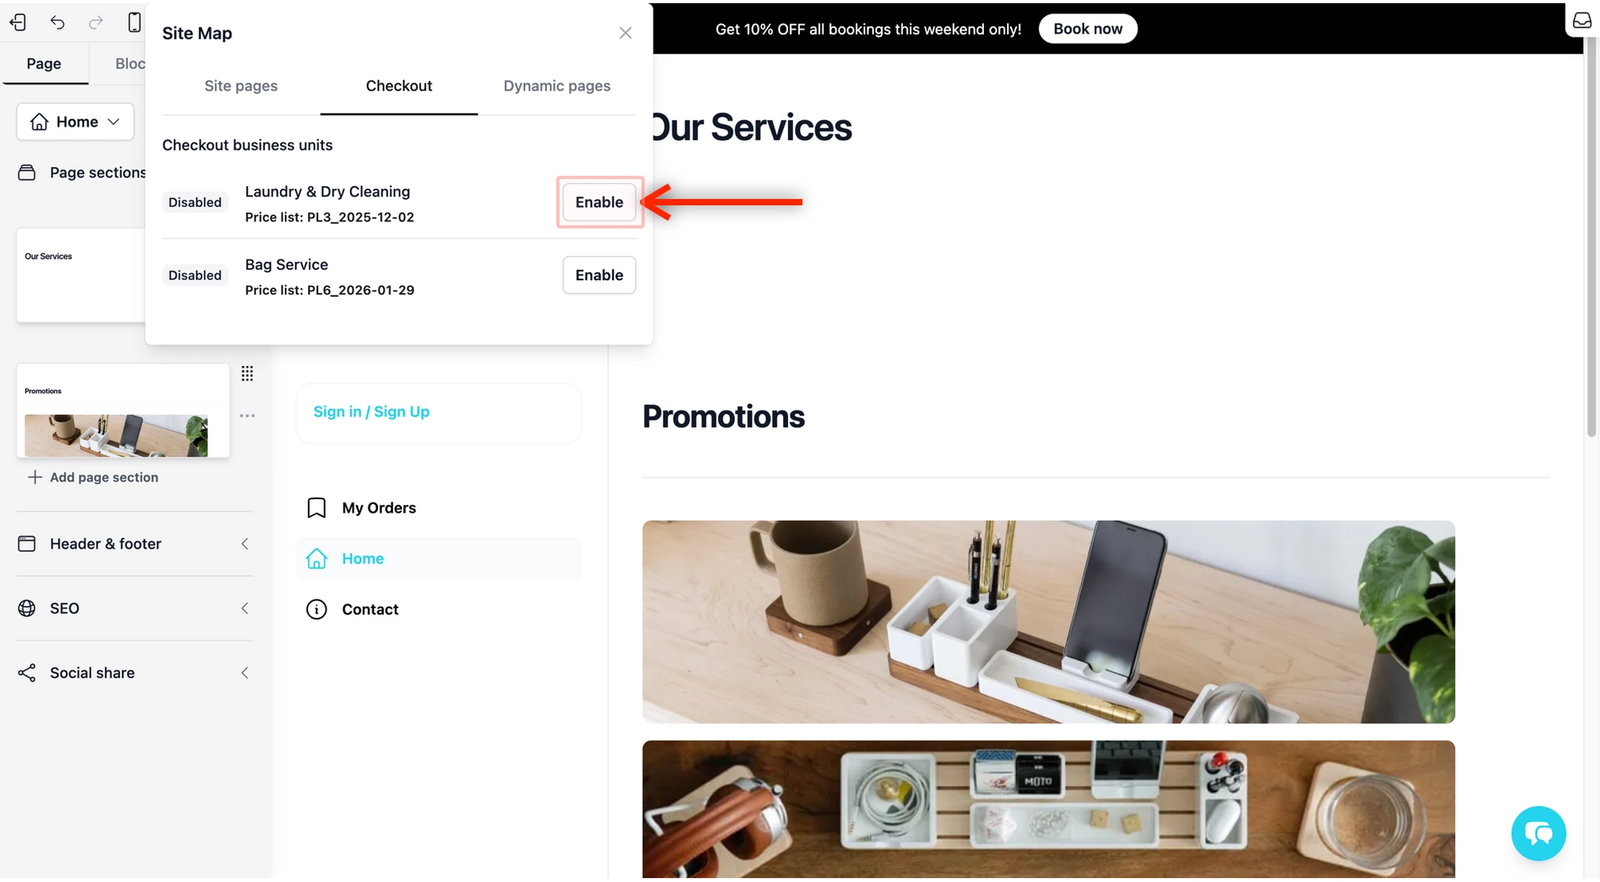
- You will now see two new control buttons: Pricing and Checkout.
Set up your Pricing Page
This is the page where customers browse your services before they decide to book.
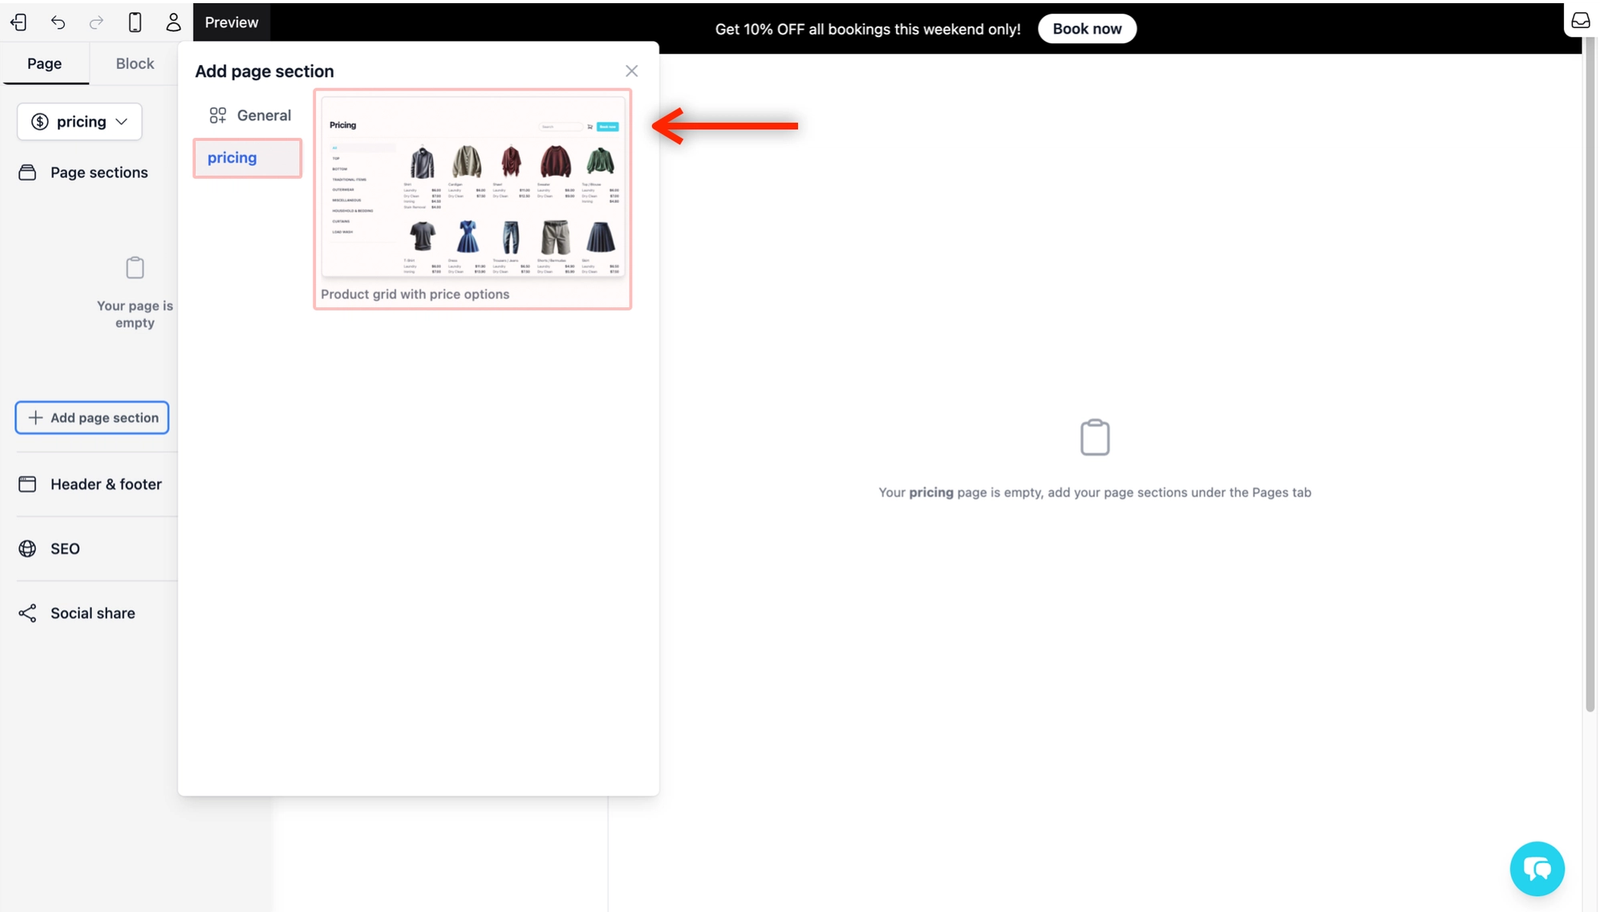
- Open the Pricing Page: From Site Map under Checkout, click on the Pricing button. Your preview will say: "Your pricing page is empty.", don't worry as this is normal.
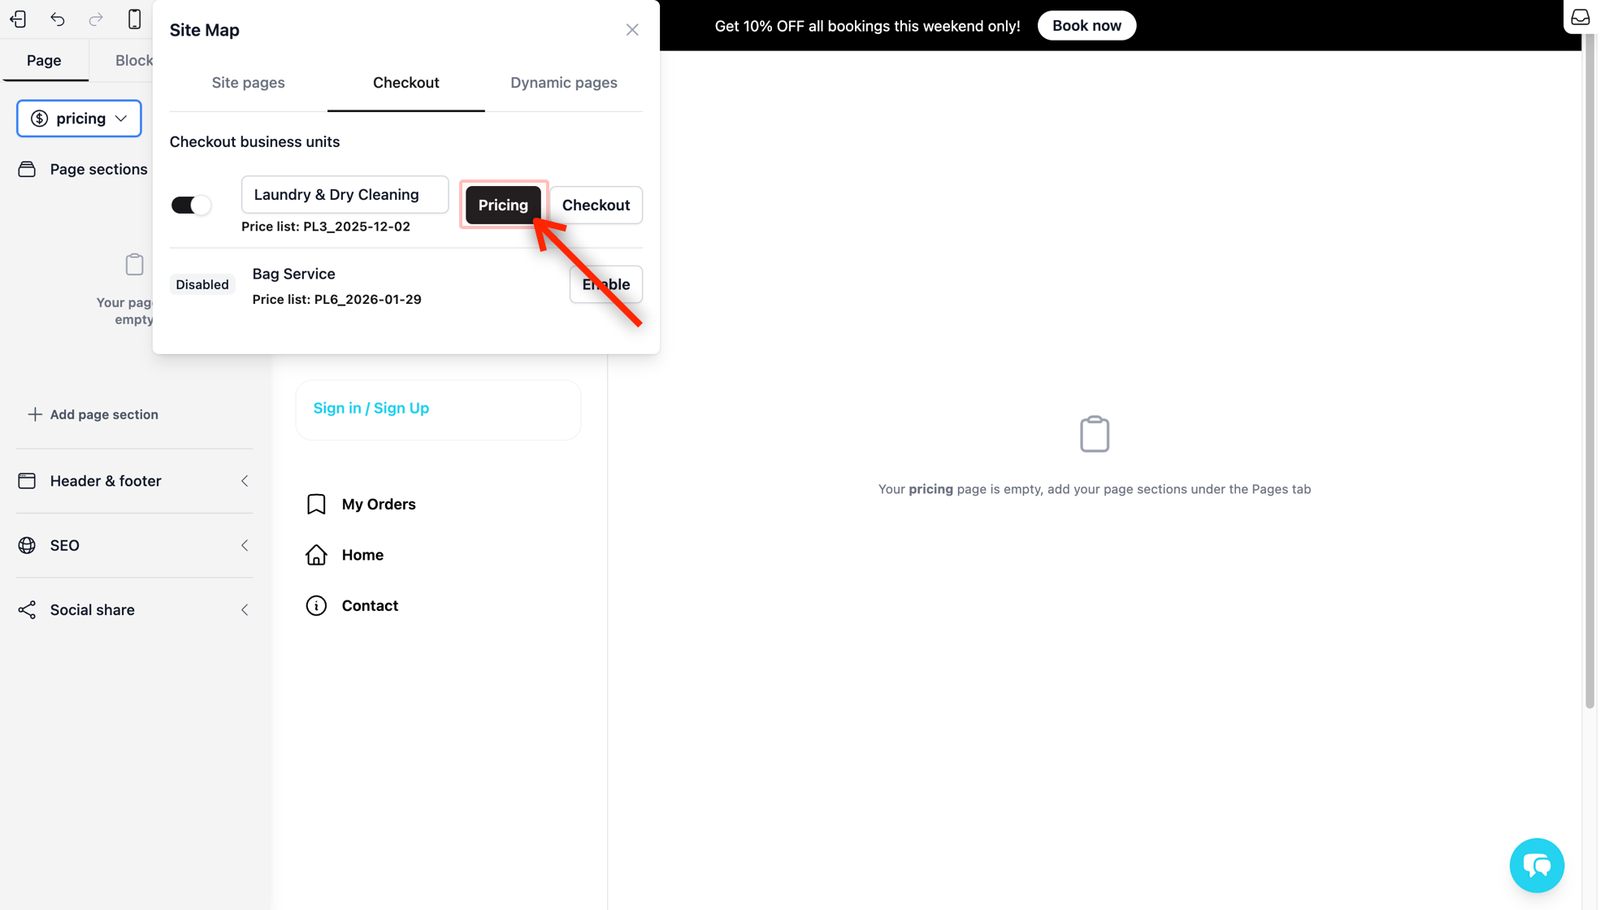
- Add your products/services: From the Page Tab, click on the + Add page section button. In the pop-up, go to the Pricing tab and select the template called Product grid with price options. Your website preview on the right will instantly update to show the services from your Price List.
- Manage Service Visibility & Notes:
- Click on any of your service item that you want to add more information on in the preview.
- Click the Settings icon in the Quick Action Toolbar.
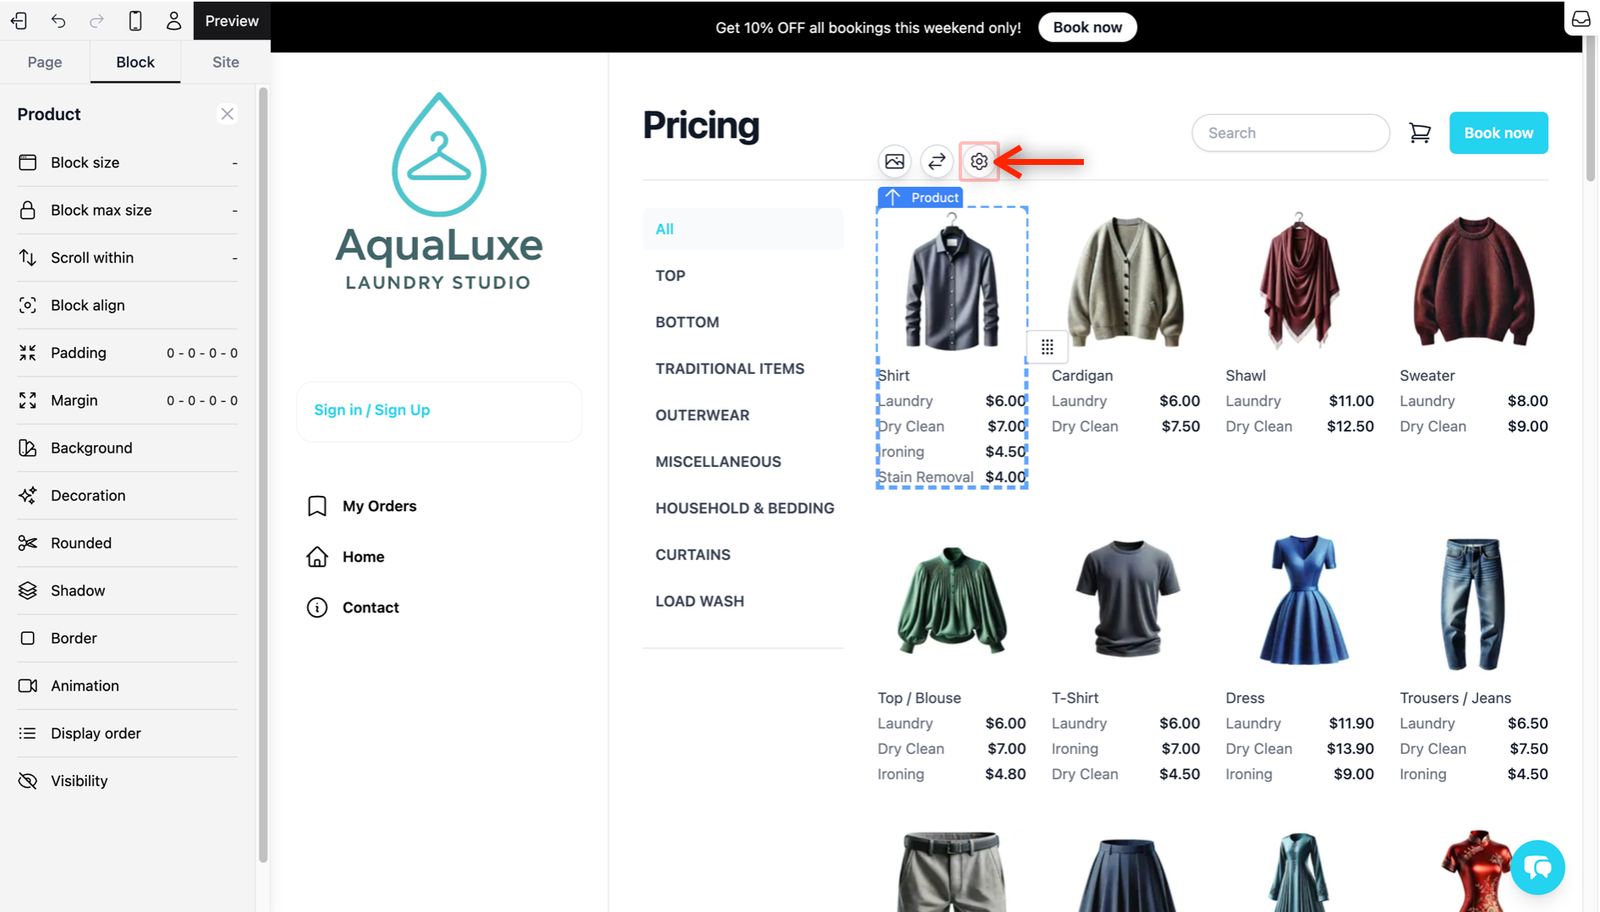
- Hide from customer: This appears as a toggle switch. It controls whether the service item is visible or not on your website. By default, it is toggled Off.
- Customer note: This is where you add extra details about the service (e.g., "Measure the size from..."). Type the information you want your customers to see here. Once you close the settings, you will see a small Information indicator next to the service name. When a customer clicks this, your note will pop up for them to read.
Customize the Checkout Process
Now that your pricing page is ready, you need to configure the Checkout page. This is the actual form where customers do their booking.
- To start editing it, click on the first button (the one that shows the current page you are in) from the Page Tab and under the Checkout tab, click on the Checkout button.
- The Easybiz system uses a ready-made flow designed for service businesses: Services → Address → Contact → Date & Time → Payment.
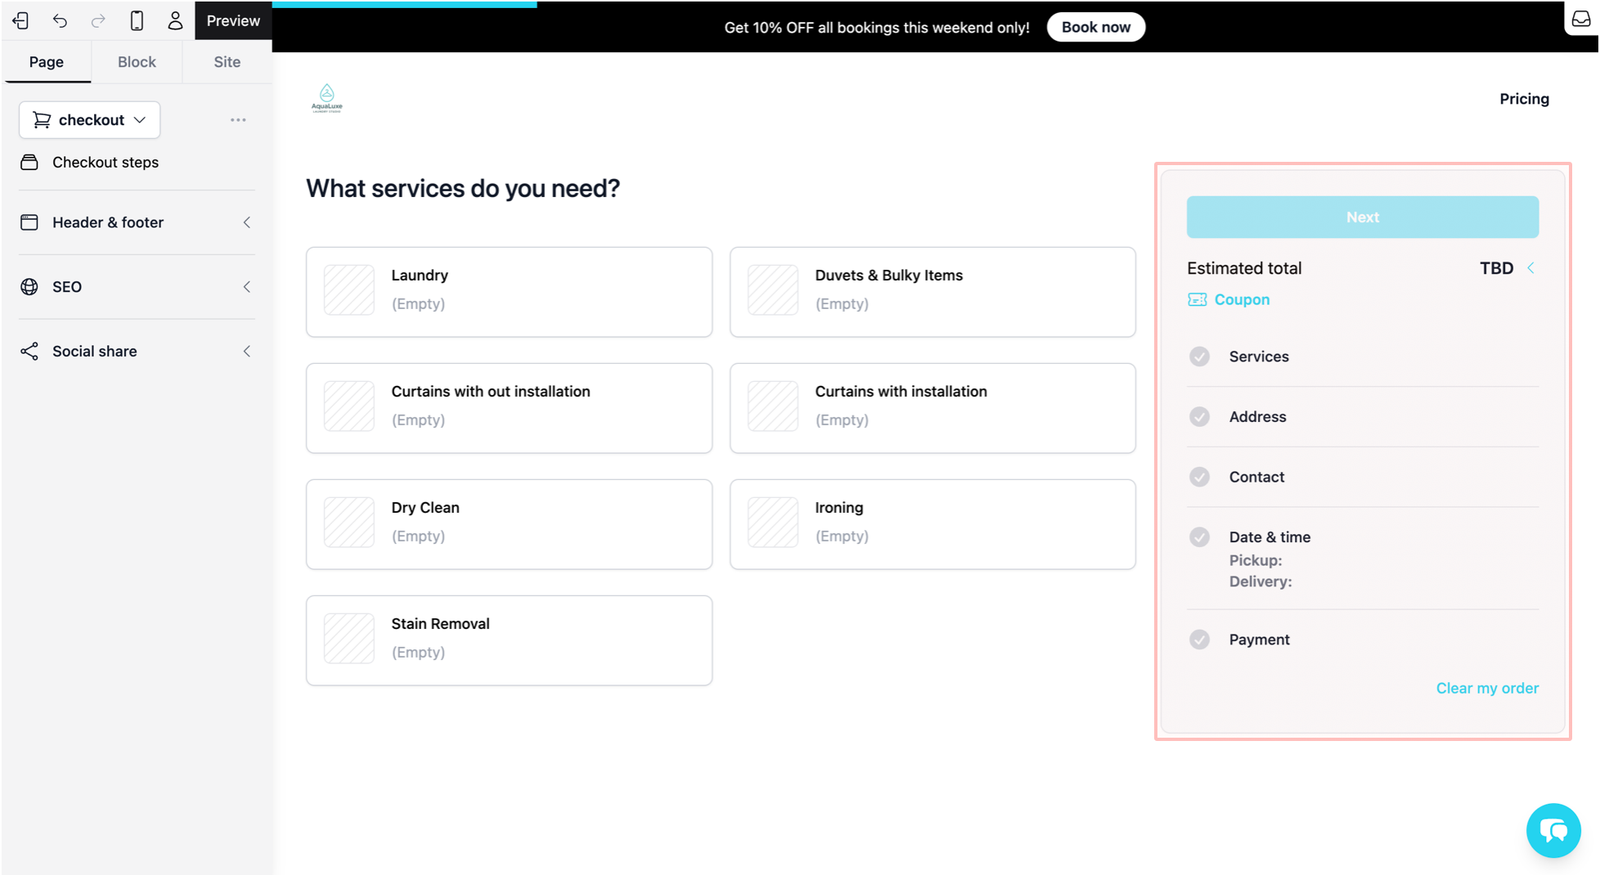
You can customize this journey by clicking on any of the steps shown in the template on the right and selecting the Settings icon from the quick action toolbar.
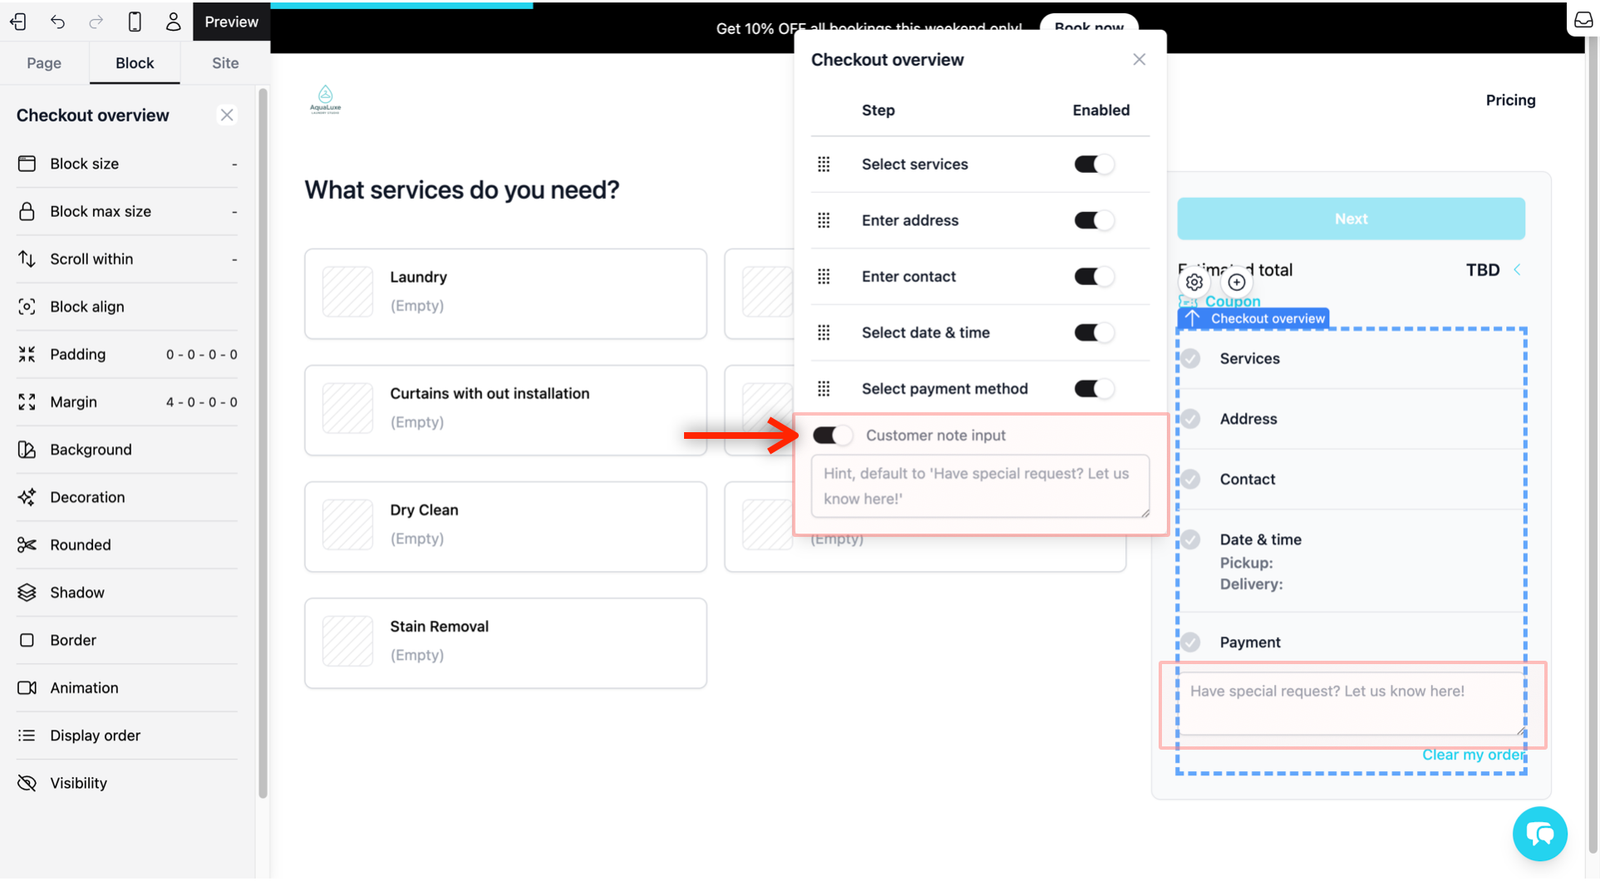
Manage Steps & Special Requests
Inside the settings pop-up, you can control two things:
- Toggle Steps: You can turn specific steps (like Address) On or Off depending on what your business needs.

- Special Requests: You will see a toggle for Customer note input. Turning this On allows customers to leave a message, such as a special request. You can use the default placeholder "Have special request? Let us know here!" or customize it by typing in your own.
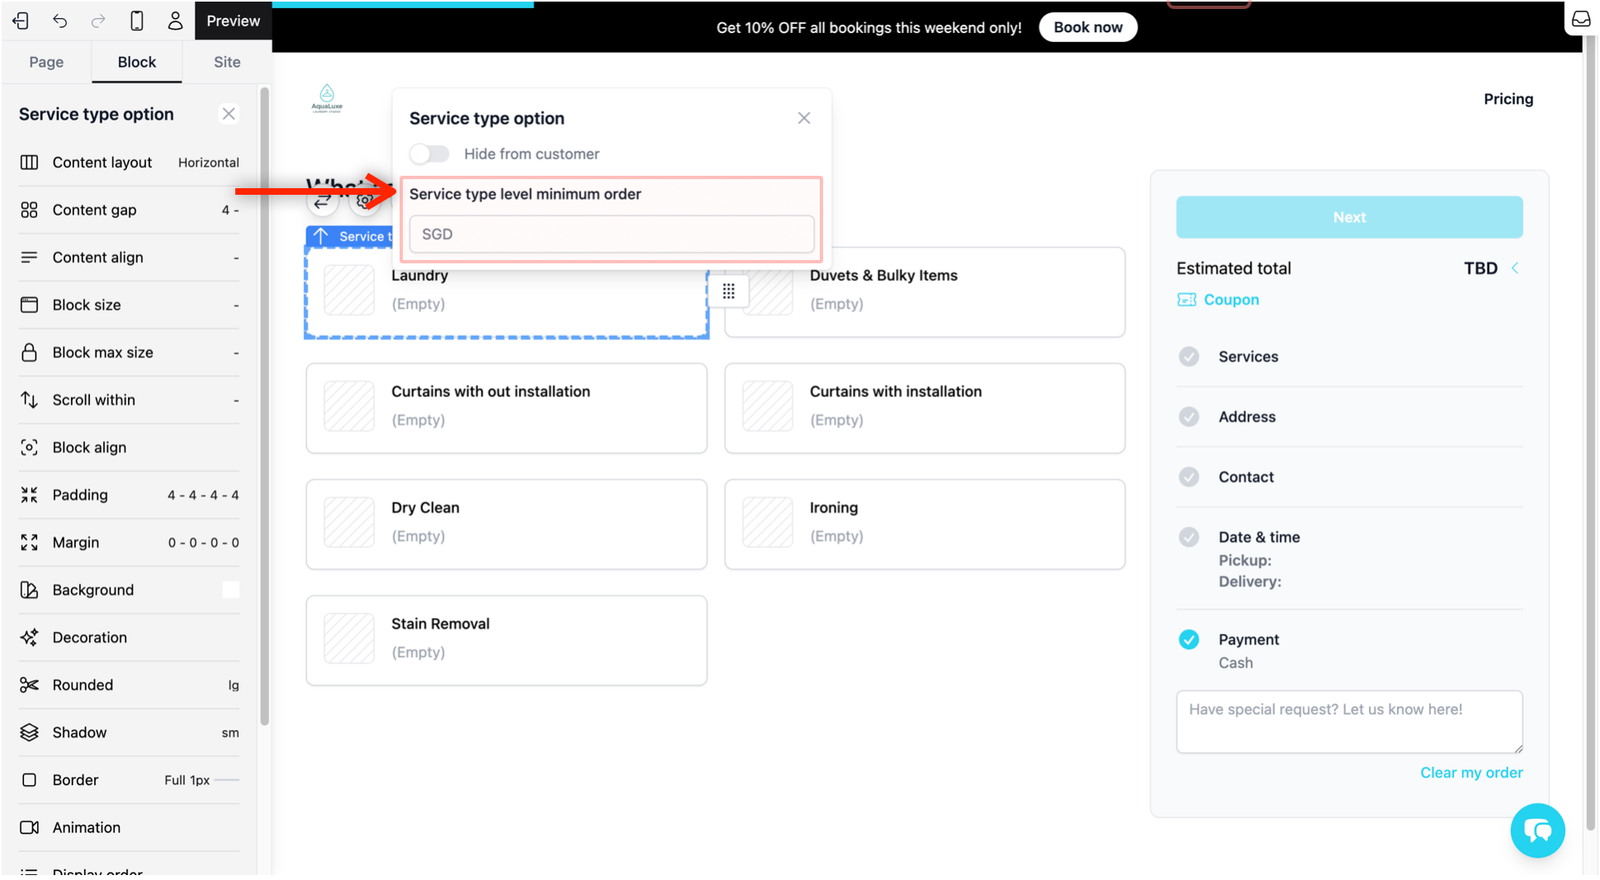
Manage the Services Flow
Set specific rules for how customers purchase your services.
- How to edit: Click on Services in the flow on the right of your website preview. Click on any of your line items and you should see the Service type option block in the preview. Click on the Settings icon.
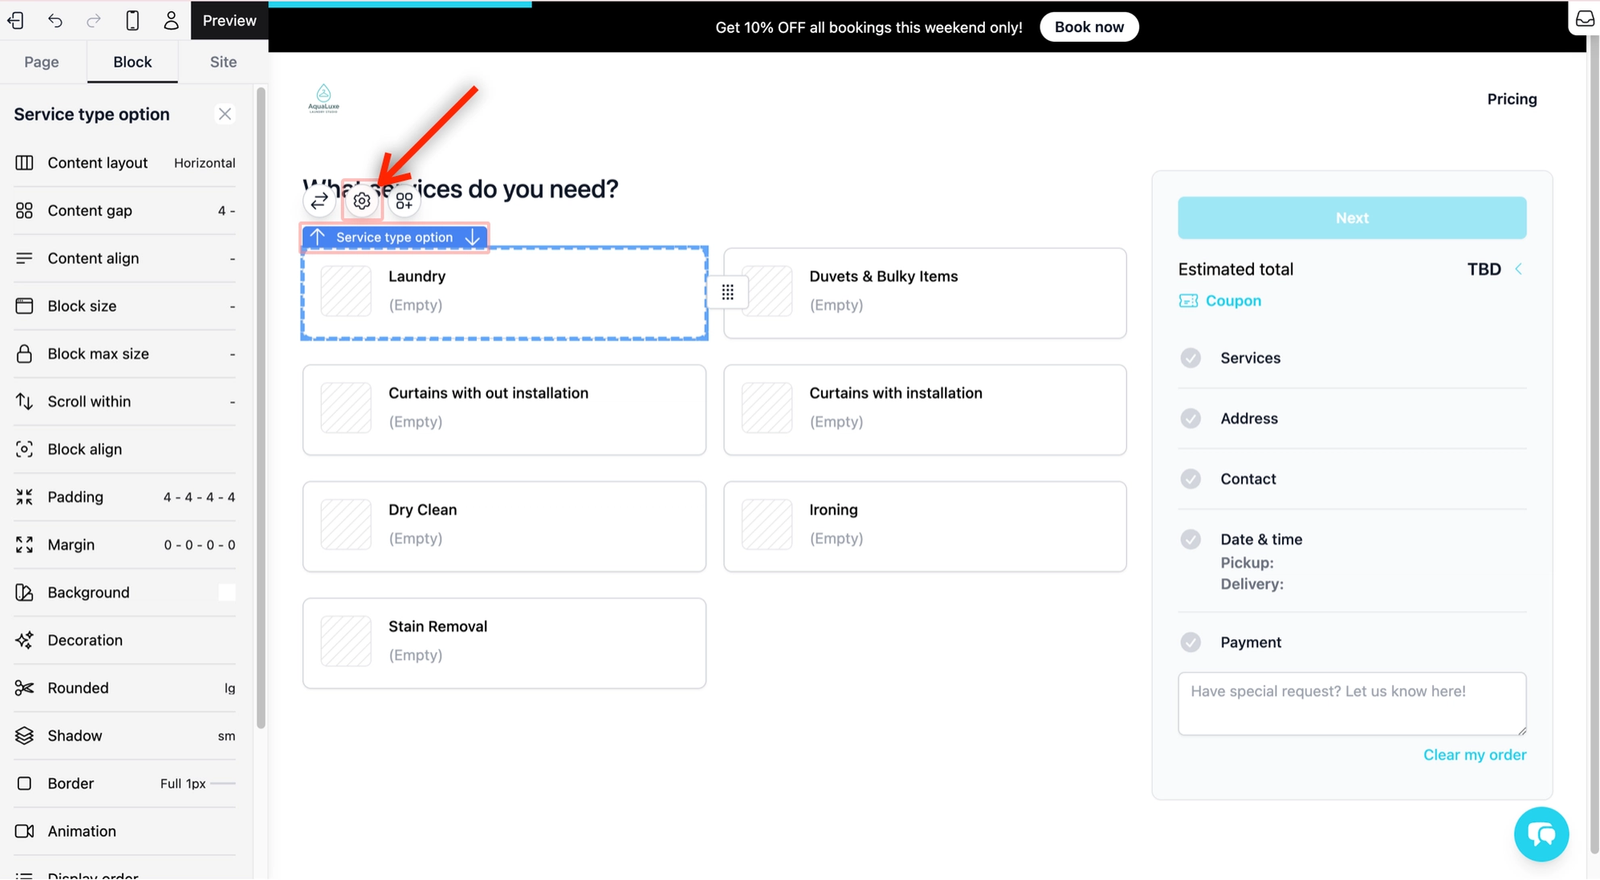
- Hide from customer: Use this toggle switch to hide a specific service item from your website without deleting it from your price list.

- Service type level minimum order: Set the lowest amount required to book a specific service.
Configure the Address Flow
If your business provides home or on-site services, you can ensure you get the exact location details.
- How to edit: Click on Address in the flow on the right. Select the Address form block (where the customer enters their address) and click on the Settings icon.
- Require unit no: Check this box if you want to make the unit number a mandatory field for your customers.

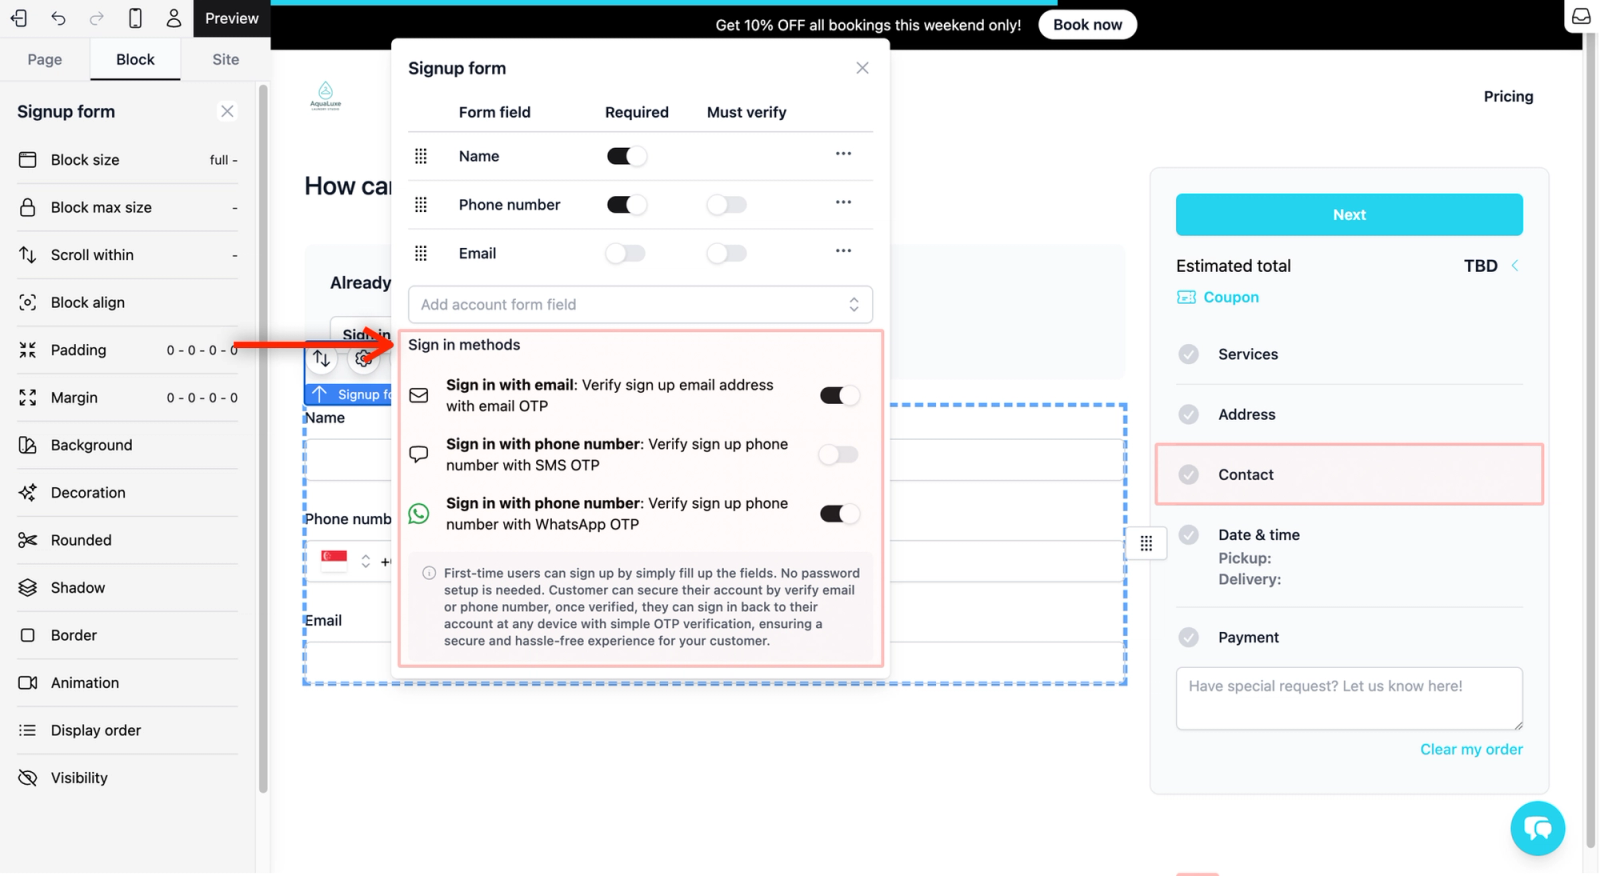
Refine the Contact & Sign-in Flow
This step manages how customers identify themselves and secure their accounts without needing to remember a password.
- How to edit: Click on Contact in the flow on the right and select the Signup form block and click on the Settings icon.
- Contact Methods: You can toggle which fields are required. By default, Email is optional.
- Add a contact method: From the dropdown field, click on it to select the contact method you want.
- Remove a contact method: Click on the 3 horizontal dots (•••) of a contact method to remove, and click Remove.
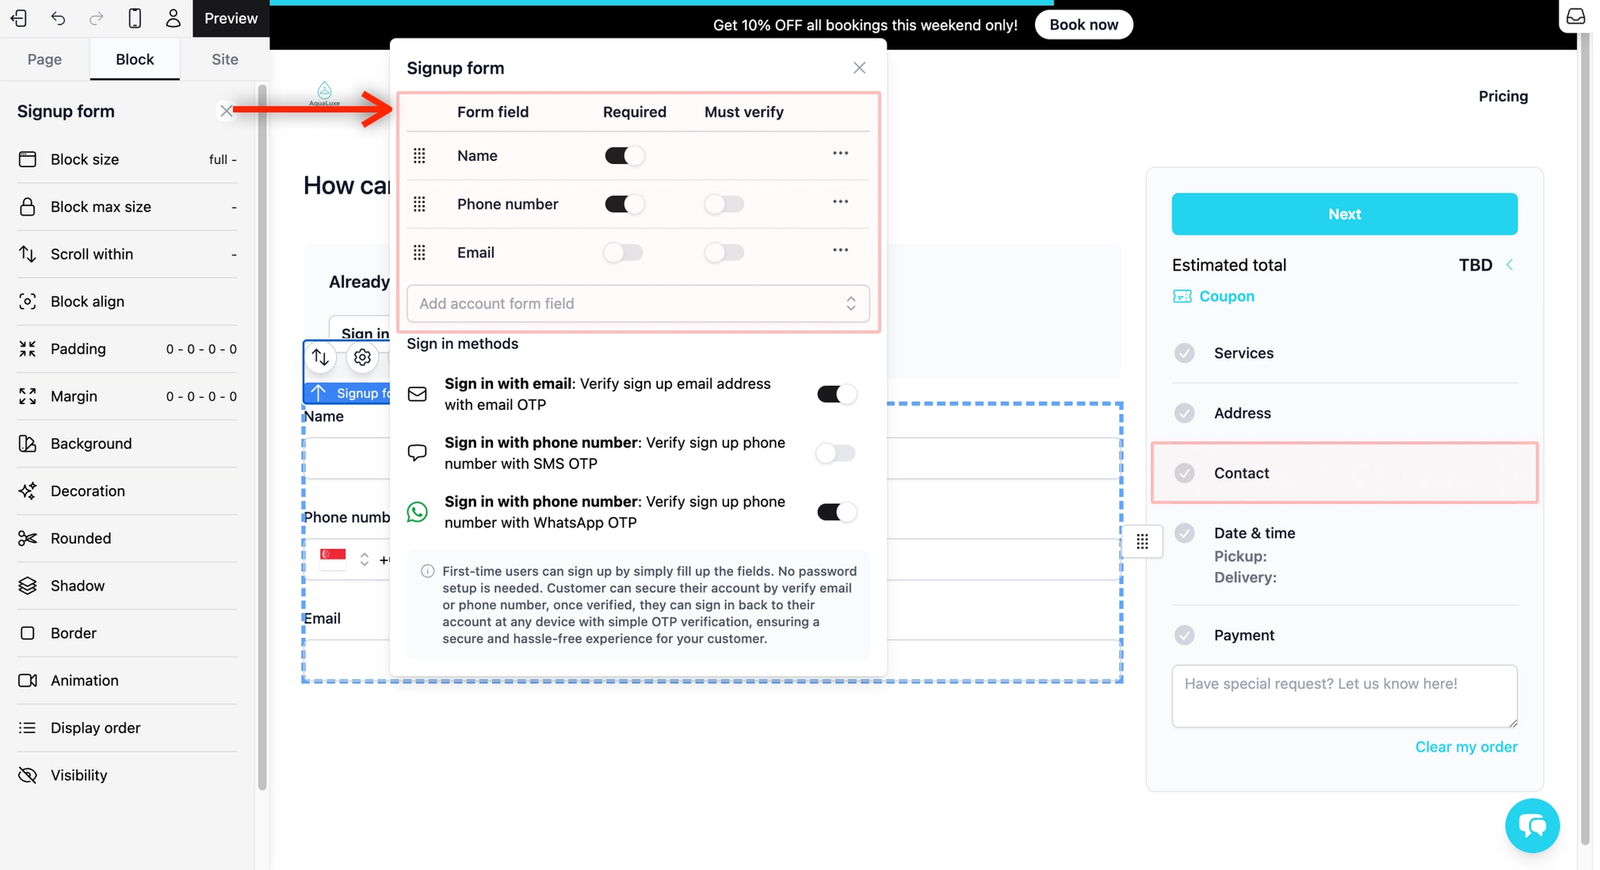
- Secure OTP Sign-in: We use One-Time Passwords (OTP) for a secure experience. Customers can verify their identity via a code sent to their Email, SMS, or WhatsApp. In order for you to turn the Must verify option on, ensure you have enabled the option of sending out OTP under the Sign in methods.
Adjust the Date & Time (Pickup/Delivery) Flow
You can provide your customers with a dropdown of specific instructions for how you should handle their items.
- How to edit: Click on Date & Time in the flow on the right and select the Checkout booking panel block (where customer choose a pick up/delivery time) and click on the Settings icon.
- Add Instructions: Click on the + Add instructions button to create options for your customers, such as "Pickup at door" or "Leave at riser." These will appear as a dropdown menu for the customer to choose from.
- Remove Instructions: Click on the 3 horizontal dots (•••) of an instruction to remove, and click Remove.
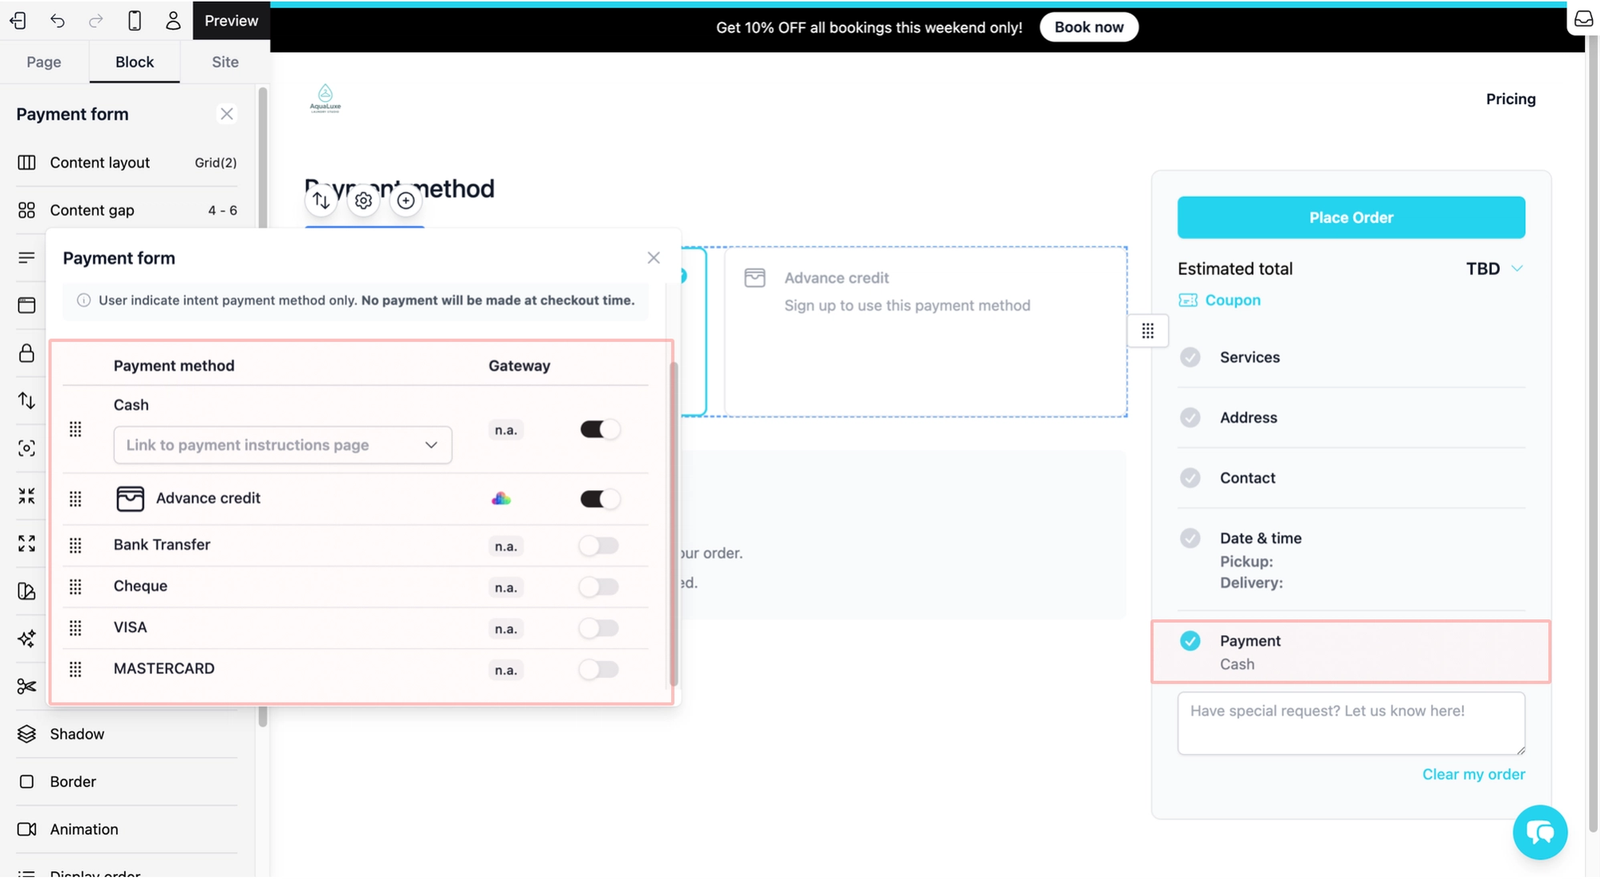
Finalize the Payment Flow
Decide how you want to collect fees and which payment methods you want to offer.
- How to edit: Click on the Payment in the flow on the right and select the Payment form block (where customer selects a payment method) and click on the Settings icon.
- Checkout payment mode: From the dropdown list, choose how to collect money (e.g., Deposit payment, Pay minimum order amount, Add card for future payment or Select intent payment method only, where no actual payment is made at checkout).

- Payment Methods: Toggle the specific methods you accept, such as Cash, Advance credit, Bank Transfer, cheque, or Credit Card.
Give feedback
Up next
Preview and Publish Your Online StoreMove your store from a draft to a live website.
Read more